diy solar

diy solar

Need to add Critical Load Panel

ChrisG

Solar Addict
Joined
Sep 23, 2019
Messages
1,566
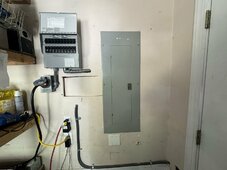
Been skating by with a full main panel and manual transfer switch for inverter for a while now. Well we bought a PHEV and now need to add a panel for additional circuit(s), want to anyway for when I upgrade my inverter here. Really like the 6000xp at my cabin but will need bigger here.

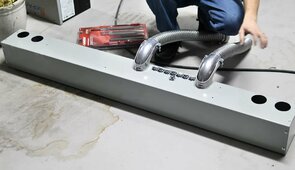
Anyway want to install a new recessed sub panel directly adjacent to main (very next wall cavity to left). I will need to extend circuits and obviously run a feeder and wonder how I do this with a wireway. All of the circuits I would move come in at the bottom of the main panel. If I cutout a knockout in rear of wireway for each panel, how to I protect the romex coming into and out of the wireway if mounting a 6”x6” (code compliant, really want 12x12) under both panels.

Or would using two nipples between each panel be better, 1 for feeder and one for moving/extending circuits (yes, load bearing wall)? Prefer wireway.

Appreciate any assistance.
IMG_4992.jpeg
 
Last edited:
Options:

Use Romex and no protection (other than wire glands)
Use AC wire (armored, like the wire in the picture above)
Use conduit or NMC and run THHN wire (might be cheaper.)

All those things meet code here. As always, check your local code.

All the above will require a lot of stud penetrations. Consider installing it on the same side of the stud to reduce wiring challenges.
@billvon So for #1, I can splice romex to romex in the wireway and bring it to second panel. If so this is great, have about 100 feet of both 12 and 14awg laying around.

Assume a 2” knockout for each panel in rear of wireway would suffice for all the romex and thhn for feeder.

Or are you just talking about going between the studs in the wall.
 
@billvon So for #1, I can splice romex to romex in the wireway and bring it to second panel. If so this is great, have about 100 feet of both 12 and 14awg laying around.
No splicing Romex unless it is in a box. The in-the-wall run has to be unspliced.
Assume a 2” knockout for each panel in rear of wireway would suffice for all the romex and thhn for feeder.
If you go the Romex route, each Romex line must have its own gland for abrasion protection. You can't just stick them all in a big cutout. Some jurisdictions allow 2 Romex runs per gland (if the gland is rated for it of course.) You can punch your own holes for more glands if you want.

So it's cheap but a lot of work.
Or are you just talking about going between the studs in the wall.
My last suggestion was to put the critical loads panel right above or below your current box so you don't have to drill a few large (or several small) holes in the stud. If they are on the same side of the stud it's a straight run.

If you go the through-the-stud route be sure to protect the wire with plates, so a sheetrocker doesn't accidentally screw into the wire someday.
 
No splicing Romex unless it is in a box. The in-the-wall run has to be unspliced.

If you go the Romex route, each Romex line must have its own gland for abrasion protection. You can't just stick them all in a big cutout. Some jurisdictions allow 2 Romex runs per gland (if the gland is rated for it of course.) You can punch your own holes for more glands if you want.

So it's cheap but a lot of work.

My last suggestion was to put the critical loads panel right above or below your current box so you don't have to drill a few large (or several small) holes in the stud. If they are on the same side of the stud it's a straight run.

If you go the through-the-stud route be sure to protect the wire with plates, so a sheetrocker doesn't accidentally screw into the wire someday.
@billvon So I can splice romex to romex in a 6”x6”x36” wireway/trough going under the panels and terminate in sub panel. I bet I have 15 romex wires coming up the large center hole in the main panel today, not sure why I would need to punch out a hole in the back of the trough for each or two wires per gland.
 
No splicing Romex unless it is in a box. The in-the-wall run has to be unspliced.

If you go the Romex route, each Romex line must have its own gland for abrasion protection. You can't just stick them all in a big cutout. Some jurisdictions allow 2 Romex runs per gland (if the gland is rated for it of course.) You can punch your own holes for more glands if you want.

So it's cheap but a lot of work.

My last suggestion was to put the critical loads panel right above or below your current box so you don't have to drill a few large (or several small) holes in the stud. If they are on the same side of the stud it's a straight run.

If you go the through-the-stud route be sure to protect the wire with plates, so a sheetrocker doesn't accidentally screw into the wire someday.
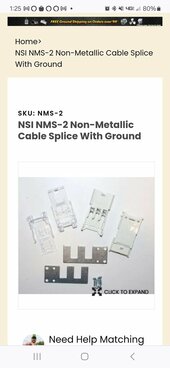
Actually, there is now an approved romex splice in wall without a box...
 

Attachments

  • Screenshot_20240414_132517_Chrome.jpg
    Screenshot_20240414_132517_Chrome.jpg
    57.5 KB · Views: 18
Think I’m going to just drill another hole through the stud and have two nipples between the panels. This TS one looks to be 1” and I can use a 1.5” or so at the top. Use THHN to extend main panel circuits to sub panel and then the feeder.

Messing with a trough under the panels seems to be a pain if every run of romex needs a knockout into and out of the trough with glands.
 

Attachments

  • IMG_4994.jpeg
    IMG_4994.jpeg
    148.1 KB · Views: 6
Looking at that, I see no clue about how the wire runs now.
I would open up the sheetrock and let the wires talk to you.
If you choose the right placement of the box, you may be able to pull wires out of the current main and then over into the new box with no splices needed. That would be the best as far as splices and such.
It might mean relocating that transfer panel down a bit, for example but that is relatively easy to do.
At least pull the cover off and see if you can get an idea of most of the cable direction. If it is mostly up, then moving over will be possible.
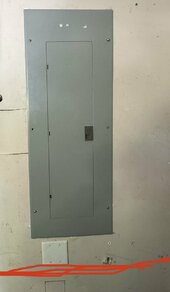
The 10 circuits I want to move to CL Panel have about 5” of romex jacket on them between bottom of panel and bottom wall plate(red line) Won’t be enough to swing over. There is only one wire out of the top of the panel going to a sub panel upstairs.

So my only options would be to mount a trough under the panels and pull what there is of romex into it and extend romex to new panel within trough. Or, just nipple between both panels and extend circuits in main panel through nipple to new panel via THHN (only hot and neutrals). Feeder will take care of ground.
IMG_4992.jpeg
 
OK so they are all coming up from the floor then? Not nearly as much wiggle room as coming down from the overhead.
Nope.
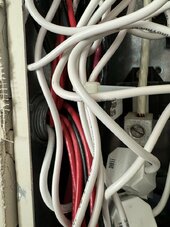
Here they are after I took that blank plate off. No wiggle room at all. Counted 17 romex coming up center large knockout on panel. All jammed through the lower wall plate

Still considering 6x6x36 wire trough under both panels. Could ‘fix’ some of that center knockout cram issue on main panel. Need to look into how to get the romex into it, splice it, run it out and into sub panel.
IMG_4998.png
 
Last edited:
I used a holesaw to put in 2x 1.5" pipe between the 2 panels side by side with a single stud between them. 2x6 studs...
 
Nope.
Here they are after I took that blank plate off. No wiggle room at all. Counted 17 romex coming up center large knockout on panel. All jammed through the lower wall plate

Still considering 6x6x36 wire trough under both panels. Could ‘fix’ some of that center knockout cram issue on main panel. Need to look into how to get the romex into it, splice it, run it out and into sub panel.
View attachment 209351
What is the LV mount plate doing on that wall? Thats a lot of romex there...
Sheetrock screws, scary...
 
What is the LV mount plate doing on that wall?
I considered doing something similar to give myself access to reach in and push in cable + fitting from the bottom or having an extra “pull point” while fishing

Not all of us are seasoned electricians that can do this blind while doing backflips
 
Think I’m going to just drill another hole through the stud and have two nipples between the panels. This TS one looks to be 1” and I can use a 1.5” or so at the top. Use THHN to extend main panel circuits to sub panel and then the feeder.
That could work. Note that code limits you to 1 3/8" holes in load bearing studs, so you will be limited to about 1 1/4" EMT conduit types.
 
What is the LV mount plate doing on that wall?
There's a code requirement out here to have an inspectable connection to a ground rod. That is most often done with a LV plate/cover right over the connection to the ground rod. Sometimes they just cut a hole and use sheetrock screws to put a 2x cover over the hole.
 
Just watched a video from @HighTechLab. He did something similar to extend his romex during his home Solark install. Looks like he extended from romex to thhn then down the flex conduit to panel. He went top to down. I’m going opposite direction.

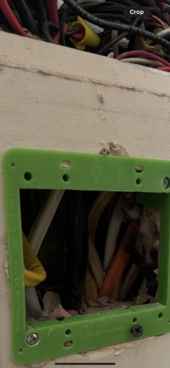
I’ll cut out Sheetrock under panel, pull out the original house built romex circuits I want to move to a CL panel, clamp them into a trough/gutter, mount trough/gutter on wall, extend to other romex or thhn, and pull to new CL panel.

Will also run feeder cable this way.
IMG_4999.jpeg
 
Last edited:
Just watched a video from @HighTechLab. He did something similar to extend his romex during his home Solark install. Looks like he extended from romex to thhn then down the flex conduit to panel. He went top to down. I’m going opposite direction.

I’ll cut out Sheetrock under panel, pull out the original house built romex circuits I want to move to a CL panel, clamp them into a trough/gutter, mount trough/gutter on wall, extend to other romex or thhn, and pull to new CL panel.

Will also run feeder cable this way.
View attachment 209360
@HighTechLab, looks like you just had a ground bar in the trough for all the Romex runs and a single run down to panel. Inspector did't have an issue with that?
 
This is another reason why I prefer my panels accessible in an unfinished part of the basement and not in a finished wall. I can actually work on it!
I put my critical loads panel near my main, with a 2" EMT conduit running between them. I'm leaving all the existing circuit grounds and neutrals where they are in the main, and simply moving the hots and breakers of the circuits I want through the EMT to the critical loads panel.

It kinda sucked having to buy a 10' length of 2" conduit so I could cut off 18 inches of it, but ya know...
 
Back
Top