diy solar

diy solar

What Mini-Split did you use, and Why?

This being a DIY forum. Most don’t have a nitrogen tank and that high dollar gauge. once all that’s paid for it would hav3 been cheaper to call an hvac guy.. Yes everything is best installed by a professional but then DIY wouldn’t exist.
they even now sell quick evak canisters. way I see it atleast I didn’t take the cheapest route (evak can) and followed the manual by vacuuming. It’s a shame but a lot of hvac so called professionals just crack it open to clear the line and say it’s good to go
All true.
I think a 40cft nitrogen tank is 200, regulator is about 150, micron gauge is around 200, vacuum pump anywhere from 150 to 900, depending on quality, 37degree flare block about 150, for correct minisplit flares...

Anybody buying a minisplit for a diy install, needs this stuff, or they can buy a diy minisplit like Mr cool that has precharged lineset... plug and play communication wiring, and requires no flaring...

Having a minisplit and installing it incorrectly leads to a system full of acid, and a failing unit needing service and refrigerant added frequently...
 
I see that Senville HVAC have a full range of heatpumps that include standard wall mount, ceiling cassette, floor mount, inline duct and central air handlers.
The central air handlers are the same as ACIQ, I guess the whole range is the same too.
 
I see in the Della manual, they call out for -0.1MPa, which with some conversion, comes out to 29.5~inHG. Still going to be relatively impossible.

I also notice they do not mention pressure testing anywhere in their manual. I also don't see ANY warranty information.

Their manual states their website is www.dellahome.com , which goes nowhere. I received the boxes yesterday, and on the side of the box, their website is www.dellausa.com , which also goes nowhere lol.
 
Google says Della is a brand sold my Align Inc: https://www.align-usa.com/brand/della/
They likely just haven't updated the box printing. They are just up the road here in so-Cal - tons of importers here.

They do have a 'contact us' form, you could request a warranty page on your model.

Amazon only provides refund or exchange for a time, then it's on the actual seller/importer.

EDIT: The dellausa domain registration may simply be expired.
 
Just looking at stats on Solar-Assistant, I can say for sure that the inverter and batteries are going to love the lower temps. Battery temps reach 36*C and inverter temps in the 90*C range. I am interested to see the difference after the mini split is installed.

Batt Temp.png
Inv Temp.png
 
Anybody buying a minisplit for a diy install, needs this stuff, or they can buy a diy minisplit like Mr cool that has precharged lineset... plug and play communication wiring, and requires no flaring...
I know sometimes the techs know better than the manuals however the manual clearly explains how to install it as I explained. My install didn’t require any flaring. They are preflared and came with coated copper gaskets to prevent leaks. The wiring was plug and play.
 
But, if you already have he argon, all you need is a nitrogen regulator, and you are good to go.
I actually have multiple regulators at my shop that I could borrow for a day. Only problem is they only go up to 300psi. Is that enough? Or should I consult the label on the machine for max PSI?
 
I tested mine with nitrogen and Gauge setup I got from "a guy". Put it up to 535psi (manufacturers spec was 500). Let it hold pressure for 12 hours. And bubble tested.

Then pull a vac for 30 min. Let it's hold. Then vaced more a 2nd time for another 30 min. Held. Released 410a. Working
 
I actually have multiple regulators at my shop that I could borrow for a day. Only problem is they only go up to 300psi. Is that enough? Or should I consult the label on the machine for max PSI?
Pioneer tech support told me they recommend 600psi to confirm no leaks.
300 should be enough for you to know if it's leaking, and enough to find the leak.
 
I actually have multiple regulators at my shop that I could borrow for a day. Only problem is they only go up to 300psi. Is that enough? Or should I consult the label on the machine for max PSI?
On my second Senville mini split, I did the vacuum, gauge did not move. Then released a little of the freon. Shut off valve and did bubble test. No leak. Let the rest of the freon out and this time I did not call my AC man. Saved$125. Some people go into overkill on the testing...
 
I did the same on my pioneer, vacuumed down for hours, let sit, realize the cheap adapter I bought leaked, vacuumed for hours and hours again let sit, no movement on gauge. Turned valve to release R410a 1/4 turn for 5 seconds closed valve. Checked everything with soapy water, no leaks. Released rest of refrigerant. Turned heat on max, was blown away how hot the air was coming out of the indoor unit, went outside checked for leaks again. Turned max cool, couldn't believe how cold air was. Went outside and finishing insulating pipes. Turned up heat, got ready for sleep, turned temp way down, slept like baby, woke up, turned up heat, went outside and put line covers on.

Wow that's a big run on of a post. Anyways, I rtfm and it's been running 24/7 ever since.
 
Oh and this is the pump I used. OMT 3.5cfm Vacuum Pump, 1 Stage HVAC Vacuum Pump for R12 R22 R134a R410a Systems, Small 1/4hp 38 Micron Vacuum Pump for Air Conditioner Servicing Resin Degassing and More, Oil Included https://a.co/d/8fqsdm4

Just noticed the 30 minute duty cycle, oops.
 
I did the same on my pioneer, vacuumed down for hours, let sit, realize the cheap adapter I bought leaked, vacuumed for hours and hours again let sit, no movement on gauge. Turned valve to release R410a 1/4 turn for 5 seconds closed valve. Checked everything with soapy water, no leaks. Released rest of refrigerant. Turned heat on max, was blown away how hot the air was coming out of the indoor unit, went outside checked for leaks again. Turned max cool, couldn't believe how cold air was. Went outside and finishing insulating pipes. Turned up heat, got ready for sleep, turned temp way down, slept like baby, woke up, turned up heat, went outside and put line covers on.

Wow that's a big run on of a post. Anyways, I rtfm and it's been running 24/7 ever since.
My old whole house heat pump never put out heat you could feel.....it would heat the house, but it always felt like cold air was blowing from the vents. These mini splits feel like they are blowing air from the depths of Hell......I like it. They must also have a direct worm hole from the North Pole to blow air that cold.
 
Got started on the install. Its already bloody hot with temps over 100*. Wish I had started 2 weeks earlier when it was 65* outside. Sigh...

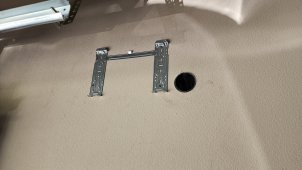
I started with mounting the bracket. I had read of a few people wishing they had mounted their bracket to a piece of plywood first, to grab studs, and I had it all set to do that, even had the bracket screwed to the plywood. I found exactly where I needed to put it, and coincidentally the only 2 studs in the entire garage were 13" apart! This let me ditch the bracket and screw directly to studs! Win-win! For now I got a pass through 3" PVC Pipe and the bracket hung.

20230518_174815.jpg

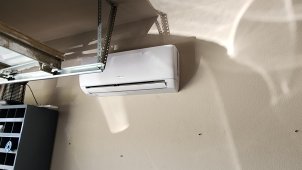
Then wired the inside unit up, and hung it on the wall.

20230518_180443.jpg

Hopefully tomorrow the wall mount for the outdoor unit will be here, then I can hang it, start vacuuming and have A/C for the weekend!
 
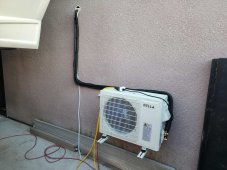
Got it finished enough to test it. and it works great! Turned it on last night and was chillin in no time! I still have to put the expanding foam in the wall pass-through, and install the line-set cover, as well as proper wiring. My electrician friend is coming this weekend to add a circuit in the sub-panel, and run some 12/2 to an AC disconnect on the wall, I just wanted to make sure everything worked, so dont judge me that its plugged into an extension cord lmao.

20230522_193815.jpg

It was able to take the garage from 99* at 7:20pm, to 80* by 10pm. Thats a 19* drop in 2hr and 40 min, and used 3.62kwh from 7:20pm to 12:Midnight. Not bad!
 
Looks like you've got the wall mount adjustment option, any chance you could move it more off the wall? Looks really close.
Yes I bought the wall mount because specs said it could be closer to the wall, if mounted up off the ground. Minimum requirement is 6" when off the ground, and I am currently at 7".

You can see in the top left corner of that picture, is the front nose of my trailer, and when I pull the trailer in/out, I will have maybe 2" of clearance. The more clearance I have the better, so I am wanting to cut off the end of the legs on the wall mount to give me a little more wiggle room/oops clearance.
 
Back
Top