The PV Watts calculator at https://pvwatts.nrel.gov/ is your friend here. We're building a new house and barn in Maine (US) and need all the power we can get from Nov-Jan. Given the low sun angle in winter, I figured out that panels mounted vertically on the south wall of the house (and maybe another on the wall of the barn) would make for an ideal string in those months, even if they performed poorly the rest of the year. Just plug in your numbers, and see how it would work for you. I think many people think all their panels need to be configured the same way. Only the panels in a string need to be configured the same, so if you have the space, strings at different angles can help you deal with seasonal sun availability.
You are using an out of date browser. It may not display this or other websites correctly.
You should upgrade or use an alternative browser.
You should upgrade or use an alternative browser.
Has anyone mounted panels at 90deg inclination (vertical)?
- Thread starter cajocars
- Start date
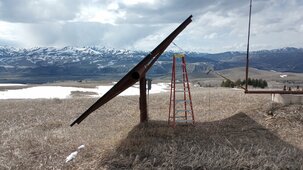
I'm now grid tied, after 28 years off grid on different property, but here is how I do it: my own rack design, I've built over 50 of them, no failures. This is my latest array, 12 250 watt modules, bought used from SANTAN Solar, just yesterday I saw a 3600 watt output, so still "good as new" and a whole lot cheaper! I put this up in anticipation of using more power due to a recent buy of a RAV4 Prime, a plug in hybrid. All winter long I had the rack at about 80 degrees, steeper than my sun angle, but with snow on the ground I get a double refraction thing happening, plus the snow slides off better of course. This was yesterday's re-setting to about 45 degrees, in June I'll go almost flat. It's all balanced, and the small comalong and rope on each side was just because it was really windy.
Very simple, one hole, with the pipe directed embedded in the concrete, no rebar or sono tube required or used. Copper ground wire in the whole first, just fill the 6' deep hole about halfway first, then use your 30 ton boom truck (if you don't have your own, like I do, a medium size tractor with a front end loader would work, or call a local boom truck guy) then the 8" sch. 40
 pipe is briskly lowered into the center of the hole (and the hole is small in diameter as possible, no need to go bigger) and the pour is completed. NOW the pipe can be plumbed, with the still fluid concrete still being able to give, tamp the mud with a long rod, and/or beat on the junk yard pipe (half the cost of new, just as good) with a sledge first to consolidate the pour, check for plumb again, and that's it. No fancy bracing needed, no careful pouring of the concrete around a previously positioned and braced pole, no critical alighning of mutiple small poles, simple and effective. Then the array was lifted with the boom truck, panels on and wired, and set into place, the channel captures the pipe, 4 5/8" dia., u-bolts ensure nothing moves.
I had to quit making these for others, when the local e inspector complained that they were not something called "engineered", and "an approved solar module mounting system." Forget the fact they saved my customers a lot of time and money, as compared to ordering approved mounts via motor freight, assembling them piece meal on site, and only then mounting each module individually. These were all built in my shop, at a level, safe and comfortable height, and they didn't involve multiple trips out to a jobsite, hopefully when the weather was good.
Very simple, one hole, with the pipe directed embedded in the concrete, no rebar or sono tube required or used. Copper ground wire in the whole first, just fill the 6' deep hole about halfway first, then use your 30 ton boom truck (if you don't have your own, like I do, a medium size tractor with a front end loader would work, or call a local boom truck guy) then the 8" sch. 40

 pipe is briskly lowered into the center of the hole (and the hole is small in diameter as possible, no need to go bigger) and the pour is completed. NOW the pipe can be plumbed, with the still fluid concrete still being able to give, tamp the mud with a long rod, and/or beat on the junk yard pipe (half the cost of new, just as good) with a sledge first to consolidate the pour, check for plumb again, and that's it. No fancy bracing needed, no careful pouring of the concrete around a previously positioned and braced pole, no critical alighning of mutiple small poles, simple and effective. Then the array was lifted with the boom truck, panels on and wired, and set into place, the channel captures the pipe, 4 5/8" dia., u-bolts ensure nothing moves.
I had to quit making these for others, when the local e inspector complained that they were not something called "engineered", and "an approved solar module mounting system." Forget the fact they saved my customers a lot of time and money, as compared to ordering approved mounts via motor freight, assembling them piece meal on site, and only then mounting each module individually. These were all built in my shop, at a level, safe and comfortable height, and they didn't involve multiple trips out to a jobsite, hopefully when the weather was good.
peakbagger
Solar Enthusiast
- Joined
- Oct 26, 2021
- Messages
- 309
My system is very similar except I built a pivot into it rather than the pipe clamps. The weight is quite well balanced. When I change my angle I use one hand to push the panel up or down and use the other hand to change the location of support strut. It takes a 7/16" and a 3/4" wrench and socket. My array is in high wind zone. Takes me about 10 minutes to make the angle swap.
nscottsdale
New Member
- Joined
- Aug 26, 2021
- Messages
- 77
Interesting... i have a block wall about 4ft in height about 10 ft inside of my property line. I have been toying with adding laser cut corten steel cap to improve a privacy divider... but landscape 90 degree mount panels .. especially local Santan Solar used ones may be the solution.
I did a few with a bit more complicated to fab hinge point, until I hit on the channel concept, as you say, keeping it balanced is key.My system is very similar except I built a pivot into it rather than the pipe clamps. The weight is quite well balanced. When I change my angle I use one hand to push the panel up or down and use the other hand to change the location of support strut. It takes a 7/16" and a 3/4" wrench and socket. My array is in high wind zone. Takes me about 10 minutes to make the angle swap.
We used a mini excavator, with a good operator, who was told to keep the hole as narrow as possible while reaching the required depth (a sloppy operator will leave a larger than required dia. hole), that turned out to be around 4', maybe less. This is the same exact way they do the big mono pole billboards along a highway,, no formwork, just dig a hole, dump the mud in stick the pole in, and keep it plumb until it sets. Not using sono-tube forms around the pole, like I've seen some do, not only is less hassle, but better, as the concrete engages with the surrounding earth, making the pull out force required to dislodge it much higher, I can attest to this while pulling posts out of the ground with my crane. Sono-tube leaves a slick surface, and will pull up easy, a "ground engaged" pole or pipe will take MANY times the actual weight before pulling free. I had to pull over 5,000 pounds once to get a 2" square steel post out of the ground, that was only 4' deep at most, set with just a few bags of concrete mix (according to the homeowner) but as it was engaged with the surrounding undisturbed earth, the force required was tremendous. Once I had it out of the ground, hanging from my load hook, the load indicator said it weighed about 500 pounds! When I had difficult sites, precluding going deep, I went wider with the holes, the concept being just the total mass of the concrete will ballast the array, in fact in some jobs I did (over lava rock) we didn't dig at all, just formed up and poured a big enough chunk of concrete to anchor things.This is excellent, @Ptom . Really nice work. What diameter hole for the 8" pipe, and did you drill it with a tractor auger? May be exactly what I need for our new place, if I can get the hole deep enough (much ledge here).
Mr onetwo
New Member
Do you have any photos and details that you would like to share?My system is very similar except I built a pivot into it rather than the pipe clamps. The weight is quite well balanced. When I change my angle I use one hand to push the panel up or down and use the other hand to change the location of support strut. It takes a 7/16" and a 3/4" wrench and socket. My array is in high wind zone. Takes me about 10 minutes to make the angle swap.
tomsilver
New Member
Get on PVWatts Calculator website. This site will tell you how to optimize your panels for your location. In the north no doubt the winter months will dictate solar capacity. Mine are tilted about 60 degrees from horizontal and south facing. I am seriously over paneled in the summer. From December-Feb, I am starving for power, so I still have a grid connection. I'm only running a small 1000 sq ft cabin with 4600 watts of panels. I would need to about double my panels to keep running over those 3 months.
OffGridForGood
Catch, make or grow everything you can.
In my area where we get 7-9 feet of frost, a pole set like this, in a cone shaped hole in the ground will lift about 6" each year from frost heaving. They will settle a bit each spring with the thaw, but they never go down as much as they rise.no formwork, just dig a hole, dump the mud in stick the pole in, and keep it plumb until it sets. Not using sono-tube forms around the pole,
In clay/silt soils, with deep frost penetration it is best to build a concete base larger then the vert, tied together with reinforcing steel. Use the smooth sonotube to prevent frost grab, sometimes we even wrap the top 2-3 feet of the sonotube with thick plastic to keep frost from grabbing the pier.
I took out a chainlink fence for a fella a few years ago, his posts were set with unformed concrete and the top of the concrete on each post was 12-16 inches higher than the surrounding soil from frost heaving. He said the fence was only in place 7-8 years. YMMV.
Wow, I'm glad that's not a factor here! I remember my brother in Fairbanks AK telling me once, that his well casing was frost heaving, and it was over 100' deep. I will be more appreciative of our 24-36" frost depth here, at least I've never had anything come close to what you describe, that's real impressive!
Last edited:
OffGridForGood
Catch, make or grow everything you can.
I worked in places that are "really north" (above lat 60) and saw 10-foot ground rods sticking up 5-feet above grade from frost jacking.
For concrete in such frost suseptable conditions, a good sized base below frost line, and discourage the surface from being able to grab the pier is the way to go.
For concrete in such frost suseptable conditions, a good sized base below frost line, and discourage the surface from being able to grab the pier is the way to go.
ScrotusGobbleBottom
Solar Enthusiast
Holy mother of...... I knew it was cold there but you make Wisconsin sound balmy with our 3.5-4 feet of frost.we get 7-9 feet of frost
peakbagger
Solar Enthusiast
- Joined
- Oct 26, 2021
- Messages
- 309
My system is very similar except I built a pivot into it rather than the pipe clamps. The weight is quite well balanced. When I change my angle I use one hand to push the panel up or down and use the other hand to change the location of support strut. It takes a 7/16" and a 3/4" wrench and socket. My array is in high wind zone. Takes me about 10 minutes to make the angle swap.
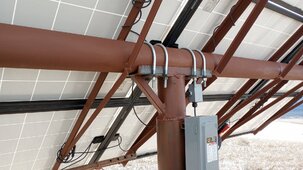
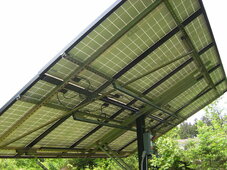
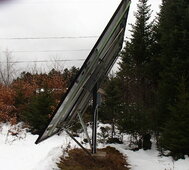
Not the greatest lighting (or solar day) on the second one (the photos inserted backwards in this post). This pole mount held a smaller array at one point but was rebuilt to hold larger panels. I was too cheap to buy new materials, so I used what I had for the backing structure and beefed it up where needed. The pole is not a single pole, its two pieces of 1/4 wall rectangular tubing separated the width of Unistrut. The array pivots on a 3/4" SS rod that was drilled through the two tubes. There are three pivot points, one in between the tubes and outboard of the tubes. This keeps the array from twisting. The strut is reinforced with plates on the inside of the strut. There are two pivoted Unistrut's that run down to mounting points on the "pole". I have three sets of holes tapped into the poles, one for winter to obtain a 30 degree off vertical angle, one for 45 angle and one for a 60 degree angle (I am near 45 latitude). There is a adjustable length sway brace that runs from the lower edge of the array several feet out the concrete base. For winter when the winds tend to be most aggressive, I have a second brace. on the other side of the array. If I was do another one I would proably but an anchor near the outer corners lined up with the bottom edge of the array and tie the swap braces to the anchors instead of the base.
I installed the entire unit solo including mixing 50 bags of concrete and pouring the base. Its been up 20 years. When I first installed it and when I rebuilt it I did it all from the ground with a six foot step ladder by flopping it back and fourth so the weight was somewhat balanced front to back. It can no longer flop all the way due to wiring connections
The first shot shows a bit more detail. of the pivot. .
.

Do you have any photos and details that you would like to share?
Not the greatest lighting (or solar day) on the second one (the photos inserted backwards in this post). This pole mount held a smaller array at one point but was rebuilt to hold larger panels. I was too cheap to buy new materials, so I used what I had for the backing structure and beefed it up where needed. The pole is not a single pole, its two pieces of 1/4 wall rectangular tubing separated the width of Unistrut. The array pivots on a 3/4" SS rod that was drilled through the two tubes. There are three pivot points, one in between the tubes and outboard of the tubes. This keeps the array from twisting. The strut is reinforced with plates on the inside of the strut. There are two pivoted Unistrut's that run down to mounting points on the "pole". I have three sets of holes tapped into the poles, one for winter to obtain a 30 degree off vertical angle, one for 45 angle and one for a 60 degree angle (I am near 45 latitude). There is a adjustable length sway brace that runs from the lower edge of the array several feet out the concrete base. For winter when the winds tend to be most aggressive, I have a second brace. on the other side of the array. If I was do another one I would proably but an anchor near the outer corners lined up with the bottom edge of the array and tie the swap braces to the anchors instead of the base.
I installed the entire unit solo including mixing 50 bags of concrete and pouring the base. Its been up 20 years. When I first installed it and when I rebuilt it I did it all from the ground with a six foot step ladder by flopping it back and fourth so the weight was somewhat balanced front to back. It can no longer flop all the way due to wiring connections
The first shot shows a bit more detail. of the pivot.
 .
. 
Last edited:
OffGridForGood
Catch, make or grow everything you can.
I have seen minus 40 in Wisconsin!
I worked for years in the Arctic, one location had over 1000 feet of permafrost ...Some areas between Ontario and the Arctic see 15-18 feet of annual frost depth, 7-9 feet is nothing really LOL.
"lucky" for my homestead area, the solid granite bedrock is only down 3 feet, sitting there like the worlds largest footing just waiting for me to drill and grout rebar to it. My ground mount project for this year I will auger down to the bedrock, drill and grout rebar, and pour sonotubes on each post location, wrap the top of the sonotube in poly & backfill and never need to worry about frost heaving ever. (the unlucky part is no potential geothermal lol)
I’ll add that to my very long list of why I don’t do cold anymore. My body holds list #1I worked in places that are "really north" (above lat 60) and saw 10-foot ground rods sticking up 5-feet above grade from frost jacking.
For concrete in such frost suseptable conditions, a good sized base below frost line, and discourage the surface from being able to grab the pier is the way to go.
Similar threads
- Replies
- 5
- Views
- 296
- Replies
- 0
- Views
- 293
- Replies
- 0
- Views
- 392
- Replies
- 11
- Views
- 467
- Replies
- 0
- Views
- 213


