diy solar

diy solar

Inverter Backing When Mounting

chrisski

Solar Boondocker
Joined
Aug 14, 2020
Messages
5,326
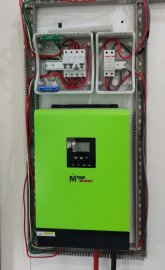
What do you use for backing for your inverter?

My installation manual said non-flammable backing. A quick search gave me a definition of flammable, but nothing to use.

Which for me lead to a bit of research to see if plywood was acceptable. All the DIY pictures I saw used plywood, a few were painted. That lead to look at different types of paint, but nothing really about fireproof paints, and a little about water based paints. Someone a while ago suggested truck bed liner like herculiner, but I don't know if that is flammable or not. For non-flammable backings, I could not really find anything on google, and a bit of a search lead me to see that a 3' X 5' long and 1/4" thick cement board could be purchased at home depot, and is non-combustible, which is even better then non-flammable. Unfortunately, this product is hardened like cement, as the name cement board implies, and did not look easy to work with with the safety knife and Dremel I had available for tools.

I used a 3/4" plywood board mounted vertically, cut a piece of thing gauge aluminum, 24 gauge I think, slightly bigger than each device and screwed that to the plywood and then mounted it. Where the wires would connect and disconnect from the system, I cut that back so wires could not short together on this aluminum sheet. I mounted the Charge controller 100 volt 50 amp and inverter with the aluminum backing. The midnight Solar combiner box, I simply took 4 screws and mounted that to the plywood.

I'm sure there's something easy I missed.
 
I would use cement board over drywall over a wood backing. (drywall paper could burn therefore thin cement board to help keep flames away from the paper) But there are other ways such as plywood with this https://www.homedepot.com/p/Firetec...Spray-for-Fabric-and-Raw-Wood-333-1/307899617

Also type X drywall is somewhat fire resistant again you would need a backerboard like plywood behind it to mount things to.

Standard paint weather it latex or oil based will do very little to suppress flames.
 
And if we’re being honest, the majority use plywood.

Just take a look at the show and tell section. ?
 
You would think that with as many people doing PV builds, you’d have a book published that tells you how to do specific things like building a Power Board, choosing a fuse size with a formula for Solar panel fuses, and a different one if needed for an inverter.

Right now, I only have 600 watts of panels on the roof, but by the end of the year, that should be 950, and a future u-grade of up to 400 watts of ground panels.
 
I used plywood with a polyurethane finish. All the heat sinks on my inverter are on top of the unit. Does the bottom get hot? Beats me. It's mounted and not moving and I can't get my hand under there to check. There is some space under the inverter, just not enough to get my fingers under there.

The inverter is going to get removed in the next few weeks so I can redo the wires for it. If I see scorch marks on the wood then I'll know it got too hot. If that's the case then I'll put spacers between the wood and the inverter to give it more room to breath.
I think if the inverter gets hot enough to scorch wood you have a bigger problem. That is I have always thought I should say. I have always been more scared if a meltdown event that actually creates a flame. Curious as to what others think could cause a fire in a solar she'd. With the fires thus season it makes a good reminder how careful we should be especially in a DIY setting.
 
My inverter is mounted on a flat surface. 3/4 plywood to provide good bite for the hold down screws. I use a piece of aluminum flashing as a liner under the inverter.
 
You would think that with as many people doing PV builds, you’d have a book published that tells you how to do specific things like building a Power Board, choosing a fuse size with a formula for Solar panel fuses, and a different one if needed for an inverter.

Right now, I only have 600 watts of panels on the roof, but by the end of the year, that should be 950, and a future u-grade of up to 400 watts of ground panels.
There is a book.
 

Attachments

  • KIMG0755.JPG
    KIMG0755.JPG
    48 KB · Views: 61
  • KIMG0754.JPG
    KIMG0754.JPG
    48.2 KB · Views: 68
There is a book.
I like Will’s book. It gives a bit of good theory on how to put a solar powered system together on on RV.

However at 90 pages it leaves off quite a bit on the details of how to get something done. An example of that isthere is one paragraph that talks about drilling a hole through a roof. As a first time drilling a hole through the roof in my RV, I needed a hole lot more than that. One thing is specifics on how to route the wires. Me personally, I prefer an oversized electrical conduit that I can run my wires through that also leaves room for expansion in the future.

Devil’s in the details, and what I’m thinking is something like a full sized college text with a how to, along with links to sites and videos with the specifics.

When I say college textbook, I mean like the kind I used when I went to college that had knowledge in them and not what my kids are using for some of there classes that comes to something like fro this online course that costs $50 through the company, but through our college we will charge you $500 to get 3 credit hours; however, I digress.
 
I agree. My "system" is going to be pretty small though - two batteries, charge controller, inverter fuse block, and two panels. I'd never drill a hole through my roof though. It's why I got a roof rack and on the Chevy Express, there are black plastic panels above the tailights that the panel wires can be routed under. Not quite sure yet how that will work, but I've seen it done. Someone told me if I wire the panels in series I'd need a bigger 24v inverter. If I wire them in parallel, I'd need to keep the system 12 volt... Is that the difference between series and parallel?
 
Fiber cement board (often called by the popular brand name Hardie Plank/Board) is very fire resistant. Almost fire proof. It is used as a siding material in home construction. So you can find it at all of the big box stores and probably most of the mom/pop home improvement stores.
 
but I've seen it done. Someone told me if I wire the panels in series I'd need a bigger 24v inverter. If I wire them in parallel, I'd need to keep the system 12 volt... Is that the difference between series and parallel?
Not quite...

Series and parallel make the same total wattage. If you have Hundred watt panels that make 20 volts and 5 amps and place two of These panels in series they make 200 watts, but at 40 volts and five amps. Placed in parallel, the panels make 20 volts and 10 amps. Bothe come out to 200 watts.

The two panels in parallel at20 volts won’t make enough volts to run a SCC that will power a 24 volt inverter, so you’re stuck at 12 volts. If you put the panels in series at 40 volts, your SCC could run a 12 volt or 24 volt inverter. Whichever inverter way you configure the panels in series or parallel, will still add up to 200 watt

Watts=Volts * Amps.

Once you put the panels on a roof and start producing power, there’s some real world stuff:

 
1613536679797.png

I use melamine covered plywood, wich makes it fire resistant and its suppose to self-extinguish... but to make it safer i route al cables with PVC channels.

The important bit, is that i use a couple of aluminum "U" channels to mount the inverter to the plywood. Having the inverter floating can help with temps and also you can route cables behind it, wich can be usefull to hide cables or if you are out of space.
 
Back
Top