diy solar

diy solar

Bottom Balance 150ah lifepo4 12 v 4s cells

Cool - now I know where the idea of bottom balancing came in. I've done it many times - but not for what we are doing here.

History - in the old days of diy EV's, bottom balancing was very popular. The reason being is that you would be only a block from home when your LVD would kick in.

But instead of pushing the EV a block to home, you would turn off the LVD, and limp back to your garage. The idea was that by doing so at bottom balance, all of the cells would hit the bottom at the same time, and non would go into reverse-polarity and be instantly trashed if they were out of balance at the bottom.

Most bottom balancers took their cells down to 2.7v, waited a day for the voltage to recover, discharge again and wait another day, discharge again and wait, and then proclaim that they were truly bottom balanced. But you are taking a big risk doing this manually, hence many opted for much bigger intelligent chargers with balance charge/discharge leads on them because of the inherent risk of doing this manually and taking cells down to zero by mistake.

In other words, bottom balancing is a very limited application scenario which you aren't in. You choose either one or the other method - not both.

For kicks, move the cells around to see if the problem follows the cell, or sticks with the slot. It is also possible that your multimeter isn't accurate. Maybe close enough for hobby work, but when dealing with LFP, where at the high end a 0.1V difference may be a go/no-go trigger, (like setting bleeders values between 3.4/3.5v etc), a Fluke out of the box (yes expensive) can be relied on. So can many other high-quality meters too. Just something to think about even though it may not fix your immediate issue.

Your BMS voltage readings can be off too. Let there be ONE standard to rule over all others. When doing LFP, a trusted meter is a must. Do you trust yours? :)
 
I also hesitate to mention this because it has been hashed out and covered in noise in the 7000+ message long compression thread...

Is there any difference if you just have the compression comfortably snug, and not "calibrated" ?
 
I also hesitate to mention this because it has been hashed out and covered in noise in the 7000+ message long compression thread...

Is there any difference if you just have the compression comfortably snug, and not "calibrated" ?
The compression is an easy task for me anyway, need to compress until the circuit board fits comfortably on top to connect. Then just enough ump so if the band or tape loosens just a hair you haven't lost your circuit board.
 
Cool - now I know where the idea of bottom balancing came in. I've done it many times - but not for what we are doing here.

History - in the old days of diy EV's, bottom balancing was very popular. The reason being is that you would be only a block from home when your LVD would kick in.

But instead of pushing the EV a block to home, you would turn off the LVD, and limp back to your garage. The idea was that by doing so at bottom balance, all of the cells would hit the bottom at the same time, and non would go into reverse-polarity and be instantly trashed if they were out of balance at the bottom.

Most bottom balancers took their cells down to 2.7v, waited a day for the voltage to recover, discharge again and wait another day, discharge again and wait, and then proclaim that they were truly bottom balanced. But you are taking a big risk doing this manually, hence many opted for much bigger intelligent chargers with balance charge/discharge leads on them because of the inherent risk of doing this manually and taking cells down to zero by mistake.

In other words, bottom balancing is a very limited application scenario which you aren't in. You choose either one or the other method - not both.

For kicks, move the cells around to see if the problem follows the cell, or sticks with the slot. It is also possible that your multimeter isn't accurate. Maybe close enough for hobby work, but when dealing with LFP, where at the high end a 0.1V difference may be a go/no-go trigger, (like setting bleeders values between 3.4/3.5v etc), a Fluke out of the box (yes expensive) can be relied on. So can many other high-quality meters too. Just something to think about even though it may not fix your immediate issue.

Your BMS voltage readings can be off too. Let there be ONE standard to rule over all others. When doing LFP, a trusted meter is a must. Do you trust yours? :)
I've decided not to worry so much about bottom balancing since most of the time if needed to be recharged it should be in the happy medium of inbetween and not bottoming out. Just didn't know and wanted to verify and do everything I can so if this doesn't work out when the cell arrives, hoping this Friday they can't say I missed a step or did everything I can and will get a full refund and they pay the shipping back. Then I am on the drawing board again since the project was dependent on 300 ah not 150ah.
 
Yeah, don't bottom balance because this is not your application.

I also notice that BatteryEvo state that they use "Overstock, Repurposed, and Surplus cells". Cool that they are upfront honest.

It just means that don't be surprised if all the cells don't match up for capacity and internal resistance together. There may be a slight skew away from lab perfection, and the diy'er should be prepared to accept and compensate for that by various means.

For example, did you clean your terminals before attaching the bms board with a non-soapy, non-metallic, NEW rough surface like kitchen scrubber? Maybe apply a SMALL dab of No-Alox and screw down? I think that's an important step that they miss in the video to make it seem plug-n-play.
 
Last edited:
Yeah, don't bottom balance because this is not your application.

I also notice that BatteryEvo state that they use "Overstock, Repurposed, and Surplus cells". Cool that they are upfront honest.

It just means that don't be surprised if all the cells don't match up for capacity and internal resistance together. There may be a slight skew away from lab perfection, and the diy'er should be prepared to accept and compensate for that by various means.

For example, did you clean your terminals before attaching the bms board with a non-soapy rough surface like kitchen scrubber? Maybe apply a SMALL dab of No-Alox and screw down? I think that's an important step that they miss in the video to make it seem plug-n-play.
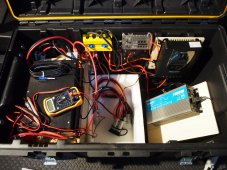
True enough, I started this slowly this project with the boys and I for science project but new it would be costly and quite expensive from an SSI standpoint so the image here is a single 150ah cell working great and a 1000 watt but a 2000 watt now in its place I used the smaller one to test and move forward with everything. The only thing holding me down to finally finishing this up is with the one cell. If all works out then I can finish wiring up and place the ground bolt so one can connect a grounding rod outside it'll be finished and turn on the videos to their home schooling parents. We created a smaller one with the framework from Will's suggestions and it seems the parents and many preppers even love it to teach from. This of course was many parents asking for something bigger. So here they go. All contained, except for the external sb175 where you will actually plug into for shore power or if you want to add battery packs.P8100006.JPG
 
NICE! I got a feeling you'll be allright in the long run. Might have to tweak your charge voltage down and experiment 0.1v at a time. Maybe use a charger with less current to give the bleeders a bit more time.

All part of the diy fun, right?

I got a feeling that unless you've already cleaned your aluminum prismatic terminals with say a new, non-soapy, non-metallic, fine kitchen brush just a little, and then at a minimum, just a *dab* of vaseline even, you might have slightly better results.

Build looks nice in that fly-away case...
Thanks, looks like No-Alox will take some time to get here so I picked some

Gardner Bender OX-100B Not Available OZ ALU Compound​

and it should be arriving on Saturday. Have scrub brushes in the kitchen and ordered 6 more to arrive Friday to replace the one and wife will be happy. Happy wife, Happy Life... Wouldn't have thought of this -- Thank you. Might do it to the older set as well. I say older a few months older is all. Couldn't hurt.

By the way, anyone have any experience with this?

iSunergy Battery Equalizer Battery Voltage Balancer 12V/24V/48V/60V/72V/96V Battery Bank for Lead-Acid Batteries and Lithium Battery Balancer

Can be found on Amazon?
 
Yep - no metallic threads or specialty stuff. Just enough to scrape away the oxidation from sitting around prior to assembly. Maybe close eyes, and blow anything anything away that might fall into the threads. One big reason you don't want any metallic bits getting stuck in there when you screw back down.

And then a small spread of anti-noalox-alumi-goo. :)
 
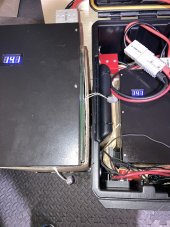
Received the Replacement Cell Friday Night. It was matched much closer to the original 3. Got to first base. Second, as others have mentioned I bypassed the bottom balancing, of course this time they were really close but when you purchase cells the first thing is you meter the voltages to make sure the cells are close. So I still don't see any harm in bottom balancing but didn't have to. Next, I did put the system together compressed since the balance circuit board would not fit unless compressed and left the clamps doing the job just incase it didn't work. I did put an additional active balancer 5 amp connected and everything went well. Let rest over night and top balanced to 3.65 volts. tested and it was perfect all cells equal. Secured the compression with fiber packing tape and one single hose clamp in the middle where they usually bulge the most. Connected the heating pads to connect later to the circuit inside. Then moved the battery close to the next and paralleled with the original and ran a 1500 watt heater for 30 minutes bringing it down. Both batteries were within a tenth of a volt. Not bad. Charged with Victron and went perfect and resting now. Both reading after full charge 14.1 volts. I also cleaned the studs of each cell and layered with a non-corrosive grease to connect to the bms circuit board and then layered on top of circuit board and the positive and negative cable connections. Just sharing a successful situation. Thanks for everyone's assistance and appreciate it, just wanted to close this with a big Thank you.IMG_0492.JPEG
 
Right on! Thanks for sharing with the updates.

Cool on the cleaning too. I always hated that part when I was building batts, I was so excited I wanted to hook up and go. Which worked at first, but a year later -- funny business.
 
So I still don't see any harm in bottom balancing........
I think there have been a lot of explanations on why bottom balancing is not on the path to a pack that is going to be balanced at the top. I am not trying to convince you if you still do not understand, however for the benefit of other readers who might see your comment out of context I should at least provide an explanation. The capacity of a cell does not change when it is top balanced or bottom balanced. Cell capacities can differ unless you purchased perfectly matched cells that have been binned by capacity, which you did not. Think of a stack of chopsticks of various lengths. The length is similar to capacity. The top represents 3.65 volts and the bottom represents ,3.5 volts. Bottom balancing is like holding the chopsticks in a stack in which you tap them on the table so they are even (all the same voltage) at the bottom. But since they are not exactly equal in capacity some will be shorter than others at the top. They would be bottom balanced but not top balanced.
 
Last edited:
Back
Top