diy solar

diy solar

Best adhesives for “gluing” down aluminum racking mounts to shipping containers.

Joe_

New Member
Joined
Sep 21, 2022
Messages
105
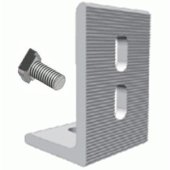
I bought some used panels which came with Unirack rails and the L and brackets to mount them pictured below.
My plan is to glue them to the steel top of my shipping containers after removing the paint then coat them and the bare steel with self leveling rv sealant or rubberized roof paint for UV protection.
1688495147042.jpg


The L brackets will be oriented as shown in the picture.
The lower foot that will be glued down is 4sq inches. It is anodized and has the same grooved surface shown in the picture.
I contacted JB WELD for suggestions on using one of their products, they suggested silka, 3m , or Dow.


The panels will be flat with the roof in pairs, elevated 4” off the flat roof in portrait orientation. 7 pairs on each 40’ container.
Their mission is to provide shade for the roof as well as electricity.

Anyone have a suggestion for an adhesive that might be up to the task. Something you have worked with?
 
Last edited:
For 20 foot containers, have used 20 foot sticks of UniStrut, BOLTED to the top "pockets" at the corners of containers. The strut had two additional bolts along the run of the strut, using Polyurethane single-part caulk and washers under the strut, to waterproof.

I would be concerned about the stress on glued L brackets, from the PVs thermal cycling, eventually tearing off the adhesive at the L brackets.

Also, with less than four inches of clearance below the PVs, the thermal radiation from the PVs, into the container roof, would not shield much of the sun's radiant energy, IMO, and so on. Good Luck, Luke
 
I put no holes in the conex.

15 years ago I flap disc’d to bare metal and glued two 3’ piece of cleaned strut to the roof with the best PL Premium I could find at Home Depot. Painted over.

Been rock solid in the Texas sun. I think I’d bend the metal if I tried to remove.

My next rails will be mounted in a similar fashion but using harbor freight magnets as pedestals. Along with the pl premium.
 
Last edited:
I like this forum a lot. Lot of good information.

I‘m rethinking my design some as a result. I’ll add some unistrut under the L shaped brackets to increase the bonding area.
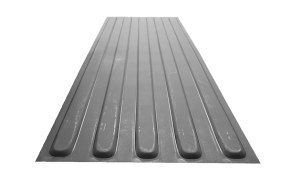
Below is a stock image of the corrugated roofing panel typically used in a shipping container. If I bond a 10” piece of tall unistrut and glue that down then mount L brackets using 3/8 strut nuts and bolts I think I can avoid the hassle of using safety straps. It also lowers the requirements placed on the adhesive. I’m still interested in adhesives.

1688506611451.png
 
There are a number of Urethane adhesives, and sealants.

Have used Locktite PL, Sonneborn NP1, have stopped using Sika (but, it may well be just fine for this use), -- all are called caulks/sealants (and some are also called adhesives) -- , all of them are available in 10-ish Oz tubes.

IIRC, there is a Locktite PL Construction adhesive in 10, and 20-ish Oz tubes. FWIW, Good Luck.

Stating the obvious, (EDIT)-if<, you will be using the strut, open face, up. You will want a washer, like the strut-type large square ones, to keep from deforming the back of the PV frame. You are probably thinking of a different approach to protect the PV frames .... Luke.
 
For 20 foot containers, have used 20 foot sticks of UniStrut, BOLTED to the top "pockets" at the corners of containers. The strut had two additional bolts along the run of the strut, using Polyurethane single-part caulk and washers under the strut, to waterproof.

I would be concerned about the stress on glued L brackets, from the PVs thermal cycling, eventually tearing off the adhesive at the L brackets.

Also, with less than four inches of clearance below the PVs, the thermal radiation from the PVs, into the container roof, would not shield much of the sun's radiant energy, IMO, and so on. Good Luck, Luke
I did something similar to this but used 4x4 timber to bolt to the pockets and one in the middle to make two 10ft sections. Then I put joist hangers and 2x4s between. Then bolted the uni strut to the wood framing to isolate from the metal container and also allow for a bit more air flow under the panels. Worked great and is rock solid in 60+ mph wind.
 

Attachments

  • F5C5ADF3-38B6-45EE-8F92-74C1BABAE0A8.jpeg
    F5C5ADF3-38B6-45EE-8F92-74C1BABAE0A8.jpeg
    218.7 KB · Views: 37
I did something similar to this but used 4x4 timber to bolt to the pockets and one in the middle to make two 10ft sections. Then I put joist hangers and 2x4s between. Then bolted the uni strut to the wood framing to isolate from the metal container and also allow for a bit more air flow under the panels. Worked great and is rock solid in 60+ mph wind.
Looks great. Did shading the container roof with panels effect the daily temperature in the container at all?
 
Looks great. Did shading the container roof with panels affect the daily temperature in the container at all?

Thanks. It helped a bit during mid day when the sun is directly overhead. But this area sees 115-120 degrees and I haven’t insulated and installed the AC yet. Was considering throwing some rigid foam under the panels but not sure how much it would help.
 
Looks great.
Thanks. It helped a bit during mid day when the sun is directly overhead. But this area sees 115-120 degrees and I haven’t insulated and installed the AC yet. Was considering throwing some rigid foam under the panels but not sure how much it would help.
I’m in a similar situation, solar heat wise. I haven’t found any foam insulation that will withstand the UV combined with the lack of humidity when used outdoors. But I am heartened to hear that it had some feel-able effect. Every little bit helps.
 
Connecting to the roof panels instead of the corner blocks of a seacan, has some issues.
Just walk on the middle of the roof, you will feel it deflect under your weight. The top of the can is not very strong except near the edges where the wall provides the support. Just to keep in mind as you design your system. Note: the corner blocks sit higher by about 1/2" than the roof, this is so stacking cans only rest on the corner blocks. If you lay a straight member from block to block, you will need to shim between the roof and the member.
Thanks for pointing that out. I haven’t been on top of my containers in a while. No reason to go up there. But I do remember the tin can effect when I was up there. It’s looking like the L brackets will be about 6” inboard from the square steel tubes that the side and top panel are welded to. It should be fairly stiff there. I hope.

The majority of my racking came cut to 7’1”. I have a minority of sticks of racking that are in excess of 8 ft that I will be cutting down to 8 ft. All are going across the container, the 8’ way. I’m planning to alternate one longer stick and one shorter one in places I need to place my conduit runs at and clamp the conduit to the top of the exposed longer sections of racking. It should look pretty clean that way.

I haven’t found any info on how far apart the supporting L brackets can be placed apart yet.
Looking at the extrusion of the racking it looks plenty stout. The panels weigh 40ish lbs a piece. There are no hurricanes here. Max design wind speed is 100 mph in this area. The 7’ spans between supports should be OK mechanically ( by eye at this point lol). I have no way of checking if that much of a span is allowed at this time. Haven’t been able to find allowable cantilever or allowable unsupported spans info anywhere in unirac’s manuals.

I read that they have an online design tool. Hopefully it does the calculations. But haven’t got that far yet.
At this point it is looking like the Silkaflex will be the adhesive of choice. That or GE silicone ll. GE Silicone has a better heat rating which is appealing, but isn’t quite as strong and won’t take paint. The paint part is important because of the high UV in the desert. Plastic of any sort, pvc conduit included doesn’t do well in this area unless kept painted with a high quality paint.


Edit..
signed in with Unirac. The racking I have is for standard pitched roofs. Their software doesn’t perform especially well doing a shipping container using this product line. I did determine that the span between mounting brackets won’t be a problem in my geographical area.
Yeah… one less thing to stress about ?
 
Last edited:
One of the problems with gluing aluminum to steel is that they have different thermal expansion coefficients. As temperature varies this will create strain in the joint. Not so much an issue with small joints, more with larger joints. Have you considered gluing short pieces of stainless steel angle to the container roof instead of aluminum brackets - stainless will closely match the expansion coefficient of the regular steel.

Still, the strength of your joint will be proportional to the surface area of the glue joint.

I've used special 3M epoxies for gluing aluminum wing structures for aircraft. The success of glue joints depends critically on cleanliness and "tooth" of the surfaces (depending on type of adhesive). In particular the glue joint will only be as strong as the paint film if you don't remove the paint.

The other issue with glueing aluminum is the oxide layer which forms almost immediately in air. Some people use stainless wire brushes and acetone to clean the aluminum before applying epoxy. A trick to get the glue to bond to metal instead of oxide is to wire brush through the wet coat of epoxy which gets the glue into contact with bare metal.

Of course the best method would be to weld steel tabs onto the steel container roof and then repaint.
 
I did determine that the span between mounting brackets won’t be a problem in my geographical area.
Not sure what area, if snow or high winds are common/or not.
I was asked to assist someone that had mounted their rack to a seacan using one edge and the middle of the roof for support, and naturally the middle of the roof began to sag pretty noticably after they got about half the PV panels up, and called for help. In their case the weight of the solar panels was the least of their problems, since they are in an area with moderate winds and high snow loads, the set up would have been a total disaster as built. The solution was changing the base mounting members to span the entire width of the can, instead of only half way. If your situation (wind and snow) are moderate, the 7-foot suppots on the 8-foot can (width) may be fine, you should consider the loads carefully. Often the wind up-lift forces are higher than the gravity loads, and may be subject to shock loads (wind gusts) I would be hesitant to rely on adhesives, attached to the flexible roof panel skin, with dissimilar materials. Your project, your choice.
 
ElectricIslander:
“Of course the best method would be to weld steel tabs onto the steel container roof and then repaint.“

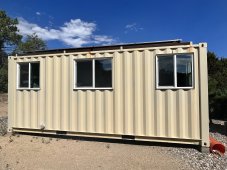
Or just attach plates with fasteners. At least on our shipping container, the long side upper span is square pipe; no penetrations into the interior.

We were cautioned to avoid walking on the roof.

We are dry enough here that paint is a repetitive chore best avoided.

Our setup was designed around the structural panels we salvaged. Winter production is the priority so wanted to tilt panels. Since we transported the raw steel tubing in our Toyota van, length was an issue.

Alas, even though we insulated the interior, without ventilation it gets hot inside. Poor surface to volume ratio, small volume with little interior mass.

IMG_2391.jpeg
 
"Forever glue" 3m 5200 marine adhesive. $$and slow setting but works.
My son and I worked on boats. We refer to it as the “White cr@p from he!!” Because getting anything apart again is near impossible and when you apply it, you can’t help get it on something that you don’t want it on, then it spreads so more.
 
Back
Top