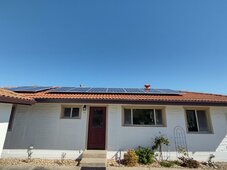
Update. The final size is 15 455w panels, 6.82kw with a Sunny Boy 5kw inverter. Their were two extra panels per the SS order and one could be mounted on the end.
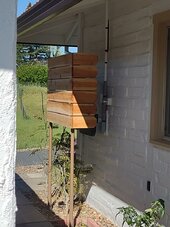
A few pics including an inverter shade barrier. It is removable by simply pulling it straight up. Larger diameter tubes are set in the ground and the smaller diameter shade barrier support tubes slide into them. When the install started the Inverter location looked to be 100% in the shade year round. But later in the fall, and spring, it turns out sun was hitting the inverter. Having lots of building materials lying around the only cost were the cedar slats and galv screws.
Installed panels with Iron Ridge xr100 rails which allowed 6 ft attachment spacing. Initially installing panels on the tile roof concerned me but after measuring rafter spans, which are almost 2 ft shorter than code at longest span, and realizing the lower rail attachments are almost directly over the exterior house wall, the concern was a non issue. For those looking at the pics and attachments note that the eaves are 36" with an exterior wall width of 8".
No combiner box was used for pv cable to thwn. Ran PV cable from both string arrays to inverter. imo - easier, less connections to possibly go bad (arc faults) and simpler install. Used 3/4" emt from each array to a DG box installed directly over the inverter on the roof. Then 1" from DG box down exterior wall to inverter.
Despite having to use RSD's I am very pleased with the SMA string inverter and roof mount. Given the roof layout, utilizing south and west roof exposures with no shade issues, and the 200 amp panel location the install worked out very well. A ground mount would have required trenching, cutting through asphalt, repair of existing irrigation pipes and possibly propane line, very long cable runs... btw - SMA RSD's were used in case of any issues. In my experience its best to use one manufacturers products to eliminate finger pointing.
I was uncertain about panels facing south and west but the output exceeds expectations "for our use" and its only April. Yesterdays production was 41.55kwh despite over three hours of clipping at 5kw. Also, my guess is some, perhaps even most of the reduced total production output with west facing panels is offset given the higher/ridiculous 4-9pm TOU rates.
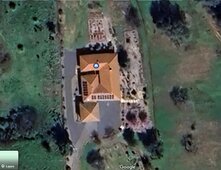
Also, google earth updated the pics and the panels can now be seen.
The best part is, after filing the 30% tax credit it will pay for itself in a much shorter time period than originally thought.


 my Kubota
 ")