


Visionquest
New Member
After much research, design and building my 12v LifePo4 upgrade to replace my two 6v AGM's in my RV is now complete and ready to install. I am very happy with the result and it will be interesting to see how it does through next winters' storage monitoring. I've attached my design file and many pictures. Here are some key points and highlites:
- I constrained the proportions to fit the existing slide-out battery tray. I've built to the maximum allowable dimensions of 14" deep by 14.5" wide.
- I wanted the maximum size 12v configuration that would fit in the space.
- I store my RV with a low power remote monitor (~3 watts) and small solar panel to keep the battery up.
- Items researched and decisions made:
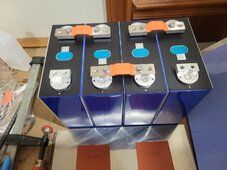
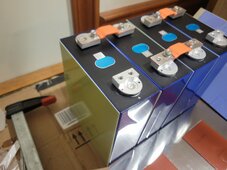
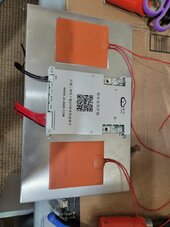
- The EVE304ah grade A cells + supplies were cost effective compared to buying 2 new 240ah AGM's but give me about double the usable energy.
- The JK-B2A8S20P BMS has some of the best reviews and so far is rock solid. It has the heat function but I'm not using it due to some uncertainty about exactly how it would operate.
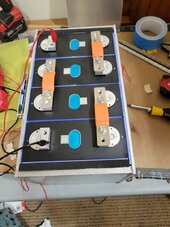
- Compression - after research I wanted to provide some degree of compression. All of the spring based designs took up too much space and looked rather clunky. I chose to use PORON foam as a compression agent and designed an all-aluminum case to constrain the cells under compression. The foam provides a good expansion vs compression force that will stay within the compression limits for the cells. This is likely not as good as the spring based designs but its a huge improvement over no compression IMHO. The case was assembled under compression with the foam compressed by 25% which is spec'd at 6psi.
- Seperators - I didn't want the cells touching so I used FR4 material cut to size between each cell. I also put it between the end cells and the PORON foam to help keep compression forces spread evenly.
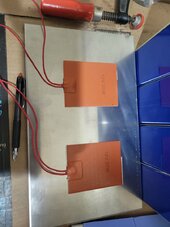
- Heating - I want the remote monitor system to operate through winter months in storage. It give me access to Blink cameras, temperature, battery stats, door alarms, etc. I am just north of Chicago and can expect temps to stay below freezing for several days in a row. Some of the coldest days are also the sunniest so I want to use the solar energy on my 190w panel to keep things running. I wanted gentle heating which is accomplished using two 25watt heat pads in series. (yields around 17 watts at 14 volts) I use three pairs for a total of ~50watts. One pair on each side of the stack and one pair on the bottoms.
- Heat applied to cells - I didn't want to apply the heat pads directly. Instead they are attached to the aluminum case which will help spread the heat evenly and keep peak temp down. However, that required isolation from the cells to insure no shorting of the cells could occur. I used thermal conductive pads similar to what is used for electronic device cooling.
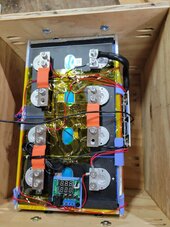
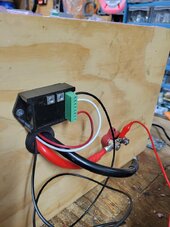
- Heating control - I wanted the heat only when charging current is available and working totally independent of the battery. I also wanted to monitor status remotely over the internet. My rig uses an RV Whisper monitor station that communicates with several devices and provides data logging and remote access. It talks to a Thornwave battery monitor which can track two voltages and one current and provides relay output control with programmable settings. So...for operation... the thornwave output will go to ground when there is a charging voltage present. The output supplies ground to the small thermostat board I added to the top of the cell stack. Once power is applied the thermostat will control power to the heating pads if the temperature is below its set point. Right now I have it set at 45 degrees F with a 2 degree hysteresis.
- Temp monitoring - I added an additional temp sensor (the white plastic container on top of the cells) which will report temperature and give me graphs remotely via RVWhisper.
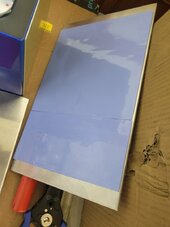
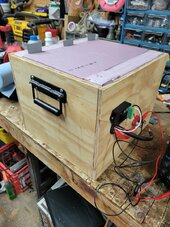
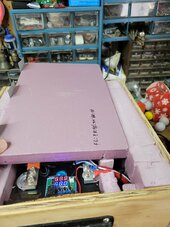
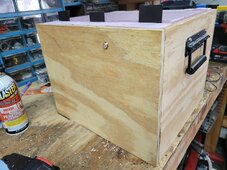
- Enclosure - I used 1/2" plywood and assembled the maximum sized box with wood glue and Kreg screws. I added handles on each side since this will weigh 60-70 pounds when finished.
- Insulation - Ideally I wanted to surround the cells with 2" of insulating foam which provides R10 level of insulation. Due to my size constraints I was only able to do that on the two long sides. I also have height constraints with the access door opening so I used 1" foam (R5) under and over the cell stack. The ends of the stack only had <1/4 " of space so I used some cork board material that I had laying around. For this the PORON foam provides a small amount of insulation also.
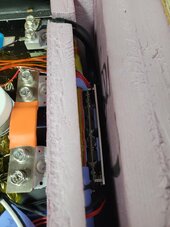
- Wiring - per recommendations on this forum I used Kapton tape to fasten down the BMS wires, thermostat sensor, BMS temp sensors, and heat pad wires. I used some of the thermal conductive pad material to protect wires from the aluminum edges. I found the perfect 1" grommet that fit the 1/2" plywood exactly. The is big enough for both power cables and associated wiring to exit the box.
- I added a two bolt buss bar to the outside for the positive battery lead. This will decouple any strain from the external feed to the main distribution buss bar.
- Not shown yet will be the shunt on the negative lead that will provide battery charge monitoring by the thornwave / RVWhisper combination. The shunt will be re-used from my AGM setup when I do the install.
Attachments
-
Lithium Box.pdf683.1 KB · Views: 12
-
 20240321_215648.jpg137.2 KB · Views: 23
 -
 20240321_215651.jpg91.1 KB · Views: 25
 -
 20240321_215656.jpg196.7 KB · Views: 24
 -
 20240321_215700.jpg149.8 KB · Views: 28
 -
 20240322_115447.jpg150.6 KB · Views: 26
 -
 20240322_191301.jpg150.1 KB · Views: 28
 -
 20240401_151029.jpg174.3 KB · Views: 30
 -
 20240405_134936.jpg194.5 KB · Views: 28
 -
 20240405_134954.jpg146.1 KB · Views: 27
 -
 20240405_152322.jpg191.7 KB · Views: 27
 -
 20240405_152351.jpg129.6 KB · Views: 26
 -
 20240405_152417.jpg152.4 KB · Views: 24
 -
 20240405_152521.jpg306.4 KB · Views: 24