diy solar

diy solar

CALB 100Ah Assembly

atatistcheff

Solar Enthusiast
Joined
Sep 20, 2019
Messages
176
I was building this (and making it up as I go along) at the same time as Will. This will be replacing the lead acid battery in our 25 ft camper trailer. Can't wait for camping season!

This uses the Batteryhookup 100A BMS plus CALB cells from Aliexpress, both of which have been mentioned quite a bit around here lately.

20200111_151057.jpg 20200111_151111.jpg

20200111_151122.jpg 20200111_151133.jpg
 
Nice! I had ordered the CALB cells when they were cheaper (under $400) but had to cancel the order due to “A series of unfortunate events” ? I also ordered the battery hookup BMS which I didn’t cancel thankfully. Now the CALB cells have inevitably risen in price and in seems out of stock ? DOH!
A clear case of cancellers remorse now. LOL
 
Last edited:
Great battery. More strapping big cells together to simplify builds!
 
Is that a piece of medium density fibre board between the BMS and the cells?
Whatever it is, how did you mount it?

It's some kind of plywood, I needed a small piece and found it in the Home Depot scrap pile. They gave it to me for free. It's mounted with zip ties going around the cells. I actually had this board left over from previous project and it just happened to fit just right. Has some rubber feet on the bottom so it stands off from the cells quite a bit. I love zip ties!
 
Great, thanks! I planned to start looking at Lowes/HD but thought I might have to go to a specialty plumbing supply or order from Amazon after measuring the circumference of the cells when pushed together. I'm still waiting for all of my parts to arrive from China :-(

What charge controller/parameters are you using? I'll be using an EPEver 40A MPPT. I'm going to tinker with the charge profile as I don't want to apply a float charge to the battery since they don't self discharge. I want them to last as long as possible. I think I'm going to set up bulk/absorption to 14.4v and try to disable float or (if I can't) set it at a modest 13.6v. From my research, that seems to be the agreed upon sweet spot according to several battery and charger manufacturers. I'm just curious how everyone else with this DIY battery configuration is setting up.
You can connect multiple hose clamps together, just unscrew them totally and insert the thread side from the second one into the screw side and daisy chain them. Be careful so you do not overtighten and crush the corners, it is best if you have some form of "guard" protecting the cell corners but it's less a problem with CALB or Winston Plastic Cells than the blue aluminium ones.
 
Thanks for the tip Steve! That's the first thought that came to my mind (daisy chaining clamps) as I have a bunch of 2" and 3" in my garage. Too many possible points of failure for my comfort though. I was going to use some small pieces of rubber on the corners just to keep the edges from "digging in."
 
Thanks for the tip Steve! That's the first thought that came to my mind (daisy chaining clamps) as I have a bunch of 2" and 3" in my garage. Too many possible points of failure for my comfort though. I was going to use some small pieces of rubber on the corners just to keep the edges from "digging in."
I saw some really huge (long) stainless ones at TSC Stores (Tractor Supply in USA) I think for 4-5 dollars each, they aren't expensive. For the corners I would suggest something stiff rather than soft like rubber.
 
I saw some really huge (long) stainless ones at TSC Stores (Tractor Supply in USA) I think for 4-5 dollars each, they aren't expensive. For the corners I would suggest something stiff rather than soft like rubber.

BTW, mine uses two of the largest clamps I could find at Home Depot daisy chained together. They didn't have a single one large enough.
 
The reason for strapping the batteries is to stop the bus-bars from ripping the terminals out of the cells when they expand?
 
How about using plastic cable ties -- much cheaper and more gentle on the corners.
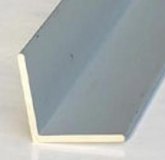
A good way to protect the corners actually is to use a piece of Angle Aluminium Stock like below... it is pretty cheap, easy to cut to size and protects the corners nicely.
alum-angle.jpg
Cells expand & contract a bit during charge / discharge which is quite normal. Keeping the cells snugged up ensure they won't balloon or anything. "Snug" not tight. They will not expand to a point where terminals split, if they do, they are in midst of hazardous failure. If in a mobile applications especially, RUBBING is a BAD THING ! If cells are slack and move a bit, over time wear spots will happen and in extremes can wear through... which would be really bad... they should be fixed so cells have no chance of vibrating or wearing at any spot. I will point out that Will uses 2-Way Tape between cells as well as strapping / binding.

Interestingly enough, I was perusing about and came across an idea for using Aluminium Stock sheeting, Angles & T's along with threaded rod to make hard core casings.... I was planning on building my new boxes from 3/4" Purebond plywood ($50 a sheet) 1 sheet makes two boxes and lid if using 280AH cells in a 8 Cell Square Pack format. Ply is still probably cheaper than Aluminium and being non-metallic a tad safer too.
 
Back
Top