diy solar

diy solar

Construction methods

Interesting. Seems like they are trying to reduce wood consumption and argue its in the best interest for insulation. They sugest single headers over windows and single top plates, but they put the responsibility back on engineering.

I wonder if the pictures are going to fall off the wall every time someone slams the door. 😅
 
  • Like
Reactions: DPC
If its a 2 by 6 wall thats already pretty ridged
Does it mean a 2 by 6 wall on 24 centre is going to be as stiff as a 1 by 4 wall in 16?

Do you really need a header on a non load bearing wall ( confession is skipped out on that in my shed a decade ago because it was on the gable end already the structure stands and has exceeded 40 pounds per square foot loading...

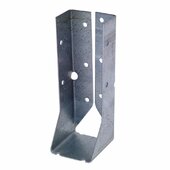
If a joist hanger is good enough to hold up a floor, is a header hanger also good enough to replace a jack stud?
1711066563228.jpeg
Dam there are a lot of variable here to consider
 
Building 6" walls to accomidate thicker insulation is very well established, and I used that in the construction of my own cabin. I would however be concerned more about the fewer nailing sites in 24" spaced studs vs 16" spaced ones. I would think that bowing under stress would be more pronounced when subjected to external forces, be them high winds, or earthquake tremors?
 
Have you heard of Advanced Framing?
 
I went the other way. Big lvl’s and 2x8 walls. The longevity of the structure has long-term environmental benefits.
 
Basically, traditional framing techniques waste wood and promote excessive thermal bridging. Worked fine when lumber and energy was cheap, but today? Not so much. Much can be learned about advanced framing from Green Building Advisor, Fine Homebuilding, and Journal of Light Construction. Each requires a subscription after at least the first few articles, but I find that money well spent even though I'm now just a homeowner and no longer own a company in the trades.
 
I used 2 ft centers while building my house.i would do that again, but only for exterior walls.


The other stuff I avoided, like using a single top plate, or two stud corners.

What they don't tell you:

-If You're going to have tile, on the wall, for example shower walls, you NEED 16 o.c walls or better yet 12 o.c . There are all kinds of gymnastics you have to do with 24 oc framing.

-For floors 16 OC is better otherwise you are going to need special subfloor(advantech) or thicker subflooring.

-If you're doing floor tile 24 OC Is going to require some major accomodations.

-interior walls. I think I would go 16.oc. More attachment points for the sheetrock.
 
Have you heard of Advanced Framing?

This isn’t a bad idea in theory, but YMMV.

If a novice homeowner who does not have experience in the construction industry attempts it, there can be cascading issues;

  1. Unfamiliar Trades like “The Framers”
  2. Lumber has become crappier & crappier over the years
  3. Quality & Care / Attention of the framing crew ( no structural allowance for wood butchers )
  4. Unfamiliar “Building Department” & Inspections
  5. Non-Standard construction brings forward issues @1201 mentioned above
  6. Other items I haven’t thought of off the top of my head
I’m retired now from a 4 decade commercial construction career. I built our last house for ourselves in 2004. Even as an expert, I hired an Architect, Structural Engineer, & Soils Engineer to build my house. Those not in the business, probably have no clue why ,,, those experienced probably do.

There are Pros & Cons to all these decisions we make;

In Canada in 1985 the NBC was changed for better “energy conservation” as the NRC had progressed with it’s study. That lead to Billions of Dollars of Repairs that the Governments “say” they have zero liability what we refer to in BC as “The Leaky Condo Crisis”.

Reminds Me of Shaggy 😁 ( It Wasn’t Me );
 
I built my home using Advanced Framing, 24"oc. This structure is a bit different as I used solid foam insulation (press fit & sealed) within the wall modules which I built as SIP's (Structural Insulated Panels). Additionally, the walls & roof are thermally broken & with a 2" free airspace as part of the rainscreen siding & cool roof system. This is a passive house design which worked out really well.

The convection generated in the roof, naturally draws the air up from the soffits & from between the siding & wall airspace and out the ridge vents preventing heat saturation in summer. The thermal break also prevents heat loss in winter which has been a huge win.

There are a lot of Passive & Efficiency things that can be incorporated into a build that reduces the overall heating & cooling loads without really increasing the cost to build. Advanced Framing does address a few things like "cold corners & headers". Even simple thing like the colour of the Roof can make a huge difference in livability (especially cooling load).
 
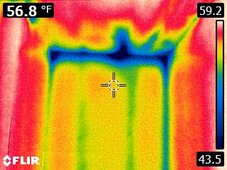
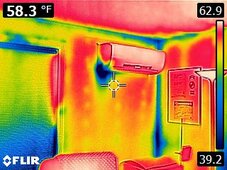
I have been keeping an eye on energy conserving building techniques and vapor and air barriers. Personal experience is 24" on center with conventional sheathing is a non starter for me as the walls will telegraph the 24" span both inside and out. Using 1" T&G pine boards will solve that issue on the exterior but that means a full coverage air barrier is needed compared to zip tape on the seams, 5/8s sheetrock will help on the interior but its still boundy unless its upped to 5/8" drywall. There is also the issue that there is still pretty hefty thermal conduction through the 2 by 6 framing. I have thermal camera and the first shot was taken on a -20 F day looking at exterior wall from the interior of the building at the junction of the wall and ceiling. That wall is 2 by 6 16" OC with standard 6" fiberglass batts. Obviously, the double plate on top of the wall is also a big issue. but as you can see, the framing sticks right out. If you look at the second shot with the minisplit, you will notice that the wall studs are not visible. The reason is that to the left of the corner at one point I gutted that interior wall and installed 1/2" of isoboard foam on interior under the new drywall. There is a slight amount of conduction through the drywall screws. The wall on the right does not have the foam and you can see the stud. The other things so to note is the big cold spot where the minisplit tubing comes through the wall. Its sealed and insulated but those two copper lines running outdoors to the outdoor unit located about floor level means a lot of heat is being carried by the tubing. The firm that built the house did not do advanced framing corners and you can you see the impact of a solid corner. Off to the extreme left is a portion of double pane casement window that I installed double cellular blind with side tracks. The blind travels in a C shaped track with a spline in the center that lines up with groove in the edge of the blinds. It adds about R5 to the window opening and more important it blocks line of sight radiant transmission out the window opening. It is quite noticeable on a cold night the lack of a cold spot near a window with the blinds closed. The upper header of the blind is a cold spot as its not insulated. The blind is about 4" from the window so there is a convection loop in the cavity which you can see with the cold zone down low and some heat spilling past the tracks and seals up top. Given the rather obscene pricing and delivery times for Euro high performance windows, I think a US high performance window with the double cellular blinds is a better fit with equivalent thermal performance.

The issue with vapor barriers in a northern climate is we have both very cold winters and increasing hot and humid summers. That means the optimum vapor barrier location for winter on the interior wall is completely wrong for the optimum location for hot and humid summers on the outside of the home. Of late the theory is put the vapor barrier inside the wall with enough insulation covering it from the outdoors that the vapor barrier is never below 32 F so any vapor in the wall remains vapor, not moisture that will form mold. That ends up looking like a couple of inches of open cell foam on the outside of a framed wall with an air and water (but not vapor) barrier on the exterior of the foam with the siding spaced out from the foam with vertical spacers with each space vented top and bottom. I see zip system offers sheathing with integrated foam but if its faced inwards it does have potential for cold mold spots where the nails are driven into the framing. Ideally it should be installed backwards with the foam facing out. The problem is that is not a structural joint and racking may occur. Thus the approach of using regular zip board and zip tape, then running a blower door test to prove the air barrier integrity then driving new holes in it along the framing lines to hold exterior foam or the new wood based insulation board they are making in Maine.

Note I had been looking at staggered double 2by 4 wall but that the need to put foam on the outside to deal with the vapor barrier issue ruins the economics.
 

Attachments

  • BT_north wall.jpg
    BT_north wall.jpg
    102.1 KB · Views: 0
  • LR minisplit and corners.jpg
    LR minisplit and corners.jpg
    119.7 KB · Views: 0
Last edited:
Maybe I'm too old school, but I don't buy it. I'd rather have a solid structure that will still be standing in a 100 years. A single layer of plywood in a header spanning the weight of snow load over a window with only one top plate? No jack studs under the header for actual support? how long are the windows and doors going to function properly?

I do agree that insulation and thermal efficiency are focal points to modern building, but they should not come at a sacrifice of structural intergrity, which is exactly what my eye sees in the article.
 
Back
Top