diy solar

diy solar

New no battery pure sine wave solar power system with smart switchers.

Picture: I have this working with two LEDs, the rail road flash is way too slow, timer needs big adjustments.

Slow progress, have to pull a 24VDC input to a 30amp MPPT charge controller on the older system and upgrade the feed to 180VDC also add a 5 amp fuse.

One way or another I will win this.😀
 

Attachments

  • 20240412_085024~2.jpg
    20240412_085024~2.jpg
    125.2 KB · Views: 4
New 180VDC feed is complete to the inverter cabinet with a new glass 5amp fuse for protection, 5+5+5 = 15Amp for the mini-split, will continue working on the 60Hz timer for the two FET inverter.

Slow progress but getting close on all fronts to the finish line, sun is shining but not ready with the inverter for testing, Project system has run great again on this blue sky day💚

More soon
 
555timer is working with a new capacitor at around 60Hz with a 4Hz drift, square wave is ugly compared to the simple 555 configuration I was using.

Going to work at least another day on a better 60Hz signal, although I like the alternating LEDs they are currently too bright for the optic couplers.

Getting close , More soon 😀
 
Made a decision but it will not be the easiest on me, The simple 555 configuration provides the absolute best square wave and 60Hz square wave, can directly drive one channel of the inverter, Tomorrow I will begin working on a transistor circuit to drive a second inverted channel.

Trash square wave VS almost perfect.
5Hz frequency drift VS 2Hz drift.
Starts with a limp VS clean start every time.

Third 180VDC 5amp solar feed is now pushing loads on the Project system (4) FETs 40N65 MOSFETs inverter 💚

You see the direction I am heading in, once I figure out just a few more bugs this thing is gonna fly.

Picture: All three solar arrays working this morning on the Project system.
.

More soon 😀
 

Attachments

  • 20240414_094848~2.jpg
    20240414_094848~2.jpg
    208.8 KB · Views: 3
Last edited:
Small step forward harvested NPN transistors from junk boards, added leads and tested.

Now have a LED that triggers full brightness with 1meg ohm resistor to the transistor base from +side 9volt battery, added a 330K resistor and the LED output drops to a minimum ❤️

Just baby steps but making forward progress, next step make the simple 555timer drive the transistor circuit I just built. After that phasing on the oscilloscope testing.

More soon
 
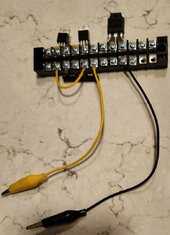
Built a simple but rare signal inverter, Guess what It works perfectly Transistor shorts out resistive circuit turning off the LEDs power, Stereo square wave output, Looking at FET trigger signals on the oscilloscope, already driving a set of LEDs like the optic couplers.
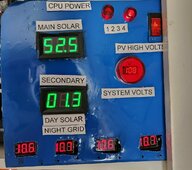
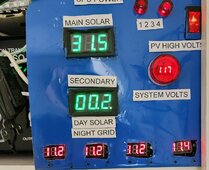
Definitely going to be one of a kind inverter, Just need to bring it all together for one more solar test, Smooth operation at dual 140VDC, Reaching a little higher next time testing with dual 180VDC looking for more inverter amps output.
Glad I already know how to set the FETs also have got lucky twice with manual live adjustment of the optic couplers brightness, let's just call it sweet spots or running real smooth.

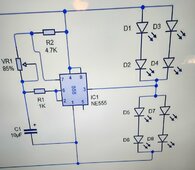
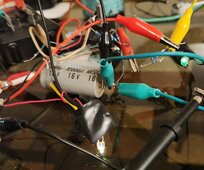
The 555 timer and transistor signal inverter pulls less than 100 miliampers from the floating 12VDC power supply that is capable of 150 miliampers.

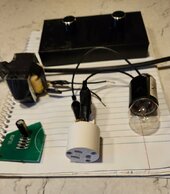
Second Picture: White and Green LEDs are dim on purpose, transmitting 58Hz stereo signals.

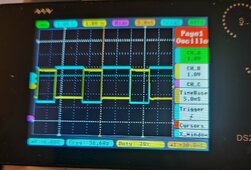
Solid step forward, need to power down the transistor circuit if the 555 timer goes off for any reason. Better than expected results square wave output looks nice on the oscilloscope.😀

Need good brightness control for both channels. Excellent results in pretesting, so very close now.😍
 

Attachments

  • 20240414_203046~2.jpg
    20240414_203046~2.jpg
    236.8 KB · Views: 6
  • 20240414_212339~2.jpg
    20240414_212339~2.jpg
    208.6 KB · Views: 7
Last edited:
555 Timer has been installed in the two FET inverter, yet to get basic gate control and P channel FET may need replacing.

May change to a terminal strip for FET mounting and quick FET change out in the future.

Must get all my ducks in a row with bench testing before I get anywhere near dual 180VDC solar, sorry for the delay, testing new P Mosfets, Correct LED control is a must, probably damaged P FET by manual over adjustment during last 180 volt test.

To save money may double (parallel) two P channel Mosfets until I have better gate control, have individually seen all the various sections preform well, refuse to stop till I have a portable inverter that works in the dual input140 volt to 180 volt range, output 120VAC 60Hz with LC pure sine output circuit.

More soon 😀
 
Last edited:
Current status have picked up a new bias to the P channel FET from the floating 12VDC power supply, must move 555 timer to battery or transformer (ISO) 12VDC power supply for the timer to correct this, much like the project power system 16VAC doorbell transformer for the CPU the timer will need to be isolated from the units internal power.

The P channel FET started working properly once I removed from the inverter, Good news is between the optic couplers and isolated power supply this should work good.

Removed floating 12VDC power supply, have FETs properly operating off the optic couplers, gathered parts for transformer based 12VDC power supply.

Work in progress on the various changes.

Expecting big progress forward today,

Picture experiment: Mounting FETs to a terminal strip and parallel two P channel Mosfets.

More later today😀
 

Attachments

  • 20240416_045039~2.jpg
    20240416_045039~2.jpg
    111.8 KB · Views: 1
Last edited:
As of right now both channels test OK for high voltage control and main output.

Timer is powered by transformer just below 5VDC also tested with 9VDC battery, Main 555 timer output can drive either channel correctly but my inverted signal although I can see it on a LED or scope up to now it fails to trigger the independent optic coupler. Strange!

Just a matter of time to figure out why, beyond Strange can 3 VDC battery power the optic coupler LED and it turns the FET on.

I will keep at it, forward progress by inches, right next to the finish line 😀

More soon
 
Stereo output, changed a resistor in the inverted timer output for more power, It really works! Must be a minimum voltage to activate the optic coupler.

Will work to set each output at the exact right level for 180VDC in 120VAC output.

Will work tomorrow to round out the spikes, although difficult to test properly putting an output isolation transformer in line should fix most of this, fine tuning the frequency to 60Hz will also help.

Will also test diodes and capacitors for any improvement in the top/bottom of the wave.

Working P and N in sync two FET inverter with on board 555 timer. (Home Run!)

Starting new drawings and detailed parts list hope to get it right the first time around, not complex at all with cheat sheet on setting the optic couplers and the correct potentiometers for the adjustments, once I can repeat the build work will start on the PCB for a kit.

Second Picture: before (grid 60Hz signal) after lots more energy in the new 555 timer square wave output.

Notice the same voltage setting and the after signal fills the screen top to bottom more also wave form is more consistent.

Thank you MIL 😊
 

Attachments

  • 20240416_170335~2.jpg
    20240416_170335~2.jpg
    296.9 KB · Views: 2
  • 20240406_181149~2.jpg
    20240406_181149~2.jpg
    287.5 KB · Views: 2
Last edited:
Ready for solar testing on the two FET inverter except the optic couplers settings are too touchy right now for live 180VDC test, the potentiometers are operating near one end and have yet to find the correct resistor or combination of resistors to steady this important optic coupler setting.

Right now the slightest touch or bump causes wide swings in the output, will work today to make it stable with set resistor values.

Still working several issues, Like 9 volt battery runs more stable than the grid powered 5VDC power supply I assembled , Haven't properly tested grid powered 12VDC power supply.

When one thing changes all the adjustments need changing, Something I should have done, order good quality five 25K potentiometers and five 50K potentiometers.

Time spent getting this part right will add power and stability to the inverters long term operation.

Parts ordered.

More soon 😀
 
Last edited:
With some tedious testing with a digital ohm meter the optic couplers/potentiometers gave me the magic resistive numbers I needed on the P channel it is 20.7 K ohms and the N channel 37.2K ohms, I used the two potentiometers I have to bridge one of the resistors in the string for each channel as a fine tune adjustment.

At this moment I have the most stable FET drive and output voltage control to date, Potentiometers have been ordered 25K and 50K to make this easier in the future.

Would like to try other power sources for the 555 timer DC power supply,

More soon, need a blue sky day 💚
 
New scope data 😎 
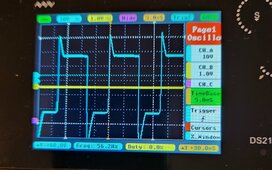
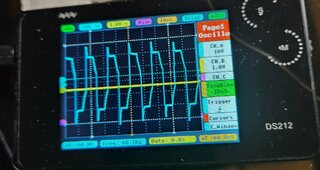
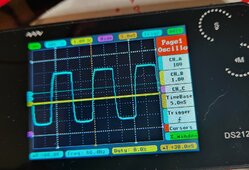
So far only thing that has changed is the way I am driving the optic couplers, Looking more like a sinewave ❤️

Best so far with internal 555 60Hz driver on two FET inverter. Small adjustment to lock on 60Hz.

I now know the top and bottom spike is a sign the optic coupler/FETs are being over driven.

More tomorrow.
 

Attachments

  • 20240417_205751~2.jpg
    20240417_205751~2.jpg
    296.9 KB · Views: 2
Last edited:
Today's testing ended early due to unstable operation at dual 180VDC and FET trigger problem, must allow parts ordered to arrive to reconfigure and try again.

Working on diagrams and parts list but until the unit runs stable nothing will be released at this time.

Best so far was 520 watts 120VAC 60Hz Inverter output with dual 140VDC input from the solar panels.

Thinking about a major changes with the big two FET inverter, Terminal strips in the Mosfet area and FET trigger signal circuit area, Speedy FET replacement and no solder part changes just until I get past the prototype phase.

Making progress on restoring the Inverter from this mornings test, P channel FET failed (second $20 P FET shorted source to drain) New P channel parts have passed initial low voltage testing, suspect the NPN transistor failed and the inverter lost sync and cause P channel fault, suspect a voltage bias in the NPN transistor signal circuit.

More later
 
Last edited:
15 Amp Project system is running the mini-split smoothly today.💚
73 degrees Fahrenheit inside 89 degrees Fahrenheit outside 3:15 PM est.

Solar day started at 9:30 AM and ends 5:30 PM that's 8 hours of solar air conditioning and a whole lot more.

Easy circuit diagram on the two FET inverter and have already proven it is all about how you drive the optic couplers.

Nice fun experiment, with a transformer this could work 12VDC and up for the DC input voltage,

Picture of running mini split and more.

More later
 

Attachments

  • 20240418_152846~2.jpg
    20240418_152846~2.jpg
    230.1 KB · Views: 1
Last edited:
Have replaced both FETs with new parts (P FET shorted) Flyback diode for N channel failed shorted (Not sure if to replace or omit both FB diodes)

Have restored basic operation on the two FET inverter, Nothing wrong with the NPN signal circuit. Seriously considering putting the dual inputs back to 140VDC to get back what I had working before, have lots of new parts so one more attempt at dual 180VDC after the potentiometers arrive and installed.

Best wishes, More soon 😀
 
Things I am working on the left 11.6 VDC grid powered transformer with diode bridge + capacitor for the 555 timer operation.

Box with dual potentiometer controls will provide exact opto coupler control and timer start.

Looks messy due to thermal paste but FETs now are mounted to a terminal strip using dual parallel FETs for P channel to save money.

Adding a 120VAC plug outlet to the two FET inverter.

Temporarily removed Flyback diodes. Aiming for maximum resistive loads 💚

More soon
 

Attachments

  • 20240419_184431~2.jpg
    20240419_184431~2.jpg
    113.5 KB · Views: 4
  • 20240419_183548~2.jpg
    20240419_183548~2.jpg
    469.6 KB · Views: 3
Last edited:
Error in connecting the wires to the new 50K potentiometers caused a fault, All I am sure of is one 12 volt zener diodes is toast (smelled it go bad) the 555timer still runs but both channels are not responding.

My plan is to go back to 9VDC testing and replace parts and research what I did wrong, also detailed drawings of the FETs, Both power supplies 12VDC, optical couplers and timer module.

Had scope and meters active during the mishap and maybe learned something, my mistake was on the P channel swapping the 60Hz reversed timer signal for one that was always on, 😳 
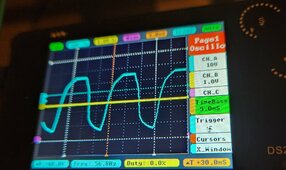
once I turned up the N channel it was a short.

Going to turn this setback into a forward step, the 50K potentiometers are going to help alot, testing on the N channel before the P channel faulted looked excellent on the oscilloscope.

More soon
 
Progress report: Restored 2 FET inverter operation and it passed the triple 9 volt testing one for the 555 timer.

Went up to dual 21VDC test and lost the N channel output, taking a break right now, have a cup full of good used N channel Mosfets bet I win this, unit is trying to tell me something ( One of your test batteries needs recharging!) but yet to figure it out, probably over driving the FETs and need to limit the high end, opto couplers are tough the actual FET gates seem not so much. More testing ahead.

Carnage from last fault: one P channel FET shorted source to drain, N channel not responding to gate signal, replaced both 12 VDC power supplies with new 2 zener diodes, removed unnecessary strings of resistors in favor of new potentiometers. Cleaning up and soldering more connections.

Running again in the 21VDC test, more bottom half adjustments needed before higher voltage.

Picture better wave for more amps and 60Hz signal. 4PM Dual 21VDC testing.

Going to put one of these nice potentiometer controls in charge of fine tuning the 60Hz signal next,Success 😀

On the previous 21VDC test the N channel battery lost output and is being recharged Whew!

More soon 😀
 

Attachments

  • 20240421_161149~2.jpg
    20240421_161149~2.jpg
    255.7 KB · Views: 1
Last edited:
Back
Top