diy solar

diy solar

New no battery pure sine wave solar power system with smart switchers.

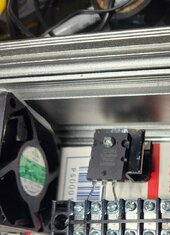
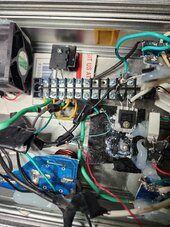
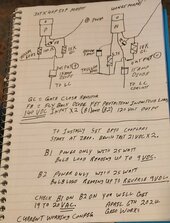
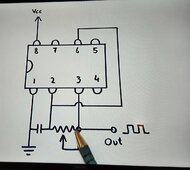
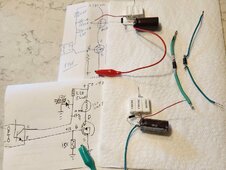
Moved 555 timer to the other end of the inverter, about 6 alligator clip jumpers no longer needed, short direct solder connections to the timer and opto couples/potentiometers.😀

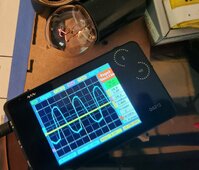
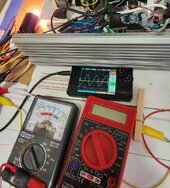
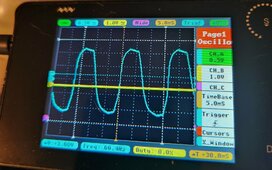
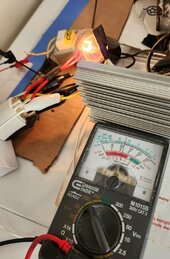
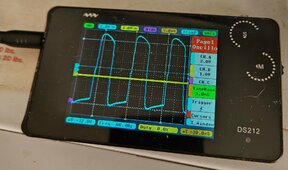
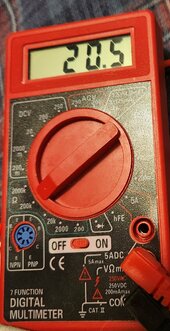
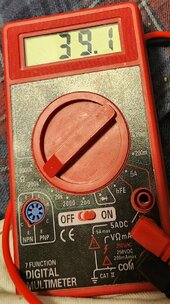
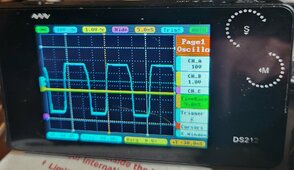
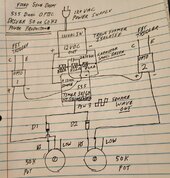
12VDC power supply for 555 timer 60Hz signal works perfect except P channel stopped working after the voltage went from 9 to12VDC , see a small signal but something is missing. Power supply from good used parts, Transformer 120VAC to 11.4VAC, Four 5amp diodes, Filter capacitor, and ceramic load resistor. Nice 12VDC power supply zero cost.

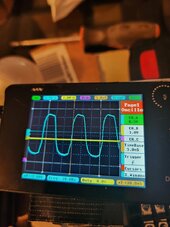
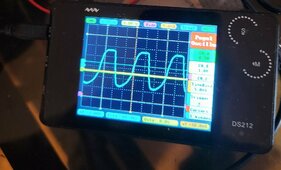
Potentiometer for 60Hz adjustment is working nice, All the new potentiometers perform well.

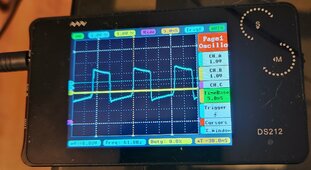
More adjustments needed for the NPN transistor circuit for inverse square wave.

Doing everything I can to make the next dual 180VDC solar test a success, If it doesn't work next step is dual 140VDC solar input and After it works again I will back fill with additional solar panels for more amps.if needed.

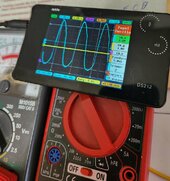
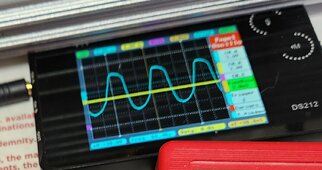
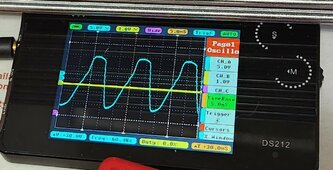
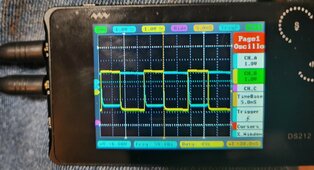
Need another day, several solid steps forward today, Collecting good data on driving the FETs, any spikes on the oscilloscope means you are overdriveing something. Closing in on the exact settings for the optic couplers also FETs big amps of energy in the current wave form can't wait to see it run.

More soon 😀
 
Last edited:
Spent the entire day rebuilding the NPN transistor circuit, New resistors connections, worked perfectly in my lap with LED in place of the optic coupler with the 12VDC power supply that I built, Once I installed the circuit in the inverter it worked like the previous one with only a trickle of output,

This is what I think is going on NPN transistor circuit needs it's own power supply (Cannot share the timer 12VDC power) a bias resistor on negative to make the base/gate function properly, going to test with a 9 volt battery and see what happens.

How it functioned at 9VDC but won't run at 12VDC is cooking my brain.

More soon, testing continues
 
Busy recently with yard work and gardening, still fighting P channel triggering from the 555 timer, Going to have to get creative with the solution.

Today's brain storm is to use three resistors like the 555timer does accross the 12VDC +/- to give a range of outputs, all I need is enough juice to flicker two LEDs dimly, I can drive either channel correctly but both at the same time and all hell breaks loose, bias from + to minus accross the diodes and LEDs, both LEDs go bright and have no signal just on all the time.

One way or another going to solve the problem with the 555timer, when it drives either channel N or P solo the single output is perfect.

Second blue sky day in a row project system rocks 😀, discovered just today the voltage controlled relays can also detect a system over voltage and in my case override the 9AM to 5:30PM clock either starting the solar day early or run later if conditions allow.

1st VCR dumps all extra loads to off or grid if system voltage drops below 98VAC, system will not reset till system voltage reaches 115VAC (Genius!)

2nd VCR Inverter output Main,
98 VAC off 115 VAC on.

3rd VCR Two wire Inverter output secondary 98 VAC off 115VAC on.

4th VCR high voltage timer override, 122 VAC on 101 VAC off.

Going to put high system voltage timer override on the forth voltage controlled relay, accross the bottom of the blue display. This will work well with my multi level solar panels also going to experiment with vertical panels less maintenance,better power curve, lower risk of hail damage. Told you I would find a good use for the forth relay.

More soon
 
Last edited:
The triple 820 ohm resistors accross the 12VDC power supply is working great to provide the second feed to each optic coupler LED. Finally figured it out and did not need the NPN transistor after all.

Will take a little time to solder install and ready for the dual 180VDC test.

Very excited expect this thing to fly real soon. Scope data and brightness control working good may need a couple more resistors to bring the brightness down another notch.

Picture diagram of corrected simple configuration 555 timer optic coupler drivers 60Hz or 50Hz signal for power production 💚

Second Picture: Dual output from new FET triggers, Looking good 😀

Third photo FETs stereo output looking good from the new optic coupler 555 driver. Success ❤️ not sure if it will work at 180VDC but already know it runs at dual 140VDC.

Bet within a week this two FET Inverter will provide solid day time power 120VAC clean 60Hz, Bet within two weeks you will have a complete parts list and circuit diagram.

Around $100 in parts, Not digital but two optic couplers, P channel Mosfet, N channel Mosfet,several diodes,resistors,several capacitors, 555timer, transformer, choke and fuses.

As far as inverters go this one has a very simple design and was built from the ground up to perform, still very early in development but several individual test say this is a good one.

Thanks everybody

Best wishes

More soon
 

Attachments

  • 20240423_164553~2.jpg
    20240423_164553~2.jpg
    144.8 KB · Views: 6
  • 20240423_162221~2.jpg
    20240423_162221~2.jpg
    313.9 KB · Views: 3
  • 20240423_195127~2.jpg
    20240423_195127~2.jpg
    312.2 KB · Views: 3
Last edited:
So much for saving money on the P channel FETs the new FETs are leaking big time at 180VDC supposed to be rated for 200 volts, swapped out for new and it did it a second time. Crap.

Delay while I order P channel Mosfets, Ordered four 500 volt IXTK40P50P Mosfets, On the way 😀

Have seen this part work before just need it to work again,

More later

Although the gates are leaking on the P FETs 180VDC unit still is working after the fact nicely at lower bench testing voltages. (Have seen this gate leak before in previous testing).

Have replaced the feedback protection diodes on the P and N MOSFETs with more powerful 10amp 200+volt rated diodes. During testing today unit proved it needs protection from inductive loads, tiny transformer touching inverter output caused one of the new weak P FETs to short source to drain, replaced and it went right back to leaking again.

Although the early morning sky condition was heavy overcast, Some meaningful testing occurred this morning, Looking for steady operation no matter the output voltage in the 180VDC testing, results of this test will point the direction for input voltage, target has been to open/round the wave for more amps output. Important no spikes when adjusting wave intensity and looking at the oscilloscope start low and increase until you see a spike then pull back some with dual 140VDC solar input to the two FET inverter you will get useful 60Hz 120VAC output power.

Have been unable to do a full sun test at 180VDC on the newest Inverter, Right now waiting on parts order for P channel Mosfets.

More soon
 
Last edited:
All new diagrams once I get it fully functional for now these are the best for getting it done.

Read from page 39 on for ongoing improvements and important tips.

Next to last picture is an example of the 12VDC/12volt Zener diode floating power supply used for gate power N channel, P channel exactly the same but flipped for polarity, Proven working example of optical FET trigger upto 180VDC.

Last picture: top left example of P channel 12VDC floating power supply, gate close resistor 15K, 6.6 K resistor is 5watt ceramic block.

Just noticed the views on the pictures top section of last photo is important P channel 12VDC floating power supply.

Best wishes

Last picture diagram Fixed morphing sinewave 😍
 

Attachments

  • 20240406_192747~2.jpg
    20240406_192747~2.jpg
    157.3 KB · Views: 14
  • 20240408_195828~2.jpg
    20240408_195828~2.jpg
    127.7 KB · Views: 10
  • 20240423_164553~2.jpg
    20240423_164553~2.jpg
    144.8 KB · Views: 12
  • 20240227_230049~2(1).jpg
    20240227_230049~2(1).jpg
    183.5 KB · Views: 11
  • 20240316_043317~3.jpg
    20240316_043317~3.jpg
    104.9 KB · Views: 12
  • 20240327_150939~4.jpg
    20240327_150939~4.jpg
    265.8 KB · Views: 1
  • 20240430_150845~2.jpg
    20240430_150845~2.jpg
    200.9 KB · Views: 1
Last edited:
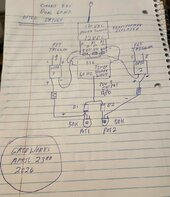
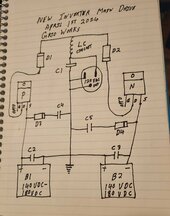
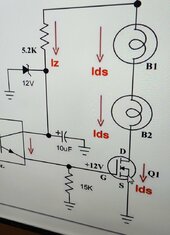
⚠️ Caution connect earth ground that appears between B1 and B2 at your own risk, not tested yet and on the surface looks electrically sound and really hope it works But.

Learned from the Project power system that earth ground hums loudly from grid power usage, this 60Hz hum interferes with the inverters timing signal and directly shorts out the FETs.

Love the two FET inverter but see no reason it should be immune to the earth ground 60Hz signal, After I get this working to my standards the second test inverter will be sacrificed in the earth ground test. Proper earth ground and netural can be added back using an ISO transformer.😎

Bench testing say once the P channel FET is upgraded I am go for the full voltage dual 180VDC testing 😀

Best wishes
 
Last edited:
Tomorrow morning will start 180VDC dual testing on the two FET inverter, P channel Mosfets have arrived, have smooth operation on the optic couplers 50K potentiometers and the best raw FET output to date on the scope 😀, current cycle drift is between 59.5Hz and 60.4Hz.

Hopefully all will go smooth, with my transformer back for the oscilloscope will be able to watch live and record data.

Just figured out in the past three days how to do no spikes output from the optic couplers and FETs hoping for a big payoff in Inverter output and reliability.

Best wishes
 

Attachments

  • 20240427_134932~2.jpg
    20240427_134932~2.jpg
    218.6 KB · Views: 9
  • 20240427_135327~2.jpg
    20240427_135327~2.jpg
    168.2 KB · Views: 8
  • 20240427_135346.jpg
    20240427_135346.jpg
    238.9 KB · Views: 8
Last edited:
Good morning ready for the dual 180VDC testing 6AM, solar day starts around 9AM.

First picture two FET inverter ready for action/sunrise, Third Picture the test loads.

Love the sine wave I am getting on the oscilloscope ❤️

Optic couplers are touchy at 180VDC, but live adjustment has netted me a sweet spot again 💚

130 VAC 60.4 Hz Nice sine wave, Bet when I turn a heater on the voltage drops.

Just waiting on full sun conditions now to complete testing.

7:30AM already running two lamps and the fan motor on the heater, so far so good 😀

More soon

Including a previous 140VDC test of the quartz tube heater working during 180VDC test I missed the opportunity for a similar picture, With continued testing I hope to double the output.💚
 

Attachments

  • 20240428_061222~2.jpg
    20240428_061222~2.jpg
    313.1 KB · Views: 1
  • 20240428_071648~2.jpg
    20240428_071648~2.jpg
    177.8 KB · Views: 11
  • 20240428_072220~2.jpg
    20240428_072220~2.jpg
    293.2 KB · Views: 1
  • 20240428_080853~2.jpg
    20240428_080853~2.jpg
    254.9 KB · Views: 1
  • 20240407_091610.jpg
    20240407_091610.jpg
    152 KB · Views: 2
Last edited:
Final results on 180VDC two FET inverter testing.

The inverter operates more stable at dual 140VDC, Needs improvement in the opto coupler/FET drive circuit very touchy at 180VDC.

At 140VDC dual input the inverter runs smooth at 120VAC output, 550 watts.

Live adjustments of both optic couplers reveals sweet spots in the operation.

At 180VDC dual input the inverter ran best at 150VAC output ⚠️, This test ended the only way it could at 700 watts heater load both P and N channel MOSFETs shorted source to drain.

Happy with the results better than expected sinewave output and pushing wound motors smoothly.

Driver circuits need improvement, Not bad for a prototype.

Best wishes, More later
💚
 
Two FET inverter has been restored to normal operation, in a few days I will test again at 140VDC.

Plenty of adjustments to work on before next solar testing, All in all amazing.

Still some mystery surrounding the Mosfets optic drivers but making forward progress daily on this front.
Both examples below, Currently fades between sine and forward saw tooth wave I have no explanation of why it does this right now. Picture examples.

Good for lighting,small wound motors, low power electronics, If I can get the amps up a bit more quartz tube heater.
Mini-split needs around 900watts.

More later 😀
 

Attachments

  • 20240428_080740~2.jpg
    20240428_080740~2.jpg
    316.7 KB · Views: 1
  • 20240428_080853~3.jpg
    20240428_080853~3.jpg
    202.3 KB · Views: 2
Last edited:
Today it's a blue sky day, All three solar arrays running the mini split and more💚

Going to spend some time in making the optic coupler driver smooth as silk.😀

More later, additional information in previous post.

Ask questions need exact part numbers?, photos/testing, also If you have information for me about optic coupler and anything that could improve the two FET inverter design would be welcome.
 
Last edited:
Last night did the math on resistors and found out the 50K potentiometers are more than what is needed to cover the optic coupler LED brightness for the inputs, From zero to you really should not go that high! adjustments availability. No extra resistors needed to drive the optic couplers. If you need high end protection a 800 ohm resistor for each optical coupler is recommended.

Have removed strings of resistors and 8 alligator clip jumpers also soldered all connections at minimum distances.

More soon,

The dual 555 optic coupler 50Hz/ 60Hz driver could be used for all sorts of green power applications 💚 More than enough output to drive multiple sets of optic couplers/MOSFETs for big in sync power production.

Much improved optic drivers but still see the ever morphing sinewave, Still all in all not bad, Not stopping now😀
 

Attachments

  • 20240430_124126~2.jpg
    20240430_124126~2.jpg
    298.1 KB · Views: 2
Last edited:
WOW Fixed it 😍

Runs stable pure sine on the two FETinverter, little capacitor across the center of the three 820 ohm resistors that bridge across the 12VDC power supply. 2A154k small green ceramic capacitor.

This is a big big step forward, Now seriously wondering if it can drive the project power board with the four 40N65 MOSFETs??

More soon 😀
 

Attachments

  • 20240430_150845~2.jpg
    20240430_150845~2.jpg
    200.9 KB · Views: 2
  • 20240430_144301~2.jpg
    20240430_144301~2.jpg
    81.2 KB · Views: 2
Last edited:
Starting the preparations for another two FET inverter test.

Featuring : Dual 140VDC solar input, much better optic coupler/FET drivers, ISO output transformer testing and more.

Will be nessassary to take down the project power system briefly to test the ISO transformer.

One solar array is easy to go from 180 to 140VDC the other requires climbing up on the 22 degree tilted metal roof.

More soon

During 180VDC testing the inverter voltage control could not get the inverter output much below 150VAC, thinking right now 160VDC may be the magic boost, tomorrow aiming for 140VDC and working FETs at the end of the day.

Just dawned on me 160VDC is easily available and has not been tested yet.😀
 
Last edited:
Just completed 140VDC dual solar testing on the new two FET inverter survived it all.

Mixed results from testing:

Ran level 1 quartz tube heater and fan for more than an hour 550watts and two light bulbs 25 watt standard bulb and 60 watt equivalent LED bulb. Inverter ran smoothly once full sun was achieved and final under load adjustments were made with the optocoupler adjustments, any adjustments that lowers inverter output/voltage even the slightest is the wrong direction. See exception to this rule coming if you are looking for a better sine wave to run transformers.
😀

Running the ISO transformers as much as I hate to say it is a fail at this point much too noisey operation, Adjustments will be required.

I was not testing for Maximum loading this time around wanted the Inverter to survive this testing, But from the voltage meters and experience in these matters I would say the inverter could push another 150 watts with out damaging anything.

In my book it's a keeper, Adjustments are touchy make small adjustments while watching scope,meter,bulbs look for sweet spot in the operation, unit will restart cleanly to the last settings.

Good quality 50K potentiometers are recommended. Small adjustments.

All pictures taken with full loads.

Not yet tested dual 160VDC input could/should provide more power output, 180VDC testing suggests 180 is too high. Rock solid results at dual 140VDC input.

Last picture scope FET output when returned to 21VDC bench testing after 140VDC full load test.

Best wishes
 

Attachments

  • 20240502_090926~2.jpg
    20240502_090926~2.jpg
    160.3 KB · Views: 3
  • 20240502_091047~2.jpg
    20240502_091047~2.jpg
    143.7 KB · Views: 5
  • 20240502_091622~2.jpg
    20240502_091622~2.jpg
    268.1 KB · Views: 1
  • 20240502_112356~2.jpg
    20240502_112356~2.jpg
    290.2 KB · Views: 1
Last edited:
Think I may have in the quest for the most power output from the two FET inverter got away from the best sinewave that the ISO transformer needs, more testing ahead.

Need the wave on the left to run a ISO transformer, the wave on the right is currently where the inverter is set for maximum output.

Has not been tested yet dual 160VDC best sinewave inverter output to ISO transformer and next logical step is dual 140VDC and best sinewave to transformer testing.

More soon

Better understanding every day 😀
 

Attachments

  • 20240430_124125.jpg
    20240430_124125.jpg
    131.4 KB · Views: 4
  • 20240502_112356~2.jpg
    20240502_112356~2.jpg
    290.2 KB · Views: 1
Last edited:
Going to bench test with battery power driving transformers and getting the best sine wave output possible, May end with another dual 140VDC input solar test to verify ISO transformer is operating properly.

Mosfets run cool inverter runs stable/smooth at dual 140VDC on the new two FET inverter 💚

More tomorrow
 
This picture is the stereo output of the ISO transformer 60Hz pure sine❤️, Hard to get output from the low end of the inverter just beyond the FETs start up.

More work to do with the adjustment controls to make this easier to work with and also need more dual 140VDC and 160VDC solar input testing.

This is good news and another step forward. Will take a couple days to maximize the transformer output and sine wave, Good news the inverter runs better when pushing the ISO transformer at this low setting. Fixed resistors may help with this once I discover the correct values.

More testing needed but big steps today towards making the new two FET inverter safe and productive.

More soon 😀
 

Attachments

  • 20240503_104835~2.jpg
    20240503_104835~2.jpg
    264.8 KB · Views: 1
Last edited:
With meticulous adjustment and testing of the 50K potentiometers, I have the magic resistive numbers for both channels to provide the best sinewave inverter output.

N channel 20.5 K ohms resistive.
P channel 39.1 K ohms resistive.

The pictures below is a recreation of the exact needed resistance with a 25K potentiometer and 50K potentiometer.

Made the 20.5 K ohms out of new set of resistors, 39.1 K ohms fixed resistors tomorrow.

It will be nice to eliminate the potentiometers when I get to the right place 😀

More soon

Big improvements just around the corner, Dual 160VDC input test coming after just one more 140VDC input test.
 

Attachments

  • 20240503_203609~2.jpg
    20240503_203609~2.jpg
    163.8 KB · Views: 3
  • 20240503_203718~2.jpg
    20240503_203718~2.jpg
    207.9 KB · Views: 3
Last edited:
Back
Top