You are using an out of date browser. It may not display this or other websites correctly.
You should upgrade or use an alternative browser.
You should upgrade or use an alternative browser.
Solar Panel System for Nest IQ Outdoor Camera
- Thread starter Mantonio
- Start date
Ampster
Renewable Energy Hobbyist
Just checking that you have WiFi within range of this installation?
Just checking that you have WiFi within range of this installation?
Yes wifi is within range.
Also found out from the manuals that the camera consumes about 10 watts of power.
15V is a difficult job...
A 12V panel under load will be around 18v... if you got a 25 watt panel, it could work, but it could also destroy the camera when conditions are favorable... I wouldn’t try, unless nest offers a solar option.
A 12V panel under load will be around 18v... if you got a 25 watt panel, it could work, but it could also destroy the camera when conditions are favorable... I wouldn’t try, unless nest offers a solar option.
I suppose a 3s LiPo pack could be set for 15V, with a boost converter... and supply dedicated current, but 180Wh each night... say 300ish Wh for covering odd charging weather...
svetz
Works in theory! Practice? That's something else
...the camera consumes about 10 watts of power....
Depends on where you live and the time of year. From this link (scroll down to the calculator), use the calculator to find the worst value for insolation (PVWatts or SAM will give you better numbers, but they're a lot more complicated to use).What type of system do I need to get to keep the camera running 24/7?
Let's say the smallest solar insolation is 4.
Power required: 24 hrs x 10 W = 240 Wh/d, 3 days reserve [optional]: 240 x 3 = 720 Wh.
At 12V, 720 Wh / 12 = 60 Ah battery.
240 Wh/d / 4 hrs (insolation) = 60 Watt, assume 20% power losses, so 75W solar panel. To catch up for lost power from cloudy days a 100W?
If the sun is shining, you don't really need to include the battery power for it during the day as the solar would supply it. So, if you want to be minimalist, assume the battery only needs to provide for "no solar power" hours... for example 16 hours of no solar would be 16 x 10 = 160 Wh/d, or at 12V you'd want ~13 Ah.
If you're going to use lead acid and want the batteries to last more than a few years, you only want a 50% depth of discharge, so double the amp hours. For lithium, go 80 or 90% (e.g., divide the amp hours by .8).
Setup your panels to charge a 12 or 24V battery bank with an SCC. Then use a buck/boost (depending if you went 12 or 24V) to convert to 15V or a 15V regulator. Supervstech's ideal of building your own battery is a good one too, but a bit more complicated.
If you live in a climate where temperatures are ever below 60°F (Lead acid), 0°C (Lithium) or greater than 100F, see the Battery FAQ as it'll affect your battery.
Also check the FAQs for a lot of example calculations.
Last edited:
15V is a difficult job...
A 12V panel under load will be around 18v... if you got a 25 watt panel, it could work, but it could also destroy the camera when conditions are favorable... I wouldn’t try, unless nest offers a solar option.
I was thinking getting a 100 watt panel off the bat. Conditions are not quite ideal since I live in Canada (Ontario).
Unfortunately Nest doesn't offer a solar panel solution. Even with other wireless cameras that offer a solar panel solution, they don't have good continuous recording software. Netgear Arlo has it but the software interface isn't as good as Nest.
Depends on where you live and the time of year. From this link (scroll down to the calculator), use the calculator to find the worst value for insolation (PVWatts or SAM will give you better numbers, but they're a lot more complicated to use).
Let's say the smallest solar insolation is 4.
Power required: 24 hrs x 10 W = 240 Wh/d, 3 days reserve [optional]: 240 x 3 = 720 Wh.
At 12V, 720 Wh / 12 = 60 Ah battery.
240 Wh/d / 4 hrs (insolation) = 60 Watt, assume 20% power losses, so 75W solar panel. To catch up for lost power from cloudy days a 100W?
Setup your panels to charge a 12 or 24V battery bank with an SCC. Then use a buck/boost (depending if you went 12 or 24V) to convert to 15V or a 15V regulator. Supervstech's ideal of building your own battery is a good one too, but a bit more complicated.
If you live in a climate where temperatures are ever below 60°F (Lead acid), 0°C (Lithium) or greater than 100F, see the Battery FAQ as it'll affect your battery.
Also check the FAQs for a lot of example calculations.
I live in North York, Ontario Canada. The lowest insolation value is 1.21. So using the formula you supplied:
240 Wh/d / 1.21 hrs (insolation) = 200W
Temp here definitely falls below 0C. Based on the faq you shouldn't be charging Lithium under that temp. What's the next best option, AGM?
svetz
Works in theory! Practice? That's something else
Best bet is probably to bury the battery to keep it from getting to cold (LiFePO4 can be irreversibly damaged if trying to charge below 0° C, or get an LiFePO4 with a low temp cutoff)....I live in Canada...
Yes, if there's no other way to keep it warm.What's the next best option, AGM?
Depends on where you live and the time of year. From this link (scroll down to the calculator), use the calculator to find the worst value for insolation (PVWatts or SAM will give you better numbers, but they're a lot more complicated to use).
Setup your panels to charge a 12 or 24V battery bank with an SCC. Then use a buck/boost (depending if you went 12 or 24V) to convert to 15V or a 15V regulator. Supervstech's ideal of building your own battery is a good one too, but a bit more complicated.
Also check the FAQs for a lot of example calculations.
Can I use an inverter instead?
svetz
Works in theory! Practice? That's something else
Don't forget to add in the losses from the SCC. I used 20% losses, but actual values range widely.... insolation value is 1.21.
240 Wh/d / 1.21 hrs (insolation) = 200W
Sure can! Don't forget to add power in for the inverter efficiency losses.Can I use an inverter instead?
Will it work with a modified sine wave? Do you by chance have a dead jump-starter? If so, these threads might interest you:What's the next best option, AGM?
Even if you don't have a dead one, might be an inexpensive way to get you what you need like this $18 inverter.
Last edited:
Ampster
Renewable Energy Hobbyist
I think the simplest solution would be a small 120 volt inverter based system.Yes wifi is within range.
Also found out from the manuals that the camera consumes about 10 watts of power.
ghostwriter66
"Here - Hold my Beer"
With the temps .. I get 2 x 12 AGM battery and a 24V solar panel (2x12) and a buck converter (24 to 15) ....
Don't forget to add in the losses from the SCC. I used 20% losses, but actual values range widely.
Sure can! Don't forget to add power in for the inverter efficiency losses.
Will it work with a modified sine wave? Do you by chance have a dead jump-starter? If so, these threads might interest you:
Even if you don't have a dead one, might be an inexpensive way to get you what you need like this $18 inverter.
I do have a dead one! Very interesting thank you for the link.
One thing that I need clarification though is cleaner way to connect the solar panels to the jump starter. Is there a guide you can refer me to that uses a standard plug instead of the alligator clips for the connection?
With the temps .. I get 2 x 12 AGM battery and a 24V solar panel (2x12) and a buck converter (24 to 15) ....
I think I'll just keep the system indoors during winters.
svetz
Works in theory! Practice? That's something else
If you don't want to use the alligator clips, anything directly connected to the battery would do....One thing that I need clarification though is cleaner way to connect the solar panels to the jump starter. Is there a guide you can refer me to that uses a standard plug instead of the alligator clips for the connection?
For example, if it has a non-regulated 12V cigarette lighter (e.g., direct battery connection, usually only fancy ones have a regulated output), you could plug the SCC output into there.
After that it depends on what sort of connectors are available on the jump-start. Anything 12V connected to the battery would work.
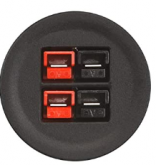
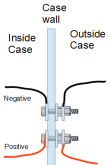
| Worse case, cut through the case and add your favorite style of connector (e.g., an Anderson). | Or, just two small machine screws if there isn't much room inside: The washers on both sides of the case add strength to the "connector", inside nut holds the screw and battery connector (ring terminal) in place, outside nut holds the ring terminal from the SCC securely. Might want to use red nail polish on the positive nut. |
You can put the fuse inside or out if your SCC needs one.
Last edited:
Please post pictures of your solution, can't wait to see what you come up with!
Will do! Thanks for all the help gents.
Similar threads
- Replies
- 3
- Views
- 126
- Replies
- 4
- Views
- 263
- Replies
- 2
- Views
- 255


