diy solar

diy solar

Small $100 "gateway drug" Hobby solar system

45North

Let it shine!
Joined
Jan 2, 2020
Messages
982
Location
Canada
I needed an excuse to get started so, not having a man cave shed, I thought I'd start with the existing 110vac Christmas lights on the shrub in the backyard! And then I'll look at some of those 12v garden spotlights in the spring.

So far I have these parts:
  • 25W PV panel
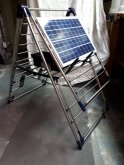
  • panel to be mounted on my wife's portable metal clothes drying rack (OK for now but she may want it back in the spring!)
  • 10W PWM charge controller
  • 12V 7Ah SLA battery
  • 150 W inverter (awaiting delivery with "cigar lighter" adapter)
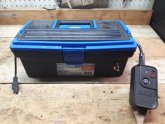
  • to be housed in an existing small plastic tool box (if it fits)
  • Kill-a-watt clone wattmeter to monitor watts used
  • sunset switch to control lights
So far, so good. I have it in the basement now - testing under the flourescent lights in my workshop. Looking forward to seeing how this particular set of devices play together.

All I need now is some sun! 20200104_200349.jpg
 

Attachments

  • 20200104_200814.jpg
    20200104_200814.jpg
    81.9 KB · Views: 86
Poor Man's Solar Battery Box

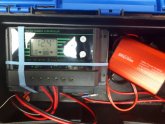
OK, so tonight I wired up my hobby box in the basement and tested it.
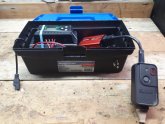
  • Input is from Solar Panel on SAE plug on left of box. Powered indoors by overhead florescent work lights.
  • Output is 110vac from small inverter to outdoor photocell switch to control and time power to the yard lights. This is necessary because the Inverter is connected directly to the battery (as recommended) rather than from the Output Load side of the SCC which supports several overnight timing scenarios but only for 12v loads. (I have purchased a couple of 12v 5A spotlights and these may be installed in garden in the spring when I take down the Christmas lights)
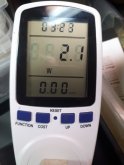
  • Test load: For indoor test purposes, Inverter is powering a small test device (electric clock) Draw is 2.1W as shown on the kill-a-watt type meter.
Other Notes:
  • Added a toggle switch to + terminal of battery to turn overall system on and off. Must remember to cover Panel sometimes to ensure proper sequence of connection; Battery is First On, Last Off.
  • Used these lever-type connectors. Aren't they cute!! I've never seen them before. They're used in Europe a lot, apparently, but fairly new in N America. Super easy to use. I just hope they stand up OK Some of them will be outside the box, but still under a plastic sheet so we'll see how that goes.
  • Whole system is very low voltage so I didn't bother with fuses or grounding
Forecast is for rain all weekend so don't think I'll deploy it to the yard just yet. Besides, I'm having too much fun playing with it in the basement!

20200109_210911.jpg20200109_211625.jpg20200109_211638.jpg20200109_210842.jpg20200109_210842.jpg
 
Last edited:
Tool Box DIY All-in-one Solar for $100
20200112_214216.jpg

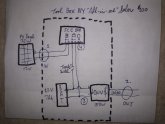
Here is the schematic for my small hobby system in a Toolbox

Inputs and Outputs
  1. SAE plug Input for 25W Panel (upgrade of previous 2.5W automotive battery maintainer panel)
  2. 110VAC Inverter output to load
  3. 12VDC female cigarette lighter plug - currently used by male Inverter input plug
  4. 12VDC Output screw ports on SCC for future loads (SCC has overnight timing options built-in)
  5. other 5VDC USB outputs (not labelled on diagram) 2 on SCC plus 2 on Inverter
This system would obviously not provide full power to an RV, but it does contain all the basic elements for someone who wants to get into solar and spend some time playing and experimenting to see what works. It can be upscaled for larger capacities.

Note this low power hobby system does not require normal safety features like grounding, fuses, and appropriate wire sizing. If you build a bigger system, at some point you will need to consider and provide these Safety elements. There is lots of good info elsewhere on this site on how to do this.
 
What kind of performance can I expect from this system?
  • Panel: 25W 12V ~2A
  • Battery: 7Ah x 12V = 84Wh - of which only 42Wh is available to 50% depth of discharge which is recommended for SLA batteries
  • Load: 13W lights (110VAC powered by the Inverter)
So, a fully-charged battery will power the lights for 42Wh/13W = 3 hours per night. After 3 hours the battery will reach 50% DOD and the inverter will, hopefully, turn off the lights to protect the battery. Note: I am relying on the battery protection function in the Inverter to do this because my load lights are 110v AC. But this battery protection voltage is fixed within the Inverter and not user-selectable like it would be on the SCC.

Once the battery is discharged to 50% how much full sun will I need the next day to top up the batteries for another night? 42Wh/25W = 1.7 hours.
Or, looking at it another way: Every hour of full sun will give me about 2 hours of power for the lights. 25W/13W = ~2.

Realistically, at this time of year, and for my northern location, with cloudy winter weather and possible snow cover on the panel (if I don't clean it off right away) I will be lucky to get any "full" sun. I'll be counting on part sun, or bright overcast to give me something, anything!. Will's book suggests using 6 hours of full sun per day as a design figure. Easy for him - he lives in Vegas!

Bottom line: You have to take your particular situation into account and plan accordingly.
  • I can see that upgrading to a bigger battery might give me more hours of power for the lights each night (assuming there was enough sun to charge them). And a bigger battery could also provide more days of "autonomy" in case there is no sun one day the lights can still come on the next night.
  • And a bigger panel would increase the liklihood that I could top up the battery despite low-light conditions.
  • YMMV
Oops! On the schematic diagram in the previous post the Toggle Switch is shown in the wrong location. It is actually located on the main + line from the battery, of course.

Does anyone have any questions or comments on this? Is it right?

No-one is commenting. Why is that?
I suspect this is because there are two kinds of people reading it: Those that already know this so it's trivial and obvious.
And those that don't know it and can't be bothered following it. Does that sound about right?
 
Last edited:
I needed an excuse to get started so, not having a man cave shed, I thought I'd start with the existing 110vac Christmas lights on the shrub in the backyard! And then I'll look at some of those 12v garden spotlights in the spring.

So far I have these parts:
  • 25W PV panel
  • panel to be mounted on my wife's portable metal clothes drying rack (OK for now but she may want it back in the spring!)
  • 10W PWM charge controller
  • 12V 7Ah SLA battery
  • 150 W inverter (awaiting delivery with "cigar lighter" adapter)
  • to be housed in an existing small plastic tool box (if it fits)
  • Kill-a-watt clone wattmeter to monitor watts used
  • sunset switch to control lights
So far, so good. I have it in the basement now - testing under the flourescent lights in my workshop. Looking forward to seeing how this particular set of devices play together.

All I need now is some sun! View attachment 4492

Everybody starts somewhere.

What got me started was a solar PV 'Battery Maintainer' that was about the size of a battery box lid...
Then it was solar sidewalk lights around my camp site,
Then it was an embarrassingly low watt panel to recharge cordless tool batteries.

Now I'm off grid running a home & machine shop.
It can become an addiction, but it's cheaper than meth in every way! ;)
 
Recharge time.....Look at the power used between the battery and the inverter, and look at the power between the charger and the battery. See how many watts you are using from the battery and how many watts you get going in during full sun. You can figure your recharge time fairly well looking at those values over a period of hours. I took a similar setup camping and I could tell at the end of the day if we had put back to the battery the power that we used the day before.
 
No-one is commenting. Why is that?
I suspect this is because there are two kinds of people reading it: Those that already know this so it's trivial and obvious.
And those that don't know it and can't be bothered following it. Does that sound about right?
Third kind: those of us who are interested, but there's so much going on in the forum and our lives that it's tough to keep up! :)
I love the small system as intro and proof of concept. With it you've demonstrated that it can be done for the very reasonable price of $100 and put to some practical use. Good job on that.

Some thoughts:
So, a fully-charged battery will power the lights for 42Wh/13W = 3 hours per night.
For this small system you (and others) will want to factor in at least the inverter loss when calculating run time. That looks like a modified sine wave inverter which likely gets you in the range of 75-80% efficiency. So maybe you only effectively have something like 33.6Wh of power available at the inverter output. Put another way, the 13W to power the lights is 16.25W from the battery due to inverter loss.

Once the battery is discharged to 50% how much full sun will I need the next day to top up the batteries for another night? 42Wh/25W = 1.7 hours.
In my experience, even with full sun you are probably only going to get 18W or so max from that panel and PWM charge controller combo.

Will's book suggests using 6 hours of full sun per day as a design figure. Easy for him - he lives in Vegas!
Agreed. I'm at 41 North and can maybe count on 4 hours per day.
 
One thing that I enjoy doing that doesn't cost a lot is salvaging 18650 batteries from old battery packs and making new packs from them. The older laptops have packs with 6 or 8, 18650 cells and normally some of the cells are functional. Sometimes you can get them free or low cost. Then you can build up packs for your solar projects.
 
Kudos for taking the plunge. My $0.02 USD:
  • That's not much solar or battery to run an inverter. I’d focus on finding 12V equipment that will run for much longer.
  • Are the Christmas lights LED? Attempt to separate into 12VDC modules.
  • Play with alternate means of supplemental power generation to stay off grid. Use a cordless drill as a hand-crank generator, converter to your car battery, etc.
When you grow the system then add the inverter and AC loads.
 
Thanks for the comments, guys.

@Bob142 yes, I agree that one of the simplifying assumptions I made was to ignore all losses and inefficiencies. Makes the math easier and I was trying to emphasize the basic flow of power in - power out. When I deploy the system outdoors (hopefully this week) I am going to find out how much actual time I get. As you noted: at our northern latitudes in winter lack of sunlight is going to have a huge impact. But that's half the fun!

@Delmar. What you are looking at is my winter project. In the summer the 110v line gets removed so I can cut the lawn. For summer project I've already purchased 2 12v 5w spotlights.
I am looking forward to installing these in the garden and powering them from the 12v Load screws on the SCC. The power demand will be slightly smaller at 10W and the sun will be higher and stronger. Also, I can take advantage of the programmable functions in the SCC which allows me to choose from several light scenarios:
  • Dusk to dawn. Or, in my case, probably until the battery runs low
  • On at dusk for x hours where x is user-selectable. Let's say I'll probably vary it from 5 or 6 hours in the spring down to 3 hours at summer solstice.
  • 24H. always on until the battery under-voltage setting
I'm a gardener in summer so I'm looking forward to observing the impact of the seasonal variations in sunlight on the system. Fun for me but not so much if this was an actual production system someone was counting on! But, hey! That's solar; get used to it.
 
Recharge time.....Look at the power used between the battery and the inverter, and look at the power between the charger and the battery. See how many watts you are using from the battery and how many watts you get going in during full sun. You can figure your recharge time fairly well looking at those values over a period of hours. I took a similar setup camping and I could tell at the end of the day if we had put back to the battery the power that we used the day before.
I'd love to be able to track the watts going in and going out but I haven't figured out how. Do you have any suggestions?
I've looked at an inexpensive ammeter with a shunt but the wiring looks really complicated for me.
I'd love to be able to monitor remotely from inside the house so I'd also consider a WiFi or Bluetooth enabled battery monitor but they cost a lot. Much as I like my numbers I can only justify spending so much to monitor a $100 system. I asked this question on another thread and came to the conclusion that I should probably stick to Automotive-type battery monitors because they are commonly available for the mass market and conveniently 12v.
Anyone else have any suggestions?
 
Last edited:
I use one of these meters for small stuff. 20amp limit. It is a bidirectional meter. If connected correctly, the watt hours count up for charging and count down for discharge.
 
One thing that I enjoy doing that doesn't cost a lot is salvaging 18650 batteries from old battery packs and making new packs from them. The older laptops have packs with 6 or 8, 18650 cells and normally some of the cells are functional. Sometimes you can get them free or low cost. Then you can build up packs for your solar projects.
I'm not really into that but thanks for the suggestion. For years I was trying to think of some way to get double use out of my cordless tool Li batteries in a hobby solar project such as this. But I was always stopped by the fact that they were all 18v (often marketed as 20v). That plus the fact that they have proprietary connections that are deliberately difficult to connect to. Think Ryobi's goofy stem!
I would still like to pursue this. Does anyone here have any suggestions?
 
I use one of these meters for small stuff. 20amp limit. It is a bidirectional meter. If connected correctly, the watt hours count up for charging and count down for discharge.
That sounds perfect - I like that it's bidirectional - otherwise you need 2 meters. But there's a few problems. It's very new; Amazon's only had it since November, so there's very little very info on it - not even a wiring diagram, no reviews, not on Amazon.ca.
But it works for you and you like it?
 
I needed an excuse to get started so, not having a man cave shed, I thought I'd start with the existing 110vac Christmas lights on the shrub in the backyard! And then I'll look at some of those 12v garden spotlights in the spring.

So far I have these parts:
  • 25W PV panel
  • panel to be mounted on my wife's portable metal clothes drying rack (OK for now but she may want it back in the spring!)
  • 10W PWM charge controller
  • 12V 7Ah SLA battery
  • 150 W inverter (awaiting delivery with "cigar lighter" adapter)
  • to be housed in an existing small plastic tool box (if it fits)
  • Kill-a-watt clone wattmeter to monitor watts used
  • sunset switch to control lights
So far, so good. I have it in the basement now - testing under the flourescent lights in my workshop. Looking forward to seeing how this particular set of devices play together.

All I need now is some sun! View attachment 4492
I am doing a similar project myself. I bought a 50 watt solar kit added a better charge controller and now I replaced my 10 amp/hr SLA for a RELiON 20 amp/hr. No matter what level you are at with solar, it is always fun to make stuff. Nice job, Webbee
 
That sounds perfect - I like that it's bidirectional - otherwise you need 2 meters. But there's a few problems. It's very new; Amazon's only had it since November, so there's very little very info on it - not even a wiring diagram, no reviews, not on Amazon.ca.
But it works for you and you like it?


New link to meter. The manual is linked in the Tech Spec section. A printed manual was in my box, as well. Note, if a new listing is created on Amazon, you might not know what history the item has under another listing. The Drok store has a lot of items and their own web page. They just use Amazon as their store front. I like mine. I have one like is showed and two with Hall sensors for DC amps, like up to 200amps.
 
Note the link that I provided above does have some reviews. Some are negative, but some of those fail to understand the meter. The meter is packaged in this case with a 20amp shunt and no control relay interface. The interface has been replace with a simple terminal block that does not have the relay control exposed. Another offering of the same meter is packaged with a Hall current sensor and relay control board. This model can turn things off when the battery voltage is too low. But for measuring watt hours in and watt hours out on a small system, the large range Hall sensor will not give good numbers. Mine is influenced by other magnetic fields and the amps are all over the place, even when no power is flowing. That doesn't mean it is flawed, but in my setup the meter was just in a bad place....sensitive to things I would rather not see.
 
panel to be mounted on my wife's portable metal clothes drying rack
Great idea about the clothes drying rack! Did you get your wife's permission to use that? :)

I am thinking of getting more panels in the spring (Renogy) but I cannot mount them on the roof myself as that would void my new roof warranty. And a licensed installer would be too expensive for me.
 
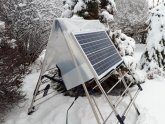
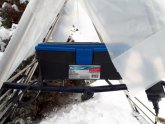
My A-Frame Solar Man Cave
Well, OK, It's a very small A-frame. Well, OK, yes, it's actually my wife's clothes rack.
@bulrush Yes, I said she's free to use it any time she wants and I'm only really using one side. But I don't think she's going to be too keen on going out into the snow.

20200116_085218.jpg20200116_085227.jpg20200116_171701.jpg
 
Last edited:
Tuning the System
The challenge now is to tune the system so I can get it to power the lights with existing power coming in. This involves ensuring that the power coming into the battery is enough to cover all losses and still have enough to get the job done.

Inputs to battery from the PV Panel
  • limited by low light and low sun angle in January at 45N (I estimate my panel is angled at approx 60 degrees based on above photo of rack forming approx. an equilateral triangle)
  • limited by snow cover - although I try to remove it promptly each morning
Power drains on the system
  • low overnight temperatures of -20C (0F) are reducing the available voltage on my 7Ah SLA battery (although it can still function and accept a charge unlike Li chemistry batteries)
  • there are unquantified "phantom" loads on the system from: the 10A SCC itself, the always-on 150W Inverter, the solar timer switch, and various pilot lights
No surprise, but I'm finding that the combination of several cold, snowy days in a row combined with system losses isn't leaving me enough for the lights.

Can I minimize my phantom loads somehow? I realize that if I wasn't using an Inverter I could be powering the lights using the Load output on the SCC and this would presumably give me more control and fewer losses. But for this first project I am powering existing 13W AC lights; necessitating the Inverter and its direct connection to the battery, and the need for a separate solar offset timer. In theory a 25W panel should be able to power a 13W string of lights, no?
Does anyone have any Comments or suggestions on any of this?
 
Back
Top