diy solar

diy solar

Hanging a Growatt

Kornbread

Solar Addict
Joined
Sep 16, 2021
Messages
1,363
Growatt spf6000dvm. The handles are nice and shiney, but why don't they manufacturer some kind of usefull handles into the chassis to ease the burden of hoisting this thing. Geez.
Not sure how the pros hang one of these low freq 100lb wall warts, but this is what I had available. Two motorcycle tie down straps, scrap 2x4, screws, and lag bolts.

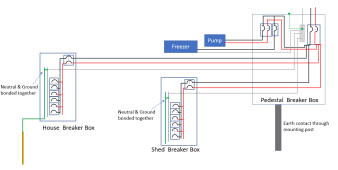
So now it is mounted and the batteries should be in any day, I'm ready to start wiring but ... the growatt has grid assist which I think will come in handy on those pesky rainy weeks we get from time to time, but what about grounding and neutral from the shed breaker box? (pic of wiring below thanks to FilterGuy)
For the 240v from grid (shed breaker box), the GW wants two hots and a ground. Why not two hots and a neutral?
As pictured below, the shed breaker box has both neutral and ground bonded. How does this affect connection of the GW to the grid?
And what about the grounding screw on the GW chassis?
In relation to the pv panels, do the panels get grounded and that ground runs along with the home run from panels to the GW?
.
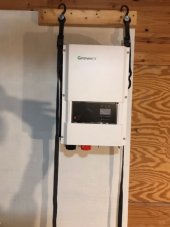
growatt hung.JPG

panel wiring.png
 
Do you know what a ledger board is?
I don't know if you have room for it but it may help. The bottom of your unit may not allow for use of a ledger board, even temporarily.

I think you should find a stud or two and go with at least 1/4" lags long enough to get through whatever is hanging on the studs + 1.5". Hopefully there is no plumbing or electrical behind the wall.

At the moment it looks like there are 6 screws which are not holding the unit tight to the wall. Screws do not have much shear strength especially when not sunk. Sink them too much and they'll snap.

My nickle's worth, set it down till you have the proper hardware and are ready to hang it.
 
The neutral and ground should be bonded at the point of service (main panel)from the grid. It should not be bonded in multiple locations.
The grounding electrode (rod, ufer) should be at the main panel as well.
 
Do you know what a ledger board is?
I don't know if you have room for it but it may help. The bottom of your unit may not allow for use of a ledger board, even temporarily.

I think you should find a stud or two and go with at least 1/4" lags long enough to get through whatever is hanging on the studs + 1.5". Hopefully there is no plumbing or electrical behind the wall.

At the moment it looks like there are 6 screws which are not holding the unit tight to the wall. Screws do not have much shear strength especially when not sunk. Sink them too much and they'll snap.

My nickle's worth, set it down till you have the proper hardware and are ready to hang it.
The straps cover up the bolts. I was iffy about picking it up like this but didn't see another way of doing it alone.
3/4"x3'x5' Advantec (expensive waferboard used in flooring) mounted to the wall using twenty plus 3" screws. All screws penetrate studs. 1/4" Backer Board (pressed cement board) attached to that with drywall screws. The cement board is for a bit of heat and fire resistance. The GW is attached with six 5/16x3" lag bolts (8mm recommended), three penetrate studs, the other three are held by the 3/4" Advantec and 3/4" interior sheething underneath that.
 
Felt like a pig wallowing in the mud today.
Picked up some lumber to build a temporary ground mount for three panels. $120 at the local lumber yard bought eight treated 2x4 (what happened, it would have been $60 not too long ago). Morning started with everything covered in ice but the sun began peeking through the clouds causing the ice to melt and turning the yard to mush (sure is pretty when everything is covered in ice and the sun hits it). I haven't been this muddy since childhood. Anyhow, the temporary ground mount is finished. Will run wires from the panels to the shed, wire the Growatt and batteries, and see if I can figure out the settings. With luck, no smoke and there will be enough power to keep the batteries charged while running a few things in the shop.
 
Of course it's going to be an uphill battle.
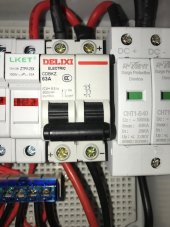
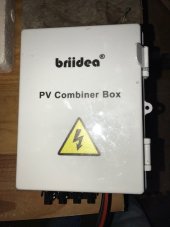
Two or more panels in a series, and planning to add another temporary three panel array to the mix, so installed this pv combiner box. Took care in keeping track of +/- and what happens? Output from the pv combiner box is reversed. Double-triple checked. Input is correct.
Polarity looks correct until it exits the 63amp breaker. Why do the polarity markings cross L-R and what does the symbol with 1-4 indicate? What's going on here?
Oh, this is the brand; $100 from Amazon w/free shipping.

IMG_1053.jpgIMG_1054.jpg
 
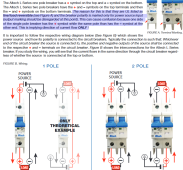
And now I discover this is a polarized breaker and see this. Adding to the kornfusion " ... it's still the positive but it goes out the negative side because it's less positive than on that side ... ". Wait a minute. What???
From what I gather, the input to a polarized breaker must follow the markings or it cannot extinguish the dc arc, therefore turning itself into a flaming marshmallow. To correct polarity from the pv combiner to the solar charger, what about simply switching polarity on the output side of the breaker? No flaming marshmallow? What about the above mention of one terminal being " ... less positive than the other side ... "?


Last edited:
Of course it's going to be an uphill battle.
Two or more panels in a series, and planning to add another temporary three panel array to the mix, so installed this pv combiner box. Took care in keeping track of +/- and what happens? Output from the pv combiner box is reversed. Double-triple checked. Input is correct.
Polarity looks correct until it exits the 63amp breaker. Why do the polarity markings cross L-R and what does the symbol with 1-4 indicate? What's going on here?
Oh, this is the brand; $100 from Amazon w/free shipping.
That breaker setup has my knoggin a bit kornfused too. ?

Maybe someone can jump in here and keep you from making the expensive blue smoke.
I'm hoping you have NOT turned that breaker on yet.
 
Oh yeah. Turned it on to check polarity at the breaker output. Quickly back to the off position.

A duh moment ... the polarity markings are only in relation to power input. It wires just like any other breaker, with the caveat that the input must be wired as stated.

Polarized breaker wiring

1645998511604.png
 
Last edited:
Flicked on that breaker at the pv panels and checked the other end of the wiring to the shop. Nothing was connected in the shop. No smoke. Yet. If it's smoke you want, I've built a couple vacuum tube preamps and smoked two out of three. Two now work and I am amazed at the sound of one of them. The other sounds decent, but the second one I have yet to get everything right. ?

Heads up, if you buy a pv combiner box, go through it and tighten everything.
 
Heads up, if you buy a pv combiner box, go through it and tighten everything.
I agree 100%. I'm the proud new owner of a torque wrench and torque driver. Everything gets inspected when it arrives, torqued to spec when installed, tested for resistance and the numbers are recorded on the connection inspection checklist.

The first solar panel I ever bought had the negative wire sitting under a screw and washer which had not been tightened, at all. I learned quick.
 
Waiting on the little things.
Purchased the wrong lugs for the battery cable. Proper ones should be here Monday. For anyone that's curious, the hole size of the lugs on an eg4 are 1/4".
Riedon 300 amp class t fuse and holder ($44+$16s&h) from t class fuse (400 amp out of stock) Due in Monday.
Drove 8' ground rod, ran wire, installed ground bar.
Purchased almost 220' (Lowe's inventory was wrong) of 2awg aluminum triplex (no comparison in price to copper and direct burial). Creates some issues with fitment as it's just too large for most component's input. Hit mouser up for some feed through din rail mounted terminal blocks that take from 10awg to 1/0, al/cu, rated for dc, and $4each din rail terminal blocks Using the din rail terminals, I can take the 2awg al down to 4awg copper, which is the largest gauge that will fit into the GW's inputs. Also bought some jumpers for the feed through din terminals for combining the two feeds from the eventual solar array.
From solar array to shed, to GW; 1)feed from solar array coming into shed consisting of 2awg al triplex, 2) then into din feed through terminals taking 2awg al > 4awg copper, 3) 4awg copper into 63amp 1000v dc breaker cheap 63amp dc breaker (not sure of the quality), 4) 4awg copper from breakers into another feed through din rail terminal block, these with jumpers din jumpers (will eventually have two feeds from the solar array and will combine both feeds here), 5) after combined, into the GW they go. As time and money allow, I'll get to building the permanent pv array and there will be two feeds of triplex from the array to the GW, so multiply the listed items x2.
Not connecting the GW to grid in any way at this time.
Sound good?
 
Waiting on the little things.
Purchased the wrong lugs for the battery cable. Proper ones should be here Monday. For anyone that's curious, the hole size of the lugs on an eg4 are 1/4".
Riedon 300 amp class t fuse and holder ($44+$16s&h) from t class fuse (400 amp out of stock) Due in Monday.
I bought a digital caliper before buying 4 different size lugs. Folks selling electrical equipment seem to forget "We need to know".

Waiting on the little things.
3) 4awg copper into 63amp 1000v dc breaker cheap 63amp dc breaker (not sure of the quality),
You might want to mount that on a fireproof surface directly below a smoke detector. Why not?
Not connecting the GW to grid in any way at this time.
Good luck figuring out the grounding scenario. Many folks have gone to the "funny farm" over the subject. I already bought my ticket.

A small torque wrench and torque driver could be useful. Everything wants a specific torque. I don't think "quarter grunt" or "half grunt" will work well with a bunch of Amps trying to get away.

Do you feel like updating the drawing (or is it good) for those of us who are "reading challenged"?
 
Have a couple torque wrenches, but sadly, none of them go low enough to be useful in this application. With gas over $3.50, not driving to the tool store until the trip can be $ justified.

Yeah, wish manus and their outlets would be a bit more specific, on the specifics, of their wares. Could of had this system up and running a week ago.

GW, fuses, breakers, boxes, everything is mounted on a 3x5 sheet of BackerBoard cement board, but yeah, a fire alarm wouldn't hurt.

Grounding ... @FilterGuy and I have been pm'ing for a while. He has been very helpful. Scared the living $hit out of me when we began going over the mess of a grounding scheme I have between service pedestal, house, old mobile home, well house, and shop. He felt it was reasonably safe, but I'm going to keep the solar stuff completely separate from grid, at least for now. He made all the drawings. I'll ask him if he cares for me to post the latest drawing.

Finished up another temporary three panel ground mount. Will get that wired into the combiner box tomorrow. Total six 250w panels.
 
I searched online locally, called the store and they had a 1/4" drive torque ratchet on the counter for me the next day. $30 at the local auto parts store. The boss lady picked it up while getting stuff from town.

Sellers who don't provide the needed info are hearing from me all the time. If they want my $$ they will give up the info. I built a new soap box so I can be heard everywhere.

First link in my signature will show you FilterGuy's smiling mug. (y)
 
Oh yeah. Turned it on to check polarity at the breaker output. Quickly back to the off position.

A duh moment ... the polarity markings are only in relation to power input. It wires just like any other breaker, with the caveat that the input must be wired as stated.

Polarized breaker wiring

View attachment 85487
All good info. One thing to add,
If you use polarized breakers as the over-current protection device on solar panel strings..... you are protecting the panels strings from current from the *other* strings. Consequently, the solar panel is the 'load' in the diagrams you showed.
 
Back
Top