diy solar

diy solar

How to connect the "black" style JK-BMS with the short B- and P- leads?

kolek

Inventor of the Electron
Joined
Sep 29, 2021
Messages
431
There's a "silver" version of the JK-BMS which has a place I can bolt my battery negative wire, that I understand.

But the black style JK-BMS I have (JK-B2A24S20P ) I have just has these tiny short battery wires. Are you supposed to unscrew the black cover and put your own size/length leads or somehow splice wires on to these stubby ones to make them longer? Obviously the leads that it comes with are far to short to reach both the busbar negative and the battery negative at the same time.

If you happen to have a picture of what you did, that would be great.
 
Last edited:
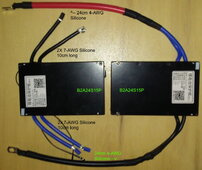
I found this picture on the forum here, looks like manually cobbling together an extension is the only option?
Really dumb that this is required. I don't even have a crimp prepared for this, will have to tear apart a ring terminal or kluge something to make this work.

BMS Wiring-extensions.jpg
 
I swear I have kluged more things in the last 2 weeks for this "DIY" solar project than my entire life up until now. Every day it's another kludge.
 
I used this,
Blue Sea Systems 2020 POWERBAR... https://www.amazon.com/dp/B00H8L5AKE

To bridge to a wire that could combine them.
So 30 seconds before wiring this piece of junk into my system I discover it requires two 2" long busbars just to connect it to your system? :rolleyes:

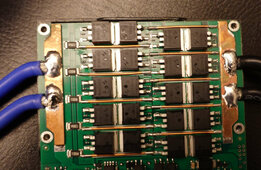
All because the morons who designed it soldered unremovable ultra short wire stubs to the motherboard? Or is it possible just to take the case apart and unbolt these wires or they are soldered to the board? (Nevermind that, I tried unbolting the case and yes, the leads are soldered in). Hard to believe a company smart enough to design a BMS could be this dumb when it comes to the connecting wires.
 
Last edited:
So 30 seconds before wiring this piece of junk into my system I discover it requires two 2" long busbars just to connect it to your system? :rolleyes:

All because the morons who designed it soldered unremovable ultra short wire stubs to the motherboard? Or is it possible just to take the case apart and unbolt these wires or they are soldered to the board? (Nevermind that, I tried unbolting the case and yes, the leads are soldered in). Hard to believe a company smart enough to design a BMS could be this dumb when it comes to the connecting wires.
Seriously? They are soldered in? Can you post a picture please?

One buys these black ones as a supposedly premium product and they have soldered connections in there?

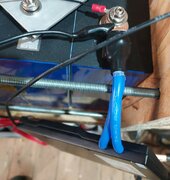
I came here to post my "solution" (pictured below). Simply crimp a copper lug onto it rated for double the thickness and put both cables in. If you need to extend I'd use a connection ferrule for a much thicker cable.

Personally I saw the shortness of these cables as a way to save on internal resistance and limiting that is a good thing, but now that you revealed they solder them inside I'm not impressed. Especially on my 350A peak system. There is real possibility of these wires coming loose and starting a fire if they go into a wrong place. We have to know about this and design the enclosures accordingly.

20240426_074246.jpg
 
@Luk88 Thank you for responding.
Ya what is the point of making a $2000 DIY battery with beefy busbars and thick copper everywhere, only to terminate with these crappy wires soldered down?JK-leads-soldered.jpg
 
Last edited:
@Luk88 Thank you for responding.
Ya what is the point of making a $2000 DIY battery with beefy busbars and thick copper everywhere, only to terminate with these crappy wires soldered down?View attachment 211588
Yes, I'm rather dissapointed by this. I'd much prefer this was a screw terminal. I believe the usual mode of failure for soldered connections like this is that they fail mechanically and then resistance increases which causes it to heat up and melt the rest of the way. At least it is some assurance that these cables are pretty tightly held by the metal case providing strain relief to the solder joints.
 
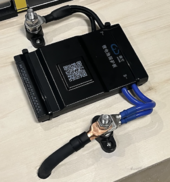
I used two slightly different approaches (based on the lugs I had on hand at the time): on the B- side I crimped each wire to a lug, and on the P- side I put both wires into a 4 AWG lug. Both lugs are on a terminal post. I did have to buy longer bolts for the posts because the ones that came with it were too short.

20240426-10-47.14.png

I don't really think the single lug versus the two lugs makes too much of a difference tbh.
 
@offgrid-curious That's a great picture. Really appreciate your input.
I'm in the middle of doing exactly something like this.
How did you attach the zip ties to the board?
I didn't even know that "terminal posts" existed, that's great to know about as an option.
Everybody is making these look so professional compared to what I'm doing.
 
Last edited:
I used two slightly different approaches (based on the lugs I had on hand at the time): on the B- side I crimped each wire to a lug, and on the P- side I put both wires into a 4 AWG lug. Both lugs are on a terminal post. I did have to buy longer bolts for the posts because the ones that came with it were too short.

View attachment 211627

I don't really think the single lug versus the two lugs makes too much of a difference tbh.
4AWG is a little on the tight side for both wires. I just checked. 2AWG is perfect and wire would not be overcrimped.

Possibly you used 4AWG terminals on the single wires?
 
How did you attach the zip ties to the board?
I used zip tie mounts that are screwed into the top of the plywood box lid, like these: https://www.amazon.com/dp/B078P8TPPZ. It's nice because it provides a bit of clearance under the BMS.

I used these terminal posts: https://www.amazon.com/dp/B0B2LK7KDR, but like I said the bolts were too short. I replaced them with 3/8-16 x 1-3/4" hex bolts.

4AWG is a little on the tight side for both wires. I just checked. 2AWG is perfect and wire would not be overcrimped.
IIRC the BMS wires are 7 AWG and when I was crimping them, they fit snugly into the 4 gauge lug. The single wires I used 6 AWG lugs.
 
Oh that's what those things are I keep seeing in people's builds. Zip tie mounts. Didn't know what they were. Looked for them at the dollar store here but they didn't have them.

Seeing these tips is really helpful. Half these parts people are using I have never see before.
 
I really have a lot of respect for you guys here who rip through this stuff.

I cannot believe how long this process is taking me. Took me a good 5 hours just to figure where to locate my battery busbar and main breaker, bolt them down, and finish the wires to connect them. I would be an absolutely terrible electrician.

Things like the BMS leads being too short, needing to combine crimp the leads, not having various parts and pieces I need, not having a good place to mount the BMS, no mounting holes on the BMS to mount it with.... and everything seems so kludgy which really rubs me the wrong way. I thought I'd be able to finish wiring today now it looks like I'm another 4-5 days from finishing.
 
Last edited:
I really have a lot of respect for you guys here who rip through this stuff.
Designing and building my solar system has pretty much been my primary focus for the past 6 months. I don't feel like I'm ripping through anything lol. I've spent soooo much time going through these forums and learning from everyone here. All the stuff you're mentioning are things that I've also picked up from the great content on this site (you just have to find it!).
 
Thanks a lot, it's encouraging to at least I'm not the only one spending a lot of time on this process. This is my first battery, I think I could probably rip though a 2nd one pretty quick if I had all the parts, by that I mean, maybe 3-4 days start to finish. But the first one has been tough.
 
Thanks a lot, it's encouraging to at least I'm not the only one spending a lot of time on this process. This is my first battery, I think I could probably rip though a 2nd one pretty quick if I had all the parts, by that I mean, maybe 3-4 days start to finish. But the first one has been tough.
Do not ask me how long I've been "building" my first battery.
Of course, it might make you feel better. And me worse!
I've had my cells for 2 years....
 
Back
Top