You are using an out of date browser. It may not display this or other websites correctly.
You should upgrade or use an alternative browser.
You should upgrade or use an alternative browser.
New JK BMS
- Thread starter Ozzy
- Start date
BentleyJ
Solar Wizard
With up to 150A you would definitely want to distribute the current to both connectors on the PCB. Probably going to get a bunch of negative comments for suggesting this: I would use fine stranded welding or DLO cable and split the strands into 2 equal pieces then connect to the screw terminals with appropriate crimp lug or ferrule.
Steve_S
Offgrid Cabineer, N.E. Ontario, Canada
A couple of options:
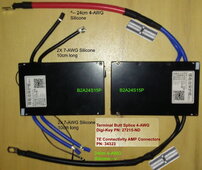
- Use two 7AWG Silicone wires off each side. You could connect them in a Y format with a 4AWG BUTT Connector to a single 4AWG wire.
BTW: 2x 7AWG = 4AWG.
- Use one wire which has obvious drawbacks.
- Use a "Busbar" of sorts. a "T" shaped one so that both terminals are connected the BMS and the hanging end connects to a 7AWG wire.
When I mention wire in this context, I am referring to Ultra Fine wire in Silicone...
Checkthisout
Solar Wizard
- Joined
- Nov 14, 2021
- Messages
- 4,889
Hi,
I am rebuilding my packs with the new JK-BMS 150A 2A balancer.
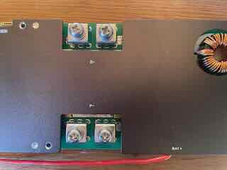
There are 2 screws an each side but I want to use only one bigger cable, should I use only one screw on each side or should I link the 2 screws with a busbar first?
and with size that busbar should be then?
View attachment 195206
Thank you
Use two cables but crimp them into the same terminal end where ever you plan to connect them.
I've seen double hole lugs before but odds of finding one in the size and bolt spacing you need is unlikely, and it isn't something you can really fab up DIY very well.
I think @Steve_S idea of two 7AWG to a 4AWG butt is probably the easiest (or to a 4AWG lug to your stuff if the distance isn't very far away, like to an external shunt or busbar).
Another option is two wires run to a nearby busbar with a singular fat wire coming off of that to your load.
I kinda like the idea of taking 4AWG cable, splitting it in half to two lugs, covering the wire in heat shrink. Would be neat, but I'm a little torn on whether doing that is OK or not.
Steve_S
Offgrid Cabineer, N.E. Ontario, Canada
This is what I did with the regular JK-BMS and his works out really well.
I am changing ALL of my systems up and that includes all new JK Inverer Edition BMS into new steel cases. The dual terminals do pose a problem in some cases but others will see it as a flexible opportunity - depends on perspective and what exactly one is doing with them.
Note that you could NOT pay me to use 2 lugs off 1 wire - That is begging for Murphy's Laws to be applied. Not something I would consider.

BTW: There are many types of lugs available, including blanks that you can drill your own holes into.

<--- https://www.quickcable.com/product-category/battery-terminals-lugs/lugs/dual-lugs/
OR blank like this or double hole


from https://www.mouser.ca/c/connectors/terminals/?q=lug blank
I am changing ALL of my systems up and that includes all new JK Inverer Edition BMS into new steel cases. The dual terminals do pose a problem in some cases but others will see it as a flexible opportunity - depends on perspective and what exactly one is doing with them.
Note that you could NOT pay me to use 2 lugs off 1 wire - That is begging for Murphy's Laws to be applied. Not something I would consider.

BTW: There are many types of lugs available, including blanks that you can drill your own holes into.

<--- https://www.quickcable.com/product-category/battery-terminals-lugs/lugs/dual-lugs/
OR blank like this or double hole


from https://www.mouser.ca/c/connectors/terminals/?q=lug blank
Thank you all for the great ideas! I live in France and here it is prohibited to put 2 cables into one lug, not sure why but it its not compliant with the regulations so I'll try to avoid it just in case I have a problem and need the insurance...
The square piece of copper 740GLE suggested is maybe the safest option
The square piece of copper 740GLE suggested is maybe the safest option
Checkthisout
Solar Wizard
- Joined
- Nov 14, 2021
- Messages
- 4,889
Thank you all for the great ideas! I live in France and here it is prohibited to put 2 cables into one lug, not sure why but it its not compliant with the regulations so I'll try to avoid it just in case I have a problem and need the insurance...
The square piece of copper 740GLE suggested is maybe the safest option
In the United States, a DIY battery would be against code PERIOD.
I stole the idea from the wago guy

 diysolarforum.com

Show me your JK BMS mounting solutions
I have a 16 qty bank of CALB 180 cells arranged in a 2p8s configuration and want to add the JK b2a8s20p BMS. JK BMS is aluminum skinned and came with short 7ga silicone insulated wires for connections, 2 in parallel for in and out. I can’t rest the BMS on top of the cells else short stuff out...
So.....?In the United States, a DIY battery would be against code PERIOD.
With that idea I have ordered a busbar that I will bend straight from the negative of the last cell to the B- of the bms. Thanks againI stole the idea from the wago guy

Show me your JK BMS mounting solutions
I have a 16 qty bank of CALB 180 cells arranged in a 2p8s configuration and want to add the JK b2a8s20p BMS. JK BMS is aluminum skinned and came with short 7ga silicone insulated wires for connections, 2 in parallel for in and out. I can’t rest the BMS on top of the cells else short stuff out...diysolarforum.com
Similar threads
- Replies
- 48
- Views
- 2K
- Replies
- 6
- Views
- 887


