diy solar

diy solar

PVC boxes and EMT conduit

48Rob

New Member
Joined
Nov 4, 2023
Messages
69
Location
61802
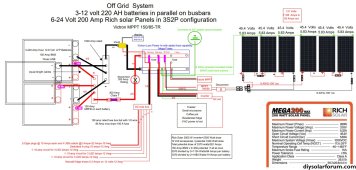
I am running bare ground from my array, along with the 12 Volt PV cables to a junction box (metal, or PVC?) inside the attic, where the bare ground will tie together with an insulated ground wire, and then run in EMT to my busbar and other grounds, and then on in another metal conduit to my ground bar in the main AC electric panel.

I am also running several branch circuits in 12 volt cable, and prefer to use PVC boxes because of the extra depth and ease of installing in existing drywall. I am aware that PVC boxes don't have knockouts for connecting EMT or flexible metal conduit, but I can easily place a connection point with a hole saw.

I am unsure if using PVC boxes, since I must run the insulated ground wire, and 12 volt PV wires in metal conduit inside the structure, is allowed?

Material: NEC 314.28

Section 314.28 specifies the requirements for the materials used to construct junction boxes. Junction boxes must be made of non-combustible material, such as metal or plastic. They must be suitable for the specific environment in which they are installed.
The NEC also says that metal junction boxes must be grounded, with an unbroken wire.

Grounding: NEC 250.110

Section 250.110 outlines the grounding requirements for electrical equipment, including junction boxes. Junction boxes must be grounded to provide a path for fault current to return to the source and to prevent electrical shock. Using an approved grounding method, you must connect the grounding conductor to the junction box.

If the junction box has metal parts not intended to carry current, you must bond these parts to the grounding system. The grounding conductor must be continuous and unspliced. It must also be sized according to the size of the junction box.

Metal junction boxes are required to be grounded by connecting the grounding conductor to a grounding screw or other approved grounding method. You must install the grounding screw in a threaded or factory-made hole.

Non-metallic junction boxes, such as plastic enclosures, should be grounded by connecting the grounding conductor to a grounding clip or other approved grounding method. You must install the grounding clip in a factory-made hole or other suitable location.


This is confusing, and concerning, as I have never grounded a plastic (PVC) box...
What I want to do, is use PVC junction boxes, and EMT and or flexible metal conduit.
Can anyone answer this or point to the area of the NEC that clarifies it?
 
I don't have a code reference but I'm confident in my understanding of how to do this.

I'm pretty sure your usage of PVC here is going to be pretty counterproductive (in part due to potentially being under-informed) compared to cutting out bigger sections of drywall and patching. Have you looked into old work cut-in metal boxes? Or using alternate routing for the conduit. Note that if you are planning on adding batteries in a ESS code compliant way, the code restrictions on where the batteries can be placed sort of biases you towards places where you don't have to do a lot of indoor drywall runs. IE outside of house or garage, in which case you might can use exterior conduit for the most part and then pop straight through exterior wall. When I see you writing about going through a lot of drywall, it sounds like it could be going into some "middle of the house" location.

Where did you get this text?

Bonding is needed for all metal components in raceway. PVC have no metal components, however you will need to add bonding bushings to the EMT fittings and jump over the EMT with ground.

If you have a current- carrying conductor splice in a metal box, then all EGC from the circuits being spliced need to be bonded directly to the box. Otherwise, you can bond the metal boxes via the EMT or FMC fittings.

FMC has special restrictions as an EGC. It must be < 6 ft total in the ground fault path, and it can only be used with circuits up to 20A. As there are many (though not all) situations where the OCPD for solar is >= 20A amps, if the conduit is meant to be futureproof then you need to pull an appropriate EGC through the FMC.

For typical DC voltages the PV needs to be in metallic conduit/junction boxes inside the structure. At a quick glance there is no exception for 12V. Check 690.31. Also FMC should be 3/4" or greater (and MC 1" or greater) to avoid extra protection requirements.

You can modify PVC boxes intended for making your own holes (the ones with zero holes, so the only way to get holes is to make them). But not the most common kind (if you look at mikeholt forum there are plenty of people that say you're not supposed to field modify those boxes), which sounds like what you're doing.

Metal boxes IMO are way easier to work with than PVC, though I didn't put them in drywall for solar run. The type that are unambiguously intended for field modification, are also just as difficult to install in drywall as metal boxes. You can get them in all sorts of geometries and add extenders/other modifications much more readily than for PVC boxes. When I installed my solar this summer I had no need beyond 4x4x2.5 or 4 5/11 x 2.5 boxes.
 
Thank you for the detailed info.

I've come here to learn, and am fast learning how little I know...

I am in an area that does not require permits or inspection, but want to build the system to be safe.

It is a small 1200 Watt system with the panels on the gable end of a pole barn/garage, and the array and ground wires running through the attic, then down to a utility room to the battery storage area.

6-200 Watt, 24 Volt panels in a 3S2P configuration, at 131 Volts, and 11.66 Amps. going into a Victron 180/55 MPPT, which pushes 83 Amps into my 12 Volt battery bank.
The inverter is to run a fridge and basic kitchen items, and the branch circuits are to run a few light bulbs (12 V) and cigar style accessory outlets for 12V fan, TV, 12 Volt fridge, etc.
The outlets are within 3' of the busbar, and the longest of the branch circuits feeding the lights is 30'.

In reviewing my plan, I really only have a problem with 3 of the outlet boxes not being deep enough. I will look online for some deeper old work metal boxes that can hold the aux. outlets.
One of the reasons it seemed to make more sense to use PVC, or Polycarbonate boxes, is because of all the holes in the metal boxes. Sure, metal boxes are fireproof, but if a fire originates in a box, the flames, dripping insulation, etc, could leave the box and contact a flammable surface?

As for the conduit being interior, or exterior, I could run the PV cables, and the ground from the array, to the battery storage area, but it would require trenching, and then once inside, I would still need to run wire in conduit up through the attic to the other rooms in the building to supply the lighting.

The text was found on the Polycase.com Website.

I had to take pause last night after reading your reply, as the ground wire issue gave me info overload...
It started out on another thread I posted here, about running a ground from the array, to the busbar, and then to the main AC panel ground bar. The advice and instruction was that outside, the ground needs to be bare copper, and once inside, it needs to be insulated, and run in conduit. All good until I hear that now the conduit carrying the insulated ground, needs to be grounded on the outside of the conduit with...a bare ground wire!

Further thought says that since I am also running current carrying wire in that conduit, that having the conduit grounded is wise. However, if the conduit "only" carries an insulated ground, such as from the busbar to the mail AC panel, must that conduit still be grounded?

It was my intention to run the PV wires from the array, down the exterior wall to to a DC isolator switch, which is plastic, and has fittings to hold the wire tight. This no longer seems doable, as it leaves the PV wires exposed for 3' on the exterior.
So the next plan was to run them in PVC conduit, down to a different type of disconnect, then back up and into the attic, where they would be spliced in a PVC junction box, with the longer wires running through the attic to the busbar. That junction box is also where the bare and insulated grounds would be spliced, and the conduit material changes from PVC to EMT.
 
Last edited:
In reviewing my plan, I really only have a problem with 3 of the outlet boxes not being deep enough. I will look online for some deeper old work metal boxes that can hold the aux. outlets.
One of the reasons it seemed to make more sense to use PVC, or Polycarbonate boxes, is because of all the holes in the metal boxes. Sure, metal boxes are fireproof, but if a fire originates in a box, the flames, dripping insulation, etc, could leave the box and contact a flammable surface?
Do you have a picture of where they're going, annotated with framing and why you need the depth?

With metal boxes you have an easier time of finding extension rings to get more volume, though i'm not sure how easy it is to make it line up with an old work box. Another thing to consider is to surface mount the conduit, that's easier for servicing anyway, and I think for DIY solar most people like to surface mount their subpanels.

The holes in metal boxes are pretty small, and if you have an unused knockout you are supposed to use a seal (most of the listed ones are metal). If you use clamps /fittings like you're supposed to then there should be fewer remaining gaps. I believe steel boxes are presumed to be fire rated while PVC needs to be tested for that (that said, most PVC boxes are rated for at least 1 hour).

As for the conduit being interior, or exterior, I could run the PV cables, and the ground from the array, to the battery storage area, but it would require trenching, and then once inside, I would still need to run wire in conduit up through the attic to the other rooms in the building to supply the lighting.

It would probably be easier to put your inverter near where your main panel or subpanel is right now. OR bring a single feeder over to that location, then create a critical loads panel & move circuits over to that. You are allowed to splice/extend circuits within a subpanel to send them to another subpanel. May require some labeling though.

It started out on another thread I posted here, about running a ground from the array, to the busbar, and then to the main AC panel ground bar. The advice and instruction was that outside, the ground needs to be bare copper, and once inside, it needs to be insulated, and run in conduit. All good until I hear that now the conduit carrying the insulated ground, needs to be grounded on the outside of the conduit with...a bare ground wire!
It's not really that difficult to bond the conduit in a plastic box, there's a standard readily available fitting for it. As long as the plastic is all at one end, and not in the middle or both ends, the bonding happens via the lock nuts.

The reason for the rule for boxes to be bonded directly to ground wire (Equipment Grounding Conductor - green) if there are splices is that there is an extra risk of a short. Also in that case you need to be extra careful if using conduits as the only EGC path. The fittings should be higher quality, installed to code, and needs to respect the limits on FMC (if flex is used). I prefer to always run a wire.

Further thought says that since I am also running current carrying wire in that conduit, that having the conduit grounded is wise. However, if the conduit "only" carries an insulated ground, such as from the busbar to the mail AC panel, must that conduit still be grounded?
Any metal component in the electrical system needs to be bonded to grounding system for safety in case a hot wire contacts that metal. You don't want random stuff to stay energized. If properly bonded to grounding system circuit breaker will trip.

It was my intention to run the PV wires from the array, down the exterior wall to to a DC isolator switch, which is plastic, and has fittings to hold the wire tight. This no longer seems doable, as it leaves the PV wires exposed for 3' on the exterior.
So the next plan was to run them in PVC conduit, down to a different type of disconnect, then back up and into the attic, where they would be spliced in a PVC junction box, with the longer wires running through the attic to the busbar. That junction box is also where the bare and insulated grounds would be spliced, and the conduit material changes from PVC to EMT.

A picture would help a lot. There's a couple ways to do this. Usually the PV is transitioned to EMT conduit on the roof (some people prefer PVC), going into a junction box. And then a length of EMT is bent to go around the eaves, or flashing used to go straight down through the roof (easier with open eaves/attic access).

I would suggest driving around to look at how people do this on their houses. If you are in an area with a lot of solar. Otherwise ask/look for example photos.
 
Thank you again for the additional info. I will continue to study and absorb all these ideas. (y)
 
It was my intention to run the PV wires from the array, down the exterior wall to to a DC isolator switch, which is plastic, and has fittings to hold the wire tight. This no longer seems doable, as it leaves the PV wires exposed for 3' on the exterior.
So the next plan was to run them in PVC conduit, down to a different type of disconnect, then back up and into the attic, where they would be spliced in a PVC junction box, with the longer wires running through the attic to the busbar. That junction box is also where the bare and insulated grounds would be spliced, and the conduit material changes from PVC to EMT.

A picture would help a lot. There's a couple ways to do this. Usually the PV is transitioned to EMT conduit on the roof (some people prefer PVC), going into a junction box. And then a length of EMT is bent to go around the eaves, or flashing used to go straight down through the roof (easier with open eaves/attic access).

I would suggest driving around to look at how people do this on their houses. If you are in an area with a lot of solar. Otherwise ask/look for example photos.
 

Attachments

  • capture3.jpg
    capture3.jpg
    511 KB · Views: 22
The vertical panels bother me a crapton. Hard to install and service without special lift. Lots of shading from eaves. God awful production some months. Also very little off the shelf code compliant mounting hardware. Yes I looked into doing this a fair bit. Any one of these concerns IMO is enough to fast fail the project and consider doing something else.

Anyway this should be really easy. PVC or EMT into the disconnect. Use cable glands on ends of conduit to clamp onto the PV cable when it goes in. This transition needs to be under the panels.
 
Thanks.

I am not talented with the CAD program I am using... The panels will be mounted on a wood frame that tilts them, from the bottom, to 31.5 degrees. The top of the panels will be even with the fascia. This location points south, and gets great sun 4 hours a day, and lesser amounts in the hours leading up to, and away from.

In my drawing, the PV cables enter the conduit under the panels, then go into a junction box, then down to the disconnect, then back to the junction box where they enter the attic, in bonded metal conduit with the green ground which has transitioned from #6 bare copper, to #8 insulated.
 
With the wall mount you will have some trouble with structural code compliance, if that matters. Need engineer stamp for the self- built mount.

You will also most likely need to directly bond the EGC to every panel. Unless you are using some kind of unistrut/superstrut between the panel and the wood. Then you can bond to the strut. Directly bonding is annoying during service. (But servicing this wall mount will already be annoying, you might need to buy a lift or something, or have a truck / know where to rent one)

In my drawing, the PV cables enter the conduit under the panels, then go into a junction box, then down to the disconnect, then back to the junction box where they enter the attic, in bonded metal conduit with the green ground which has transitioned from #6 bare copper, to #8 insulated.

Yeah that sounds fine,.
 
Directly bonding is annoying during service. (But servicing this wall mount will already be annoying, you might need to buy a lift or something, or have a truck / know where to rent one)

I appreciate your concerns and will weigh them carefully. Will you define "annoying" in this scenario, both the bonding and servicing?
The fame mount allows easy access from underneath to all cables but the ground, and that can be remedied by bonding the panels on the bottom instead of the top.
The bottom of the panels are roughly 8' off the ground, and from the building face to the bottom end of the panels is about 32 inches. For me anyway, pretty easy to access any of the wire connections/runs with a ladder. Or am I completely missing something?
 
The vertical panels bother me a crapton. Hard to install and service without special lift. Lots of shading from eaves. God awful production some months. Also very little off the shelf code compliant mounting hardware.

One of the reasons I am considering this plan is because of the more or less even sun hitting them through the peak hours.
I can just as well mount them on the roof at the end of the gable in the photo, but then the two strings are facing two different directions, and I have only 1 string working in the morning, and the other working in the afternoon. I have too many trees blocking the sun...

If roof mounted, would you attach them to the roof directly, or put them on angle mounts tilted up to get more southern exposure?
The orientation of the front of the garage is south. Looking straight at it, is north.
 

Attachments

  • capture3.jpg
    capture3.jpg
    511 KB · Views: 5
Last edited:
I appreciate your concerns and will weigh them carefully. Will you define "annoying" in this scenario, both the bonding and servicing?

Bonding - Suppose you use the Weeblug designed for bonding the EGC directly to the panel. Then every time you need to move the panel you have to unhook the EGC (and technically, if you look at servicing manuals for racking, they tell you you should restore the EGC to as much of the array as possible so you don't add electrocution risks). You may also need to use a more flexible EGC, like maybe stranded #6, which would make things harder to work with in some cases.

The pre-drilled bonding points for these are on the bottom BTW.

Servicing - The big advantage of ground mounts and roof mounts is that you have a stable floor to work on (let's pretend the roof slope is "nice", like what you have in the picture). That lets you unmount panels and put them on the side. That is not possible for wall mount panels at the height you have in the picture.

I don't exactly know how commercial-style installations really work in install / servicing side. But I did recently happen to see a covered parking project, with panels about 20 feet up. And they had some lifts sitting in the parking lot while they were working on it. So presumably that is how they got access.

For your case, it sounds like you will be able to get a ladder under there and tilt the panels for access. I guess if you put the MLPE (if any) on the bottom edge of the panels, that would help a lot (top edge would suck for access). So this isn't so bad. I was assuming they would be flat mount to the wall with zero clearance. 32" is plenty to service.
 
If roof mounted, would you attach them to the roof directly, or put them an angle mounts tilted up to get more southern exposure?
Parallel mounting to the plane of the roof is the easiest to design & get approved. For my city, if I use any kind of angle mount, I have to get engineer stamps.

So it comes down to a cost-benefit analysis. Angle mounts would get more out of each individual panel, but you pay for it in more expensive hardware and permitting process (it might even be kind of hard to find someone to help prepare these plans. while parallel flat mounting is super high volume and well understood). In my area I rarely see angle mounts on people's houses, in fact I think I've only ever seen those online. I guess people compensate by adding more panels.

Yeah, trees suck, and the reason I was considering vertical panels was because there was a gap in the trees right there.
 
Did you put in a couple different scenarios into PVwatts to see what you'll get across the year?

PVwatts won't handle shading, you can search the forum for some example of tree modeling commercial software. I'm not familiar with that, I relied on someone else to do that for my house and I extrapolated from their data.
 
BTW your original post said 12V in a lot of places. Do you mean 12# gauge? The panels in your picture don’t look like 12V

For this awkward wall install you might want to use #10 for a tiny bit of extra future proofing, if the array needs to be reconfigured.

Also 12V panels tend to not have the certification's for home installation (but a few do).
 
Did you put in a couple different scenarios into PVwatts to see what you'll get across the year?

I tried it, and another for hours, but found these calculators/graphics easier for grasping the whole picture.
Good I think, as you can enter your coordinates. Making me rethink this location.

BTW your original post said 12V in a lot of places. Do you mean 12# gauge? The panels in your picture don’t look like 12V

Thanks for catching that...
The panels are 200 Watt, 24 Volt.
Wire will be 8 AWG.
The 12 Volt reference is for the (12 Volt) accessory outlets and lights.

I've attached a drawing of the overall system.
 

Attachments

  • capture2.jpg
    capture2.jpg
    717.4 KB · Views: 15
Cool. For your ~120V strings, it is safe to use #10 both before and after the combiner.

#8 requires a little more careful shopping for if used in MC4 cables since there is a specific size of MC4 you need to use. While #10 MC4 is more widely stocked.
 
Back
Top