Symbioquine
Solar Enthusiast
- Joined
- Jul 6, 2021
- Messages
- 431
Some things I've learned about the DuroMAX XP9000iH - hopefully some of this will help other folks:
Similar Generators
This generator is very similar to the following generators which can be used (with a grain of salt) as a reference when looking for helpful reviews, alternate manual descriptions, and parts/wiring diagrams.
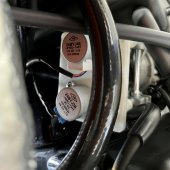
Fuel Solenoid & Hidden Fuses
See https://diysolarforum.com/threads/how-efficient-is-your-generator.50418/
Handle Swap
The generator has two kinds of handles, the horizontal bar handles which are located on both ends of the generator and the folding ones that are bolted on to the horizontal bar handle on one end of the generator.
The folding handles can be moved from the back end of the generator to the end with the front panel. This is useful if you're storing the unit in a tight space, but still want access to the front panel - for example to plug in the battery maintainer.
I saw one Youtube comment that referred to moving the handles by drilling new holes in the other end's horizontal bar handles, but I can't recommend that strategy. The horizontal bar handles are interchangeable, but not identical. The back end has a shorter foam pad on the horizontal bar handle that fits between the bracket for the folding handles, but the corresponding foam pad on the front horizontal bar handle goes the full length. I'm pretty sure the bracket for the folding handles wouldn't fit over the foam pad nicely, and it would leave the rear handle with some unnecessary holes and a short foam pad. It's better to also swap the horizontal handles as part of moving the folding handles to the front.
Moving the handles from one end to the other doesn't require any actual modifications to the hardware, but is fairly involved because you have to take the wheels and all four clam-shell sides off the generator. Once that's done, it is simply a matter of removing the 4 bolts that hold the folding handles on, unbolting and sliding the two horizontal bar handles out and swapping them, then re-attaching the folding handles on the front of the generator.
When taking the clam-shell sides off the generator, make sure not to lose these little clips;

Future Possible Parts
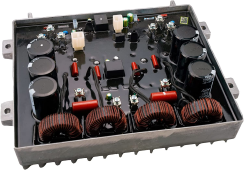
When the fuel solenoid issue happened, I was worried that it might be one of the main boards (control or inverter) so I spent some time looking for possible replacement parts.
One part that looks very similar is the inverter board for the Predator 8750 - I haven't tried this yet, but I'm willing to bet it's probably the exact same part...
Helpful Reviews


Similar Generators
This generator is very similar to the following generators which can be used (with a grain of salt) as a reference when looking for helpful reviews, alternate manual descriptions, and parts/wiring diagrams.
- Predator 9500 Inverter Generator
- GENMAX GM9000iED
- TOMAHAWK TG9000i
Fuel Solenoid & Hidden Fuses
- If used regularly on propane, the fuel solenoid will burn out since it isn't rated for continuous duty (part claims 8 hours duty cycle, but realistically its days are numbered regardless in a hot vibrating engine compartment)
- When the fuel solenoid burns out, it behaves like a serious short and blows a little glass fuse (F15AL250V) behind the front panel (where all the plugs/indicators are)
- There are three such little glass fuses (of different ratings) in inline holders behind the front panel which seems like one of the less user serviceable places on the generator
- The fuse that the fuel solenoid causes to blow also means the whole front panel ends up unpowered - making the whole generator look dead
- DuroMAX's support line didn't know want or know how to walk me through even that level of troubleshooting so they sent me a whole new generator under warranty - I don't feel bad about this since I basically begged them to help me troubleshoot the one I already had and cumulatively spent more than an hour on hold
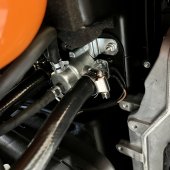
- With a dead fuel solenoid, this generator can still work on gasoline just by unplugging the fuel solenoid and replacing the blown fuse
- The fuel solenoid can be replaced with a motorized ball valve which should have a much longer service life - don't bother trying to get the barbed elbows off the original solenoid since they used some crazy locktite seal stuff and there's no place to put a wrench on the solenoid, instead just get these ones to go with the motorized ball valve linked above
- I'm still experimenting with the motorized ball valve strategy above. The main downside seems to be that it is a bit slower than the fuel solenoid which can allow a tiny amount of fuel to flow after it normally would, resulting in a backfire during normal shutdown
- The CO sensor is very sensitive and is inside the case of the generator with the engine - any wind or attempt to shelter the generator from the wind/rain will almost certainly cause nuisance tripping of the sensor
- Unplugging the CO sensor does not prevent the generator from starting, but it does not operate normally - the oil warning light comes on and the engine runs in a weird surging version of the low idle
- I'm experimenting with operating the generator with the CO sensor removed by tying the green/yellow striped wire with the white wire that lead towards the area below the starter on the engine as shown on this video
- (Please don't lecture me about the safety risks of doing this: The generator will always be operated in an outdoor enclosure away from people. It is too loud to comfortably stand near under load. We have CO sensors/alarms in our nearby living spaces. I intend to label the generator clearly to indicate that it does not have a CO sensor.)
- Somewhat related: https://diysolarforum.com/threads/2021-honda-generator-carbon-monoxide-indicator.25808/
- I don't know whether the low oil shutdown is still functional in this configuration
- Instead of cutting the wires as shown in that video, a replacement plug can be made that shorts the two relevant pins and leaves the rest unconnected. I found that the connector was the same as one from an old computer power supply board;


See https://diysolarforum.com/threads/how-efficient-is-your-generator.50418/
Handle Swap
The generator has two kinds of handles, the horizontal bar handles which are located on both ends of the generator and the folding ones that are bolted on to the horizontal bar handle on one end of the generator.
The folding handles can be moved from the back end of the generator to the end with the front panel. This is useful if you're storing the unit in a tight space, but still want access to the front panel - for example to plug in the battery maintainer.
I saw one Youtube comment that referred to moving the handles by drilling new holes in the other end's horizontal bar handles, but I can't recommend that strategy. The horizontal bar handles are interchangeable, but not identical. The back end has a shorter foam pad on the horizontal bar handle that fits between the bracket for the folding handles, but the corresponding foam pad on the front horizontal bar handle goes the full length. I'm pretty sure the bracket for the folding handles wouldn't fit over the foam pad nicely, and it would leave the rear handle with some unnecessary holes and a short foam pad. It's better to also swap the horizontal handles as part of moving the folding handles to the front.
Moving the handles from one end to the other doesn't require any actual modifications to the hardware, but is fairly involved because you have to take the wheels and all four clam-shell sides off the generator. Once that's done, it is simply a matter of removing the 4 bolts that hold the folding handles on, unbolting and sliding the two horizontal bar handles out and swapping them, then re-attaching the folding handles on the front of the generator.
When taking the clam-shell sides off the generator, make sure not to lose these little clips;
Future Possible Parts
When the fuel solenoid issue happened, I was worried that it might be one of the main boards (control or inverter) so I spent some time looking for possible replacement parts.
One part that looks very similar is the inverter board for the Predator 8750 - I haven't tried this yet, but I'm willing to bet it's probably the exact same part...
| From Listing | In Generator |
|
|  |
Helpful Reviews
Attachments
Last edited:


")