PotusGobbleBottom
Corn Pop was a bad dude.
YESI’d love to see some destruction testing
YESI’d love to see some destruction testing
Oh snap I didn’t think of that, good call.The stud is isolated in the mrbf holders, otherwise the stud would bypass the fuse
Are those all going to be filled with the EVE 304A cells?LMAO ~ Well folks, bored ?
My fun begins ! some assembly required and lot'sa patience. lol
View attachment 207080
All of these get a 200A JK-Inverter edition. New 4.3" screen.
All get Single M8 Case Terminals.
This stack of 6 = 68" high. NO CELLS inside "yet" as this is just unpacking and prepping for assembly
<--- #1 waiting for cells to top charge...
#2 and below standing by waiting.
Sometimes I wish I had 6 arms & hands...
24V system, 8x 280AH cells per case.Are those all going to be filled with the EVE 304A cells?
That would be 46,694 Watt-hours! Awesome.
That is still pretty nice!24V system, 8x 280AH cells per case.
1680AH / 43kWh
Would someone be able to stack a 2nd lug on one of those M8 terminals you got or is it designed for only one and you are going to home run each case?
My first order took about seven weeks but Chinese new year holiday was in the middle of the order, and the second at just under five weeks arriving Monday. Just getting next order together to complete the 57kwh bank.That is still pretty nice!
I just ordered 4 of the 304A battery kits from Amy. Plus a 12v to switch my RV house battery over to lithium.
Now the hardest part is waiting! I feel like a 6 year old who knows they’re getting a new bike for their birthday.... but it's two months away. (Is it here yet? Now? How about now?)
Amy told me it could take 3 weeks to get the cases cut and everything ready to ship, so I imagine it will be 2 months before I am going to get my hands on them.My fifth and sixth 8s box is arriving Monday
My first order took about seven weeks but Chinese new year holiday was in the middle of the order, and the second at just under five weeks arriving Monday. Just getting next order together to complete the 57kwh bank.
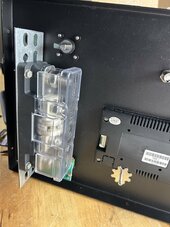
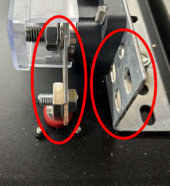
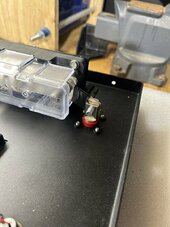
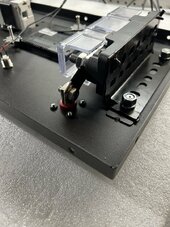
Cool idea S Davis. I would cover the fuse and everything connected to it. It's too easy to make a mistake with all of that metal exposed. Tape is way better than nothing.Ok this is going to work, I am mounting a 200amp class t fuse to the back of the front handle, I have 4m of 2ga 200c red and black wire coming and I will use it to go from the breaker to fuse and from fuse to front main lug.
View attachment 207382View attachment 207383View attachment 207384View attachment 207386
Looks like a good solution but a couple of ?Ok this is going to work, I am mounting a 200amp class t fuse to the back of the front handle, I have 4m of 2ga 200c red and black wire coming and I will use it to go from the breaker to fuse and from fuse to front main lug.
A great idea. When messing around in my battery case, the only concern I want it keeping my tools clear of battery terminals and being careful not to pull anything out of place once assembled. An untimely oops can really mess up the day.have NO SHARPS AT ALL

What about swapping the positive and negative terminal around, so the fuse is not anywhere near the negative?Sorry it was just a mockup to see if it will fit, I didn’t mean to trigger any ones OCDI am going to adapt or change the angle to be more pleasurable on the eyes. I am not using the inverter model BBS so I have more room.View attachment 207486
And it will be covered. And with my ocd I will probably have to paint the angle as well.
That is a good idea, I would have to make a couple extra cables for the negative. But I have some Eriflex flexibar 3/32/1 that I could probably use between the fuse and main positive.What about swapping the positive and negative terminal around, so the fuse is not anywhere near the negative?

quality cast lugs
no worries, work in progress. Going for safety here, not just my life anybody around my build could be at risk.Better BUT I had a heart palpation when I saw all that Open Unprotected Steel. A flash in my mind of what would happen if a piece of metal bridges that connect to (+) and the bracket etc... 1 oopsie Flash = 1 Bad Day.
View attachment 207517
1) I would at minimum put heat shrink to cover the busbar from Fuse to Terminal. Also I would shorten the M8 Bolt so not so much thread is exposed. "Murphy Temptation".
2) Your Angle Bracket ! PLEASE TRIM THAT DOWN ! get rid of excess and really make sure it is all "soft edged" so nothing sharp...
Another Murphy Temptation".
Never EVER provide temptations / Invitations for Murphy to come and apply his laws onto you. Straight from the Lesson Learned pile of Crisis Management, Rule 1 being Prevent the crisis in the first place !


