diy solar

diy solar

Avoiding Galvanic Corrosion

I didnt read the whole thread so some of this might have been mentioned before.
Physical cleaning of aluminum terminals and connections is a bit of a risk and depending on how much current you are moving can increase the resistance in the connection. Hand held wire brush would be the safest. Sticking something on a rotary tool, whether its a wire wheel, scotch brite, sand paper or WHY is crazy. You need the faces of the connection as flat as possible to maintain as much surface contact as possible. Every single scratch you put on the surfaces reduces the surface area available to make contact with the mating surface. That said, you have to make due with what you have and if the connections are already beat then your not going to do anything worse to them so WTF, you might as well. If the connections are flat and smooth then I suggest (and will use) a chemical deoxidizer such as aluma brite. I use this on all the aluminum I weld and am going to use it on my batteries and aluminum busbar. Before anyone starts pointing out all the drawbacks and risks, no you cant be stupid and do a poor job of the clean up. You must be careful and sparing when using and have to make sure you wash away/clean it off. Its important and there is no getting around it. If your not detailed oriented and dont understand, then use a physical means of removing oxide and live with the downsides of that. If you are careful and understand what is going on, using a chemical method to remove oxides will maintain a smooth flat surface and increase surface contact.
I think my resolution was too high and focus too narrow when I was thinking about this. I still believe chemical oxide removal is the best approach for aluminum bus bars however yesterday while I was watching my kids open their presents it just jumped into my head that because face of the terminal is pretty much flush with the surface of the plastic that surrounds it, there was a good change that applying liquids to the terminals would cause them to be drawn into the space between the terminal and the surrounding plastic which could cause obvious issues. For now Im going to have to back away from the idea of using a liquid on the terminals.
 
Last edited:
I should also say, its a super easy one to test. Just drill and tap 2 holes into a piece of softer aluminum like a 3xxx series but even 5052. epoxy a stud in one and once cured stick a spacer over the stud, a washer and a nut and torque them both and see which one fails first. just make sure you get the same thread engagement and the hole is epoxied properly.
This is a great test. Has anyone done it yet? When doing it, check the resistance of the connection after the stud is installed and after epoxy is applied. I believe you will find an increase in the resistance because the stud will be insulated by the epoxy.
 
I think my resolution was too high and focus too narrow when I was thinking about this. I still believe chemical oxide removal is the best approach for aluminum bus bars however yesterday while I was watching my kids open their presents it just jumped into my head that because face of the terminal is pretty much flush with the surface of the plastic that surrounds it, there was a good change that applying liquids to the terminals would cause them to be drawn into the space between the terminal and the surrounding plastic which could cause obvious issues. For now Im going to have to back away from the idea of using a liquid on the terminals.
I agree that introducing liquids in this manner is not a good solution. Especially when it requires a water rinse. Ensuring that the water completely removed would require baking out or time in a low humidity environment. Both would allow oxidation to return unless coated with a lubricant.
It always comes back to this. Clean your terminals and bus bars, protect them with a quality connector lube, and assemble carefully.
 
I would have thought that by putting thread locker on the bottom of terminal hole, when you screw down into it the 'air pressure' plus thread locker mix would be forced up the threads(so long as you didnt put down too much)?

That implies that your bolt is long enough to reach the bottom of the terminal. Miss the bottom by a couple mm and you have a nice pool of thread locker at the bottom and nothing, or very little, on the threads.

I agree that introducing liquids in this manner is not a good solution. Especially when it requires a water rinse. Ensuring that the water completely removed would require baking out or time in a low humidity environment. Both would allow oxidation to return unless coated with a lubricant.
It always comes back to this. Clean your terminals and bus bars, protect them with a quality connector lube, and assemble carefully.

I'm in the chemical cleaning camp. If you have enough liquid to puddle up, it's too much. A (clean) damp rag with Acetone is good enough.

I'll reiterate the cleaning technique used by folks that TIG weld aluminum:
1. Degrease/clean the surface
2. Lightly abrade the surface to remove the oxide layer. Abrade in one direction.
3. Final clean with a cleaner of your choice that leaves no residue. I tend to use Acetone and if not that, then denatured alcohol. I've heard that vinegar may be effective.

Do not use compressed air to blow off the oxide dust created by step #2 or to hasten the drying process. Air is what promotes the oxidation. I'm not sure I would even blow it off with my breath, but that might be a bit extreme.

The welding guys can be rather anal. Oxides on aluminum make it difficult to weld because the oxides melt at a much higher temperature than the base aluminum. They recommend using a stainless steel brush that has only been used on aluminum.
 
In the mid to late 90s I was one of 11 welders in British Columbia that held a PWP to weld aluminum busbar (4" diameter aluminum tube (1/4" wall IIRC) with internal backing) at BC hydro substations.
1. Degreasing and cleaning is very important. This is where you use acetone and do it before you wire wheel.
2. Wire wheeling or wire brush, direction is irrelevant. Blowing with air has almost no effect on amount of oxide produced. The purpose of wire wheeling the surface is to remove months, years, decades worth of oxide. Wire wheeling the surface and welding it an hour later, even a day or two will have no/almost no perceptible oxide, even a month you will be fine unless it is sitting out in the elements. Before you have put the wire brush down oxide has formed, it is extremely rapid initially, once the initial layer is formed, future depth of oxide is significantly slower and blowing air over it for a second or two is immaterial.
3. You can acetone again at this point just in case something flew out of the wire wheel but if you wash your wire wheel first your good. If you skip this step you will be fine for all but the most critical aerospace applications (and you will probably be fine in those too).
 
That implies that your bolt is long enough to reach the bottom of the terminal. Miss the bottom by a couple mm and you have a nice pool of thread locker at the bottom and nothing, or very little, on the threads.
I just installed my flanged aluminium studs 1 hour ago. I opted for a small line of threadlocker down one side of the terminal threads, none on the terminal surface or terminal bottom. Noalox on the terminal surface only(mearest film). Tightened the flange stud to 2nm using the double locked nut method. Will leave it a day or so to cure and hope i have enough thread locker around the threads to do the job. The studs were soaked then wiped with IMS. Contact after instal gave identical readings (to 2 dec places on DMM)across terminals as i got before the instal, so hopefully good enough contact at the faces.

When i measured the terminal hole depth previously, i felt it was 7mm, which i suppose would give an effective thread hole depth of 6mm???
To prove it to...take the supplied screw, place it down through two supplied busbars, then measure the threaded part that protrudes...you will find that it is exactly 6mm and this combo doesn't bottom out the cell terminal.
 
I just installed my flanged aluminium studs 1 hour ago. I opted for a small line of threadlocker down one side of the terminal threads, none on the terminal surface or terminal bottom. Noalox on the terminal surface only(mearest film). Tightened the flange stud to 2nm using the double locked nut method. Will leave it a day or so to cure and hope i have enough thread locker around the threads to do the job. The studs were soaked then wiped with IMS. Contact after instal gave identical readings (to 2 dec places on DMM)across terminals as i got before the instal, so hopefully good enough contact at the faces.

When i measured the terminal hole previous, i felt it was 7mm, which i suppose would give an effective thread hole depth of 6mm???
To prove it to...take the supplied screw, place it down through two supplied busbars, then measure the threaded part that protrudes...you will find that it is exactly 6mm and this combo doesn't bottom out the cell terminal.

Could you post a picture of your studs .... also, where did your get them?
(I didn't search back in this thread, so I could have missed that in an earlier post.)
 
Could you post a picture of your studs .... also, where did your get them?
(I didn't search back in this thread, so I could have missed that in an earlier post.)
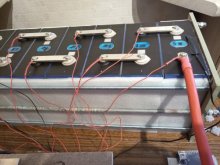
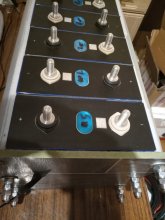
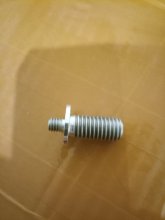
i went from this to this....
threaded rod compression.jpgflanged stud instal.jpgflanged stud.jpg

If i was getting the studs made again, i would do it slightly different. I would opt to keep the stud size the same above the flange, ie 6mm instead of 10mm, as i realised later that you have more surface contact area with only a 6mm hole as opposed to the 10mm hole in the busbar. I would also increase the flange size a fair bit bigger than the terminal size, and have it hexagonal shaped to apply the torque.

I had mine made here... SB Cov Ltd - manufacturer of special components. (specialbolt.com) however they are expensive when only getting a few done.
 
i went from this to this....
View attachment 31447View attachment 31445View attachment 31446

If i was getting the studs made again, i would do it slightly different. I would opt to keep the stud size the same above the flange, ie 6mm instead of 10mm, as i realised later that you have more surface contact area with only a 6mm hole as opposed to the 10mm hole in the busbar. I would also increase the flange size a fair bit bigger than the terminal size, and have it hexagonal shaped to apply the torque.

I had mine made here... SB Cov Ltd - manufacturer of special components. (specialbolt.com) however they are expensive when only getting a few done.
Yes ... it does look like you are loosing some surface area for the bus bar contact.

Thanks for posting that
 
Yes ... it does look like you are loosing some surface area for the bus bar contact.

Thanks for posting that
It is not as bad as i first thought, i my circumstance, since my new busbars are much wider than the old ones supplied with the cells. Some of the current runs through the central post(aluminium conductivity versus stainless steel conductivity), so when the nuts are torqued down, you still get pretty good conductivity.(imo) The supplied busbars had a very large chunk of metal punched out of them(could never see them expand /contract that much), so they too, lost a fair amount of contact area.
 
Last edited:
If i was getting the studs made again, i would do it slightly different. I would opt to keep the stud size the same above the flange, ie 6mm instead of 10mm, as i realised later that you have more surface contact area with only a 6mm hole as opposed to the 10mm hole in the busbar. I would also increase the flange size a fair bit bigger than the terminal size, and have it hexagonal shaped to apply the torque.

I had mine made here... SB Cov Ltd - manufacturer of special components. (specialbolt.com) however they are expensive when only getting a few done.

Looks good! And I agree on the stud size above the flange.
 
One thing i did notice, there was a lot of grime/metal particles at the bottom of the terminals when i cleaned them out prior to instal...cotton bud and IMS. Just something to be mindful of...imo.
 
That implies that your bolt is long enough to reach the bottom of the terminal. Miss the bottom by a couple mm and you have a nice pool of thread locker at the bottom and nothing, or very little, on the threads.
Hopefully you know that bottoming out the bolt is a hazardous proposition on these cells. There is a very real risk of penetrating through into the internal workings. Staying clear of the bottom will still provide plenty of thread engagement.

I'm in the chemical cleaning camp. If you have enough liquid to puddle up, it's too much. A (clean) damp rag with Acetone is good enough.

I'll reiterate the cleaning technique used by folks that TIG weld aluminum:
1. Degrease/clean the surface
2. Lightly abrade the surface to remove the oxide layer. Abrade in one direction.
3. Final clean with a cleaner of your choice that leaves no residue. I tend to use Acetone and if not that, then denatured alcohol. I've heard that vinegar may be effective.

Do not use compressed air to blow off the oxide dust created by step #2 or to hasten the drying process. Air is what promotes the oxidation. I'm not sure I would even blow it off with my breath, but that might be a bit extreme.
A cloth damp with acetone or another solvent would be a good cleaning process. The previous poster was talking about a fresh water flush after chemical cleaning.
With moisture being a requirement for corrosion, that was my objection.
 
In this situation a bit of water once during cleaning is of no risk for corrosion. Repeat wetness is required. Though for expediency I would also suggest a no residue solvent.
 
In this situation a bit of water once during cleaning is of no risk for corrosion. Repeat wetness is required. Though for expediency I would also suggest a no residue solvent.
Moisture introduced during assembly and trapped in the terminals means corrosion from the inside out
I'm using a Scotch-Brite pad and a lint-free wipe damp with 91% isopropyl alcohol.
 
Im really curious, The purpose of using a solvent to wipe the surface of an aluminum weldment is to remove grease and oils from the surface so that once you strike the arc and establish a puddle, you dont contaminate it with those hydrocarbons. Why is everyone wiping the terminals with acetone or alcohols (with water in them)? I am asking this because many people subsequently smear an antioxidant on the surface. Is wiping with a solvent just a procedure from the welding industry that has carried over but doesnt really have any practical value?
 
Moisture introduced during assembly and trapped in the terminals means corrosion from the inside out
I'm using a Scotch-Brite pad and a lint-free wipe damp with 91% isopropyl alcohol.
Its not moisture trapped "in" the terminal that was my concern, that is very simple to deal with. It is moisture trapped around the terminal. Moisture drawn in-between the terminal and the plastic "collar" around it that appears to have a very tight interface and is capable of drawing liquids into it (capillary). Even a damp cloth with 91% may have enough in it if the space is small enough and the cloth is "damp" enough. It will then leave its 9% water behind.
 
Back
Top