


You are using an out of date browser. It may not display this or other websites correctly.
You should upgrade or use an alternative browser.
You should upgrade or use an alternative browser.
JB Weld versus Loctite for grubscrews
- Thread starter fafrd
- Start date
The reason Im not is consistency. Overfill the hole a little and you get excess on the terminal, Underfill and your stud isnt as secure as it could be.
I guess I should have been more specific with my question.
I understand you are going a different direction (with vent holes). I was hoping you might have some advice for us poor soles who are limited to working with solid posts.
At the beginning, you had said (and others had agreed) that ‘trapped gas’ could be an issue with JB Weld.
Now that you have seen how (relatively) easily uncured JB Weld flows out the thread space, I was wondering whether this has changed your view of the concerns regarding trapped gas.
Consistency is an entirely different matter, but screwing in a threaded rod with a dollop of JB Weld on it’s center should allow all gas to escape before the JB Weld begins to compress against the hole bottom and starts to squeeze up into the threads.
The alternative is to put some JB Weld in a puddle at the bottom but I’d think that has greater chance of trapping some gas.
As far as consistency, seems like that would be much easier with a dollop since you can see it and adjust it (compared to anything you put down in the hole which will be much more difficult to control and adjust).
I wiped the foil immediately after I was done doing the test, within 5 min, with acetone, toluene and brake cleaner. The smudge persisted. Not doing that unless I have to.
Epoxy isnt really compressible so there is only two reasons I can think of that any would continue to come up after. First is if you have trapped air in the hole and it is under pressure and is pushing epoxy up the hole and second is if the stud wasnt fully at the bottom of the hole and is continuing to creep down displacing epoxy and pushing it up.
I have a machinist making me one right now!
Sorry, I understand now!I guess I should have been more specific with my question.
I understand you are going a different direction (with vent holes). I was hoping you might have some advice for us poor soles who are limited to working with solid posts.
At the beginning, you had said (and others had agreed) that ‘trapped gas’ could be an issue with JB Weld.
Now that you have seen how (relatively) easily uncured JB Weld flows out the thread space, I was wondering whether this has changed your view of the concerns regarding trapped gas.
Consistency is an entirely different matter, but screwing in a threaded rod with a dollop of JB Weld on it’s center should allow all gas to escape before the JB Weld begins to compress against the hole bottom and starts to squeeze up into the threads.
The alternative is to put some JB Weld in a puddle at the bottom but I’d think that has greater chance of trapping some gas.
As far as consistency, seems like that would be much easier with a dollop since you can see it and adjust it (compared to anything you put down in the hole which will be much more difficult to control and adjust).
I personally dont think It matters if it is on the end of the stud or in the bottom of the hole. I really hadnt considered putting it on the end of the stud. Just my personal opinion, I think Id put it in the hole and run the stud into it. Id make sure the end of the stud was flat or rounded slightly. Sometimes you look at the end of a threaded fastener and the end is concave. I dont think you want that.
Putting it on the stud does sound like it could be easier to judge an amount.
You certainly dont want to remove it after it has been threaded in. I tried that only threading it out half way and then back in and I could hear several bubbles popping as they were forced back out.
If you go the route of putting it in the hole, I suggest applying it with a toothpick or some other small instrument a little at a time until you think you have enough. During each application wiggle the instrument very quickly up and down to help the epoxy flow and disperse in the hole and then give it a minute or 5 to flow on its own and flatten right out.
Thats about all I have....
Great. Will let you know how my dry run works out...Sorry, I understand now!
I personally dont think It matters if it is on the end of the stud or in the bottom of the hole. I really hadnt considered putting it on the end of the stud. Just my personal opinion, I think Id put it in the hole and run the stud into it. Id make sure the end of the stud was flat or rounded slightly. Sometimes you look at the end of a threaded fastener and the end is concave. I dont think you want that.
Putting it on the stud does sound like it could be easier to judge an amount.
You certainly dont want to remove it after it has been threaded in. I tried that only threading it out half way and then back in and I could hear several bubbles popping as they were forced back out.
If you go the route of putting it in the hole, I suggest applying it with a toothpick or some other small instrument a little at a time until you think you have enough. During each application wiggle the instrument very quickly up and down to help the epoxy flow and disperse in the hole and then give it a minute or 5 to flow on its own and flatten right out.
Thats about all I have....
Bob B
Emperor Of Solar
- Joined
- Sep 21, 2019
- Messages
- 8,763
@noenegdod .... I'd be really interested if you tested with one of your drilled studs or drilled your test bolt .... if it is more difficult to remove than without the hole in the stud?
If I have any spare time I could set up a test jig but I really dont have accurate enough gear to provide quantitative results. It would just be more or less a seat of the pants evaluation and I think that if there is a difference it wouldnt be large enough for me to actually detect.@noenegdod .... I'd be really interested if you tested with one of your drilled studs or drilled your test bolt .... if it is more difficult to remove than without the hole in the stud?
Well, I was going to use Permatex orange in my terminals, but after reading this thread, I got tempted by a permanent solution.
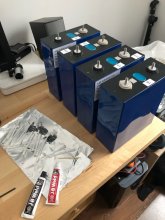
So I got some two-part JB Weld this morning. After cleaning the terminals and grub screws with acetone, I mixed a very small amount of epoxy and tried it on the first cell. I used a Q-tip on which I had removed most of the cotton and painted the threads in the terminals and on the grub screw. That was too much, I had to clean a small amount that oozed out. It was obvious that most of the epoxy that came out was from the amount I put on the screw, so for the rest of terminals, I decided to try and put epoxy only on the terminal threads, mainly towards the top, and on the tip of the screw. That worked well. On a couple of terminals, I saw a tiny amount of epoxy ooze out a few minutes later, however that was easy to clean. I am happy with the result so far.
So I got some two-part JB Weld this morning. After cleaning the terminals and grub screws with acetone, I mixed a very small amount of epoxy and tried it on the first cell. I used a Q-tip on which I had removed most of the cotton and painted the threads in the terminals and on the grub screw. That was too much, I had to clean a small amount that oozed out. It was obvious that most of the epoxy that came out was from the amount I put on the screw, so for the rest of terminals, I decided to try and put epoxy only on the terminal threads, mainly towards the top, and on the tip of the screw. That worked well. On a couple of terminals, I saw a tiny amount of epoxy ooze out a few minutes later, however that was easy to clean. I am happy with the result so far.
Attachments
Last edited:
That's an awesome report. Thanks!Well, I was going to use Permatex orange in my terminals, but after reading this thread, I got tempted by a permanent solution.
So I got some two-part JB Weld this morning. After cleaning the terminal and grub screws with acetone, I mixed a very small amount of epoxy and tried it on the first cell. I used a Q-tip on which I had removed most of the cotton and painted the threads in the terminals and on the grub screw. That was too much, I had to clean a small amount that oozed out. It was obvious that most of the epoxy that came out was from the amount I put on the screw, so for the rest of terminals, I decided to try and put epoxy only on the terminal threads, mainly towards the top, and on the tip of the screw. That worked well. On a couple of terminals, I saw a tiny amount of epoxy ooze out a few minutes later, however that was easy to clean. I am happy with the result so far.
Wow, you’ve made all my careful experiments pretty much meaningless...Well, I was going to use Permatex orange in my terminals, but after reading this thread, I got tempted by a permanent solution.
So I got some two-part JB Weld this morning. After cleaning the terminals and grub screws with acetone, I mixed a very small amount of epoxy and tried it on the first cell. I used a Q-tip on which I had removed most of the cotton and painted the threads in the terminals and on the grub screw. That was too much, I had to clean a small amount that oozed out. It was obvious that most of the epoxy that came out was from the amount I put on the screw, so for the rest of terminals, I decided to try and put epoxy only on the terminal threads, mainly towards the top, and on the tip of the screw. That worked well. On a couple of terminals, I saw a tiny amount of epoxy ooze out a few minutes later, however that was easy to clean. I am happy with the result so far.
Did you use any kind of torque to thread in your grubscrews or just finger-tight?
Did you feel it hit the bottom? Did you leave it on the bottom or back off a bit (1/4 turn)?
And lastly, do you think a dab on the bottom alone would have worked? Did you also put some on the upper female threads because you were concerned the JB Weld would not ooze all the way up there to coat that area?
At this point, I’m probably going to hold off doing mine until yours have cured and you’ve had a chance to test them.
I believe the recommended torque for this diameter stainless thread is 40 or 45 inch-lbs (based on stretch of the stainless), so if your JB Welded terminals can reach that level of torque without issue (after curing), I’ll be following in your footsteps...
I threaded the screws in by hand (easily) to the bottom, and then backed off a bit.Wow, you’ve made all my careful experiments pretty much meaningless...
Did you use any kind of torque to thread in your grubscrews or just finger-tight?
Did you feel it hit the bottom? Did you leave it on the bottom or back off a bit (1/4 turn)?
And lastly, do you think a dab on the bottom alone would have worked? Did you also put some on the upper female threads because you were concerned the JB Weld would not ooze all the way up there to coat that area?
At this point, I’m probably going to hold off doing mine until yours have cured and you’ve had a chance to test them.
I believe the recommended torque for this diameter stainless thread is 40 or 45 inch-lbs (based on stretch of the stainless), so if your JB Welded terminals can reach that level of torque without issue (after curing), I’ll be following in your footsteps...
The epoxy being more of a paste, I think it would have been more difficult to drop the right quantity on the bottom. I felt I had a better chance to have more JB Weld on most of threads this way.
I do not have a proper tool to measure the torque, unfortunately. So far, for top balancing and capacity testing, I only torqued lightly and carefully by hand, with an Allen key.
LOL. I think I heard someone say "hold my beer"Wow, you’ve made all my careful experiments pretty much meaningless...
I threaded the screws in by hand (easily) to the bottom, and then backed off a bit.
I think I’ll leave mine on the bottom to maximize thread engagement. The reason to ‘back off’ is to leave some headroom in case grub screw comes loose and continues to turn when tightening a nut from above.
With hardened epoxy in the space between bottom of grub screw and bottom of terminal hole, there is reslly
The epoxy being more of a paste, I think it would have been more difficult to drop the right quantity on the bottom. I felt I had a better chance to have more JB Weld on most of threads this way.
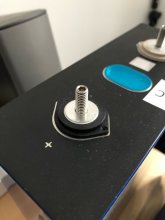
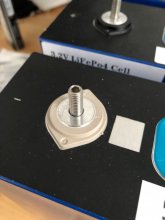
I tried my ‘dry run’ on a 1/4” binding post and found the same thing. I put a big enough dollop on the bottom of the bolt to fill what I believed would be the air space but it bottomed without oozing out of the top.
I unscrewed the stud and was surprised to see that epoxy had only oozed up through the lowest 2 of 5 threads. The top 3 threads of the stud were clean.
So I added another dollop and tried again and this time when I removed, I had epoxy up 4 out of 5 threads. A 3rd dollop of equal size and I got a nice bead of epoxy oozing out of the top through the thread opening which was easy to clean off.
It was pretty easy to get a pyramid-shaped dollop on the end of the bolt (grubscrew) which always came out roughly the same size, so I think I’m happy enough with this ‘insert and remove until oozing out of the top’ method that I’ll glue the grubscrew into my stripped terminal using approach.
I’m actually shocked at how much JB Weld it took to fill the airspace of a threaded bolt - far more volume on their than I would have estimated.
The nice think about the technique I tried today is that you can easily take 2 or three passes to get the volume of glue JB Weld correct. I’m pleasantly surprised to discover how liquid this epoxy is...
For my actual attempt at threading my damaged cell, I will probably attempt to get 1-2 ‘pyramid-sized’ dollops positioned at the bottom of the hole using a matchstick and then apply a 3rd dollop to the bottom of the bolt. If you can get JB Weld oozing out of the top thread on the first attempt (without wasting a ton), that’s obviously the best of all worlds...
Fpoet said:I do not have a proper tool to measure the torque, unfortunately. So far, for top balancing and capacity testing, I only torqued lightly and carefully by hand, with an Allen key.
I bought a sensitive 0-80 inch-lbs with minimum markings of 0.25 inch-lbs for $20 on Amazon. A good investment if you want to secure lugs / busbars in a reliable and repeatable manner...
I bought a sensitive 0-80 inch-lbs with minimum markings of 0.25 inch-lbs for $20 on Amazon. A good investment if you want to secure lugs / busbars in a reliable and repeatable manner...
Link?
")
That's the one I have too.
ArthurEld
Solar Wizard
In case anyone is interested, I torqued all of the nuts on the studs that I used loctite on to 45 in lbs.
Then I backed off and retorqued to 40 in lbs.
None of those studs were stripped. But a lot of them were very loose. Loose threads in aluminum is a bad combination.
I am satisfied that they will hold now.
Then I backed off and retorqued to 40 in lbs.
None of those studs were stripped. But a lot of them were very loose. Loose threads in aluminum is a bad combination.
I am satisfied that they will hold now.
Last edited:
ArthurEld
Solar Wizard
That thing screams SHORT! lol
And it doesn't look easy to cover.
I need to find one that is insulated or that is easy to insulate.
This one has almost 9000 happy customers - https://www.amazon.com/Wheeler-Accurizing-Measurement-Gunsmithing-Maintenance/dp/B0012AXR4S/ref=sr_1_4?crid=2G40M1YPFJ1VP&dchild=1&keywords=torque+wrench+inch+pounds&qid=1612615244&s=hi&sprefix=torque+wrench+in,tools,185&sr=1-4
And free returns in case I don't like it
Last edited:
Hardly but if you had taken a small amount of time and actually read through the thread you would have half a clue as to what you have left on the table. Lets just jump right to the end result and do a quick test.Wow Rocket Science
Thread a nut finger tight down the stud to the terminal surface. Take a thin piece of paper or better yet the thinnest feeler gauge you can get and see if it will slip in under the nut anywhere around its circumference. Check all of them because a broken clock is right twice a day. When you find one (or all of them) that you can slip something under, what is it exactly that you think that stud sees when it gets torqued down? Simply by torquing the nut down you are differentially loading the sides of the stud and the terminal/epoxy/stud interface. Will it fail? I have no idea. You may be just fine and the rest of us that were discussing it to death may have been simply wasting our breath and time but if you have a failure it will be because of some small detail like this that you plowed over.
Rocket Science? No. Hold my beer? Yes.
Solarfun4jim
Solar seduced :-)
I'm surprised you decided the conductive silver epoxy was not worth it. What is your reasoning for this?There are two conversations intertwingled in this thread.
1) What to do if you have damaged or stripped threads.
2) What to do if you have brand spanking new cells with good threads.
I agree with you that loctite on good threads the very first time you screw in the posts is the right thing to do. Get them in and never take them out. (I would probably use red though). In the past I used a conductive silver epoxy but have since decided it is not worth it.
Unfortunately, as DIYers, as soon as we get the cells we want to play with them...and we do. Unless someone has heard the warning that the SS screws will damage the soft aluminum threads, they end up with damaged or stripped threads. That is exactly what happened to me with the first cells I bought. A lot of others on this thread and other threads have said the same. I am willing to bet that for every one that admits they did it there are several that have not admitted it.
Similar threads
- Replies
- 21
- Views
- 2K
- Replies
- 41
- Views
- 3K
- Replies
- 8
- Views
- 343
- Replies
- 29
- Views
- 2K