ChadClancy
New Member
- Joined
- Mar 19, 2021
- Messages
- 3
I just wanted to post some pics of my first LiFePO4 battery build using four 280Ah cells and an Overkill Solar BMS. This is for an RV to replace our current lead acid deep cycle batteries.
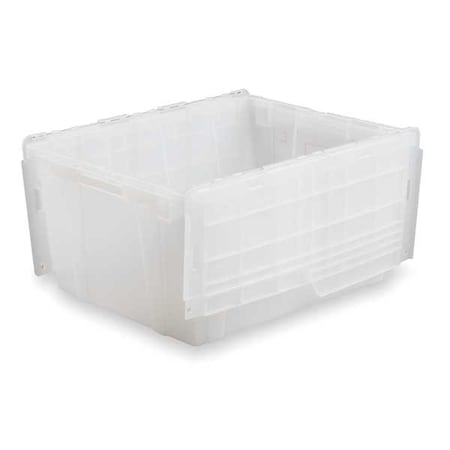
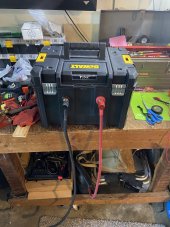
This battery bank will be located inside a storage compartment in the RV so it will be well protected but there are other things stored in the same area so I wanted it to be self contained and protected. I also wanted it to be as compact as practical so I went to the local box store looking for storage bins of the right geometry. This wasn't as easy as I originally envisioned. I was looking for something with an inside footprint of 12x8 inches and a height of around 10 inches. When looking to see what was available, it seemed like most containers of that size had a limiting height with most of them in the 8.5 inch range which was insufficient. I did find one that would be a tight fit with a height right around 9 inches. I wanted to have studs on the main +/- terminals so I knew that I would have to size these just right for everything to fit with this case. Here is a pic of the box which is about $13.50 at Home Depot. This is a waterproof case so I drilled holes in the top for some ventilation. A small PC fan could be added to help circulate airflow through the case.

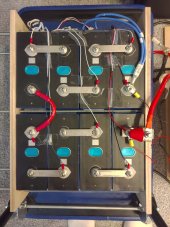
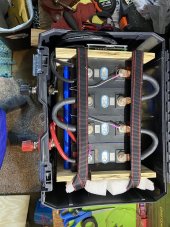
And here are some pics of the assembled battery. I made some 3D printed bulkheads for the box battery terminals and I still want to make some color coded magnetic covers to shield the terminals. If you need more clearance for a cell clamping and/or spacing setup, I would suggest putting the battery posts on the side, alongside the BMS (but separated to avoid shorting).


Not a great deal of clearance inside but there is just enough to have a little room to spare on the BMS side and to be able to make the bulkhead/terminal connections on the front.


Since this is for a mobile installation, I will probably make some sort of strap system to secure it to the floor of the RV storage bin where it will reside.
One thing I forgot to mention is that this case comes with internal deviders that I removed and I also cut out the ribs ob the side of the case that these slide into. Quick work with one of those multi-tool saws.
This battery bank will be located inside a storage compartment in the RV so it will be well protected but there are other things stored in the same area so I wanted it to be self contained and protected. I also wanted it to be as compact as practical so I went to the local box store looking for storage bins of the right geometry. This wasn't as easy as I originally envisioned. I was looking for something with an inside footprint of 12x8 inches and a height of around 10 inches. When looking to see what was available, it seemed like most containers of that size had a limiting height with most of them in the 8.5 inch range which was insufficient. I did find one that would be a tight fit with a height right around 9 inches. I wanted to have studs on the main +/- terminals so I knew that I would have to size these just right for everything to fit with this case. Here is a pic of the box which is about $13.50 at Home Depot. This is a waterproof case so I drilled holes in the top for some ventilation. A small PC fan could be added to help circulate airflow through the case.
And here are some pics of the assembled battery. I made some 3D printed bulkheads for the box battery terminals and I still want to make some color coded magnetic covers to shield the terminals. If you need more clearance for a cell clamping and/or spacing setup, I would suggest putting the battery posts on the side, alongside the BMS (but separated to avoid shorting).
Not a great deal of clearance inside but there is just enough to have a little room to spare on the BMS side and to be able to make the bulkhead/terminal connections on the front.
Since this is for a mobile installation, I will probably make some sort of strap system to secure it to the floor of the RV storage bin where it will reside.
One thing I forgot to mention is that this case comes with internal deviders that I removed and I also cut out the ribs ob the side of the case that these slide into. Quick work with one of those multi-tool saws.
Last edited: