diy solar

diy solar

Curved Roof Rigid Panel Mounting Help

GingerHuntsman

New Member
Joined
Sep 6, 2021
Messages
8
Hey Everyone,

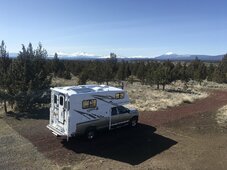
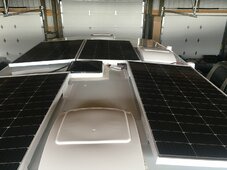
I was able pick up a couple of panels for my 2012 R-Pod and I would like to ask the community if anyone has come up with decent solution for a low profile installation on a curved surface. I'll be installing 1 panel on the rear and 1 panel on the front (see pics below). I've read a couple of existing threads from others and I like some of these solutions. My concern with having an eco light weight trailer is that I may have little roof material to bite into. So screwing brackets directly into the roof deck may not be a feasible solution in my scenario. I'm also nervous about screwing right through into the interior as I have never installed anything on my RV roof before. The thickness of my roof is approximately 1" from what I measured. Maybe this is typical but would like to hear from the community on this one.

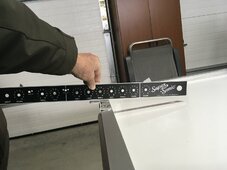
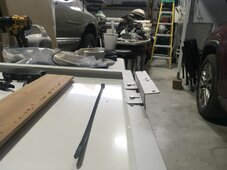
I've taken a couple of pictures to show the roof angle and how the panel lays onto it. I was considering using ABS Solar Panel Mounting Brackets but didn't know if I could get away with curve on the front and back of the trailer. I've read that the ABS Brackets are primarily designed for flat roofs but it would be great if I could modify them to work in this application.

Thanks in advance for any help you can provide!

PXL_20240418_201452529.MP.jpgPXL_20240418_201509562.jpg
 
I have a curved roof, too. Had to use aluminum uni strut to attach the 200W rigid panels on my roof. Only way I know that works. I also used tilt mounts but I will never tilt them. Just made it a lot easier to install them.
IMG_4960.jpg
IMG_5198.jpg
 
I really like those, too. They work great with unistrut. I use the tilt mounts because they are more forgiving because I don't have to have the unistrut perfectly placed.

I just like unistrut because I can always attach a 10 foot section to the roof cross members. Then the panels go on top wherever they fit best.
 
Last edited:
What I did. Fiberglass roof, doubled up on the standard mounts, VHB tape, Gorilla tape over the top, no drilling into the roof at all.
Thick 14 inch zip ties, creating a mounting angle. Just another option…. 200s in the rear, 160s in the mid section.
 

Attachments

  • 5532207C-5065-416B-AAA3-20F6AA2CB6F1.jpeg
    5532207C-5065-416B-AAA3-20F6AA2CB6F1.jpeg
    344.4 KB · Views: 11
  • 7A68B26C-1836-40E2-BF2D-F3C9AB223E63.jpeg
    7A68B26C-1836-40E2-BF2D-F3C9AB223E63.jpeg
    209.8 KB · Views: 11
  • FE40EB41-9587-47C7-B52A-7B47E3F6C1E7.jpeg
    FE40EB41-9587-47C7-B52A-7B47E3F6C1E7.jpeg
    164.8 KB · Views: 12
  • D99BC13E-D0E7-47E7-B498-77384FAA93A7.jpeg
    D99BC13E-D0E7-47E7-B498-77384FAA93A7.jpeg
    171.3 KB · Views: 11
What I did. Fiberglass roof, doubled up on the standard mounts, VHB tape, Gorilla tape over the top, no drilling into the roof at all.
Thick 14 inch zip ties, creating a mounting angle. Just another option…. 200s in the rear, 160s in the mid section.
Nice install. Fiberglass roofs are an ideal match for VHB installs. My panels would just rip off the membrane roof but they would still be solidly attached to the membrane as they flew off.
 
I have a hard time to tell... is yours an aluminum roof? painted white.
If is rubber or edpm membrane then you have to penetrate, if aluminum or fiberglass or steel then you should use VHB tape.
You will need to tape to the flat surface, not kidding, the flat surface runs front to back, not side to side. Side to side is a curve, front to back is almost flat (the curve on a 1.5 inch length of this roof is nearly flat). So, put the brackets on the sides, not the ends.
I would use thicker tape to account for the slight curve that is there. You will have to play it by ear and see how contact is made, but you can build up tape where needed easy with scissors...

What I would do, assuming this is metal roof, is at Homedepot get the thin aluminum angle iron. Use this as your bracket. Tape one side to the roof, then entire length of the panel minus 3-4 inches on ends, and use self-tapper #8 hex head screws (easier than phillips), not to be confused with allen, to drill the aluminum angle iron into the sides of the panel - careful not to hit the top where the glass is.
You do not need VHB tape the entire length of the angle iron, but in 4 inch segments with 3 inch gaps would be more than enough bond, but entire length is fine too. Cut a more narrow length of tape to wedge under the tape if needed to fill the gap made by any curve. I am betting the aluminum roof deforms to flat to meet the VHB tape/angle iron.
R-Pods are made of a one-piece, seamless fiberglass roof which is a signature element of the R-pod’s design construction. From the feedback so far, it seems that a VHB install is preferred.

Is there a preferred method to prepare the fiberglass surface for the VHB tape and the surface tape that will hold down the brackets? I did see @Will Prowse recommending denatured alcohol/spirits in one of his older videos. Would this still be the preferred method for an older roof like mine? Also, what would be the recommended surface tape to cover the VHB and mounting brackets?

Finally, I'll 100% be installing safety wires from the panels to a solid anchor on the roof to prevent the panels from falling off during transit if the panel mounts should ever fail. :)
 
Is hard to tell from your pic if your roof is dirty, pitted, paint peeling off in the pits or if it is smooth.
For others reading and have different roof -the textured aluminum roof is a little harder to tape to than a smooth roof. You will need thicker VHB tape so it more easily sinks into the detents and grabs more surface.
Is your fiberglass smooth or textured? You can use a heat gun and heat the tape to help it deform into the pits, but do not get too hot or this could harm the tape. (I have to use heat to remove the tape). If smooth then you are good.
Alcohol works fine to clean the roof. Clean the anchor too. Prep work is critical to making the tape stick.
You might find, after you have the anchors mounted, that there is no need for a safety wire. Roof airflow is turbulent, not laminar, so is not like it is getting hit with 70mph headwinds.
3M makes the VHB tape. It comes in different thicknesses. Get the thicker.
I have tried VHB tape in my car interior, on the textured plastic, and never been able to make it stick too well, so for a textured surface do a test stick to see how well it will hold before doing the entire project.
 
I used double thickness on mine, primarily to help compensate for any deviations in getting my mounts to lay flat. Not sure if that’s advisable or not, but it seems fine. I used 3M 4950 and 8 mounts per panel. Cheap upcharge for peace of mind.
 
Just added 2 more 200W mono panels to my setup. I love using unistrut. I use the Renogy tilt mounts because they are cheap and make it easy to pre-assemble the unistrut on the ground.
IMG_5775.jpeg

This is aluminum untistrut and mounts so it doesn't weigh much. I just carry it up the RV ladder. Place it where I want it to check things out. I use a stud finder to find the cross braces. Then attach it with two 1/4 x 1 1/2" stainless lag bolts per side (4 total) with a large stainless fender washers. Four total penetrations. Lap seal under and over the bolts and that sucker ain't leaking and won't go anywhere.
IMG_5776.jpeg

Four penetrations for 2 panels does not scare me. If you can find your roof cross members, I think this is the way to go.

IMG_5778.jpeg
 
Last edited:
Back
Top